
Gelukkig Nieuwjaar Allemaal, Leo hier. Today we will build a mini-game in SwiftUI with long press gestures.
I’m more inclined to build more and more stuff with SwiftUI this year. I still need to dive deep into it, to learn all the little details I’m missing in the big picture of my studies.
For example, another day we had a bug here that a view received a view model with two values. Both of the values were updated when we were initializing the view, but when the view was updated only one of them updated the view. I put print statements and breakpoints everywhere but nothing made sense. A few minutes later, I could understand the problem, the custom equal operator of the view model wasn’t taking into consideration the second parameter, equatable update, and the problem was solved.
This kind of problem still bugs my mind thinking about the SwiftUI framework. I don’t completely get it yet, although I’m way more secure using it now than at the beginning of last year.
The challenge today is to build a full mini-game just using one SwiftUI function as the main engine. The challenge is to use just one gesture to create the whole game.
Talking about this year, I’ll focus my studies on SwiftUI, animations, and structured concurrency.
No more talking let’s build that mini-game! But first…
Painting of the Day
The painting I chose for today is a 1665 art piece called “Argument over a Card Game” by Jan Steen.
Dutch painter Jan Steen, who worked in the 17th century, distinguished himself from his contemporaries with a highly varied body of work that includes portraits, works on historical and biblical themes, genre painting, and landscapes. But Steen’s artwork does have a unique style, with a focus on humorous and narrative elements in his paintings in particular.
Steen remained in The Hague up until 1654, at which point he relocated to Delft and rented a brewery from a local brewer. Even though Steen kept on selling his paintings, they were not enough to sustain his family, so the brewery was added as a second source of revenue. This has led some to assume that Steen’s celebratory scenes of drinking and revelry were based on his experiences as an innkeeper. Which you can observe in this article’s featured painting.
I chose this painting because they are playing a game, and that’s exactly what we are going to do today.
The Problem
You want to add a long press gesture to a view in SwiftUI. When the user taps for more than several seconds to the view you want to trigger an action from the app.
I’m truly a believer in deliberate practice. On other day I found a very old Spartan quote that says: “Sweat more in practice, bleed less in war“.
It is interesting that when you practice you have all the room to make mistakes and learn from them, that’s why I love to create small practical experiments to put my recently acquired knowledge to test.
Today I decided to create a simple mini-game. The idea is to press a button to get your hand warm, if you press too much you will burn your hand and lose the game. The closer you get to the fire without burning yourself better will be your score, but be careful, too close and you can burn yourself.
Check the gif below to see what we will build today.
As you can see a really small game because the idea here is to use the SwiftUI onLongPressGesture function to trigger the hand to move with a max time defined.
Let’s build that!
SwiftUI Setup for Long Press Gestures
First of all, start a new project, and let’s start to add the basic views to it.
Everything will be inside a VStack while the Reset button and the Score labels will be in an HStack. Check the code below:
struct ContentView: View {
@State var handPostionOffset = 0.0 // Manipulate the position of the hand
@State var isPressing = false // Controll while the user is pressing for a valid time or not.
@State var isGameOver = false // Controll if the game is over or not.
@State var presentGameOver = false // Controll the presentation of the gameOverModal
@State var score = 0
@State var timer = Timer.publish(every: 0.1, on: .main, in: .common).autoconnect()// a timer to trigger the animation changes of the hand position.
var body: some View {
VStack {
HStack {
Button("Reset") {
}.buttonStyle(.borderedProminent)
.padding()
Text(isGameOver ? "GAME OVER" : "Score \(score)")
}
Image(systemName: "fireplace")
.resizable()
.imageScale(.large)
.frame(width: 200, height: 200)
.scaledToFit()
.foregroundColor(.red)
Spacer()
Image(systemName: "hand.wave.fill")
.resizable()
.imageScale(.large)
.frame(width: 50, height: 50)
.scaledToFit()
.offset(y: -handPostionOffset)
Text("Hold Me")
}
.padding()
}
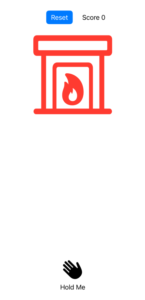
}With that in place, you should have the basic screen build built like the image below:
We are ready to add some spicy to this view.
SwiftUI – onLongPressGesture code Example
Now let’s add the long press gesture feature to the Hold Me text.
Text("Hold Me")
    .onLongPressGesture(minimumDuration: 0.9, maximumDistance: 50) {
        isGameOver = true // if the minimum duration is passed this closure is called and the game is over.
        presentGameOverModal = true // present the modal when the game is over
    } onPressingChanged: { isPressing in
        self.isPressing = isPressing

        if !isPressing {
            timer.upstream.connect().cancel() // when the isPressing is false that means the game ended
        }
    }
What is this doing?
We are using the function called onLongPressGesture with all parameters.
The minimumDuration parameter is the duration of the long press that must elapse before the gesture succeeds, and in our case, we are using that duration to finish the game. So when 0.9 seconds have passed, the first closure is called.
The minimumDistance is actually the maximum distance that the fingers can go before the long press action is canceled.
The first closure (action) is the one that triggers the long press action. When the user starts a long press this closure is not fired, it is only executed after the minimumDuration time has passed while the user is holding his finger.
The final closure is the onPressingChanged and it is executed every time the pressing state changes. For example, when the user starts a long press this closure is fired with the value isPressing equals true, but when the user stops pressing the button OR the minimumDuration is passed this closure receives the isPressing equals false.
When the user stops to press the button or the minimumDuration time has passed that means the game ended, so in the onPressingChanged we must cancel the timer.
Now let’s add the animation ticker to the hand.
Animating SwiftUI View With Timers
We will use a timer to trigger the animation changes of the Hand SF Symbol on the view. Add the code below on your outer VStack:
.onReceive(timer) { timer in
    if isPressing {
        withAnimation(.linear) {
            handPostionOffset += 43
        }
        score += 1
    }
}
This function is receiving all the timer tickers and checks if the user is pressing the Hold Me text. If the user is pressing that means we need to move the hand toward the fireplace, if not, we don’t need to do anything.
This is all the game engines for this article. Now we will add the reset button features.
Resetting the State of the Game in SwiftUI
To reset the state of the game to the initial position we must do 3 things.
- Send the hand back to the original position.
- Set the score to zero.
- Set isGameOver variable to false.
Let’s do that, copy/paste the code below:
Button("Reset") {
    timer = Timer.publish(every: 0.1, on: .main, in: .common).autoconnect()
    withAnimation {
        handPostionOffset = 0
    }
    score = 0
    isGameOver = false
}.buttonStyle(.borderedProminent)
    .padding()
All the other pieces of code should be in place right now.
We just need to add the Game Over sheet at the end. Copy and paste the code below at the end of the outer VStack:
.sheet(isPresented: $presentGameOverModal, content: {
    Text("GAME OVER")
        .font(.largeTitle)
})
With this in place every time the user presses the Hold Me text for too long, it shows the Game Over screen! Pretty cool, isn’t it?
Full Code Example – SwiftUI Mini with Long Press Gesture
Check the full code below:
import SwiftUI

struct ContentView: View {

    @State var handPostionOffset = 0.0
    @State var isPressing = false
    @State var isGameOver = false
    @State var presentGameOverModal = false
    @State var score = 0

    @State var timer = Timer.publish(every: 0.1, on: .main, in: .common).autoconnect()

    var body: some View {
        VStack {
            HStack {
                Button("Reset") {
                    timer = Timer
                        .publish(every: 0.1, on: .main, in: .common)
                        .autoconnect()
                    withAnimation {
                        handPostionOffset = 0
                    }
                    score = 0
                    isGameOver = false
                }.buttonStyle(.borderedProminent)
                    .padding()

                Text(isGameOver ? "GAME OVER" : "Score \(score)")
            }

            Image(systemName: "fireplace")
                .resizable()
                .imageScale(.large)
                .frame(width: 200, height: 200)
                .scaledToFit()
                .foregroundColor(.red)
            Spacer()

            Image(systemName: "hand.wave.fill")
                .resizable()
                .imageScale(.large)
                .frame(width: 50, height: 50)
                .scaledToFit()
                .offset(y: -handPostionOffset)

            Text("Hold Me")
                .onLongPressGesture(minimumDuration: 0.9, maximumDistance: 50) {
                    isGameOver = true
                    presentGameOverModal = true
                } onPressingChanged: { isPressing in
                    self.isPressing = isPressing

                    if !isPressing {
                        timer.upstream.connect().cancel()
                    }
                }
        }
        .onReceive(timer) { timer in
            if isPressing {
                withAnimation(.linear) {
                    handPostionOffset += 43
                }
                score += 1
            }
        }
        .sheet(isPresented: $presentGameOverModal, content: {
            Text("GAME OVER")
                .font(.largeTitle)
        })
        .padding()
    }
}

struct ContentView_Previews: PreviewProvider {
    static var previews: some View {
        ContentView()
    }
}
And that’s it! We built a game using just one SwiftUI gesture.
Summary
Today we finished a full game using just one SwiftUI gesture. We also built some animations and
A long press gesture is a continuous press-and-hold action on a view that triggers a specific action or series of actions. To add a long press gesture to a view in SwiftUI, use the onLongPressGesture modifier, which takes a closure that contains the action or series of actions to be triggered by the gesture. You can also customize the minimum duration of the long press gesture and specify whether it can be recognized simultaneously with other gestures.
Fellow Apple Lovers, that’s all. I hope you liked reading this article as much as I enjoyed writing it.
If you want to support this blog you can Buy Me a Coffee or say hello on Twitter. I’m available on LinkedIn or send me an e-mail through the contact page.
You can likewise sponsor this blog so I can get my blog free of ad networks.
Thanks for the reading and… That’s all folks.
Image credit: Featured Image


