
Hallo muren en daken, Leo hier. Today we will talk about how to create a persistent user settings configuration using AppStorage in SwiftUI.
Let’s remove the elephant from the room because AppStorage annotation uses UserDefaults. Don’t treat UserDefaults like your personal dumping ground for every piece of data under the sun.
Sure, it’s tempting to stash everything there since it’s so easy to use, but remember, UserDefaults isn’t meant for heavy lifting. Stuffing it with too much data can slow down your app. Also, don’t rely on UserDefaults for sensitive information like passwords or tokens. It’s about as secure as writing your secrets on a Post-it note and sticking it on your monitor. Resist the urge to use UserDefaults as a substitute for proper data persistence methods like Core Data or FileManager when dealing with large datasets or complex relationships. Trust me, your future self (and your users) will thank you for not taking shortcuts here.
In the Xcode 15.3 update, I had problems with all my simulators. None of them worked anymore and I was able to fix them by going to Mac Settings -> Storage -> Developer -> Delete Xcode Cache and Project Build Data and Indexes. I hope that doesn’t happen with you too, but from what I’ve read in the iOS community a lot of people had the same issue. This just proves that dealing with cache is hard for everyone, even for Apple engineers.
Last week we visited the world of SwiftUI with our latest article on how to invert any view! It’s very curious that with a small change in the modifiers, you can have a big impact on how the view is presented to the user.
If you are an iOS developer I bet one of your favorite Swift features is enums, but do you know how to avoid the most common mistakes using it? That’s why I wrote a full article about the do’s and don’ts when using enum. I hope you all enjoy it!
No more talking, let’s code! But first…
Painting of The Day
The painting I chose today is a 1870 artwork called In the Cellar by Silvestro Lega.
Silvestro Lega, an Italian realist painter, played a significant role in the Macchiaioli movement.
Born in Modigliana, he excelled in drawing at a young age and later honed his skills at various academies. Initially influenced by academic principles, Lega’s style evolved towards Realism. Despite personal tragedies, including the loss of loved ones, he continued painting and even established a gallery. Lega’s encounter with Impressionist works in 1879 further impacted his artistic trajectory. His legacy endures as a pivotal figure in the Italian art scene of the 19th century.
I chose this painting for today because we are talking about storage and a Cellar is a kind of storage, isn’t it?
The Problem – How To Create a Persistent Settings in SwiftUI
You need to create a Settings View that uses SwiftUI as a persistence layer.
Today we will create a very simple Settings screen. I didn’t think beforehand about this but this article is perfect if you are doing a take-home project that requires you to create a settings screen for your assignment. It’s literally copy and paste from this article. So if you are looking for an article explaining how to create a Settings view for your take-home test, you belong here.
The view that we will build is this.
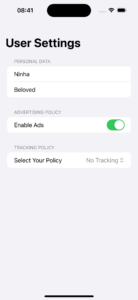
We want to persist betwen app launches the name, the address, whether the user wants ads or not, and the type of ad policy.
Let’s start building the example.
SwiftUI User Settings Screen Using UserDefaults Persistence
First of all, let’s check what Apple Docs has to say about AppStorage annotation. It is:
A property wrapper type that reflects a value fromUserand invalidates a view on a change in value in that user default.Defaults
public init(wrappedValue: Value, _ key: String, store: UserDefaults? = nil) where Value == String
The first parameter is wrappedValue which is the default value if a string value is not specified for the given key. The key parameter is used to read and write the value in the user defaults store. And finally the store is the user defaults store to read and write to. A value of nil will use the user default store from the environment.
For example, to store a userName from a TextField in the UserDefaults that would start with “No Username” as the default value and send values for a UserDefaults Suite, you could create a variable like this:
@AppStorage(wrappedValue: "No userName", .settingsUserNameKey, store: UserDefaults(suiteName: "myUserDefaullts"))
    private var userName: String
In the code above we are using the full extension of the @AppStorage annotation described before. And you don’t need to use every parameter of its initializer, the wrappedValue and the store are optionals.
UserDefaults suiteName Parameter
If you are curious about what suiteName of the UserDefaults does it is the initializer that allows you to create a UserDefaults instance that accesses a shared set of preferences stored in a custom app group container. This parameter enables data sharing between multiple targets within the same app group, facilitating seamless communication and synchronization of user preferences across different components of your application.
Remember that those AppStorage variables can cause the view to rerender, so it’s intended to be used with other SwiftUI views to react and change the app behavior as you wish.
Now that you know how it works in a complete example.
Code Sample – Using UserDefaults With SwiftUI
First, start a new SwiftUI project and we will add a little extension to String.
The following code will be used as the keys for our storage. I like to do that way because then the whole project can use the keys anywhere and we don’t have issues in manual typing then over and over other classes.
extension String {
    static var settingsUserNameKey : String { "settings.userName" }
    static var settingsUserAddressKey : String { "settings.userAddress" }
    static var settingsUserAdsEnabledKey : String { "settings.isAdsEnabled" }
    static var adPrivacyTypeKey : String { "settings.adPrivacyType" }
}
A nice article idea is how to deal with static strings in iOS. I’ll add that to my backlog.
Continuing in our journey lets use them as keys for the @AppStorage annotations of the following view:
struct ContentView: View {
    @AppStorage(wrappedValue: "No userName", .settingsUserNameKey) // Need the wrappedValue initialiser
    private var userName: String

    @AppStorage(.settingsUserAddressKey) // No Need the wrappedValue initialiser
    private var userAddress: String = ""

    @AppStorage(.settingsUserAdsEnabledKey)
    private var isAdsEnabled: Bool = false

    @AppStorage(.adPrivacyTypeKey)
    private var adPrivacyType: AdPrivacyType = .noTracking

    var body: some View {
        NavigationStack {
            Form {
                Section {
                    TextField("Name", text: $userName)
                    TextField("Address", text: $userAddress)
                } header: {
                    Text("Personal Data")
                }

                Section {
                    Toggle("Enable Ads", isOn: $isAdsEnabled)
                } header: {
                    Text("Advertising Policy")
                }

                if isAdsEnabled {
                    Section {
                        Picker("Select Your Policy", selection: $adPrivacyType) {
                            ForEach(AdPrivacyType.allCases) { trackingPolicy in
                                Text(trackingPolicy.rawValue)
                            }
                        }
                    } header: {
                        Text("Tracking Policy")
                    }
                }

            }
            .navigationBarTitle("User Settings")
        }
    }
}

enum AdPrivacyType: String, CaseIterable, Identifiable {
    var id: Self {
        return self
    }

    case noTracking = "No Tracking"
    case essential = "Only Essential Cookies"
    case full = "Standard Tracking"
}
In the example above you can observe several interesting things. Let’s break it down:
- The variables annotated with the @AppStorage can have default values or not. If they don’t have a default initial value you need to provide one yourself.
- You can use the @AppStorage with all types that the regular UserDefaults also supports. This means if you want to store complex types, you need to do an interesting workaround for that limitation.
- You can use the @AppStorage annotations to refresh the view. Check the isAdsEnabled variable above and you will understand that you can use it anywhere in the app to enable and disable features. We are using it here to hide or not a whole section of the Settings.
Now you can use those variables throughout your app! For example, if you have a header view that needs the username you could just create it like this:
struct HeaderView: View {
    @AppStorage(.settingsUserNameKey)
    private var userName: String = ""

    var body: some View {
        HStack {
            Image(systemName: "star")
            Text(userName)
                .font(.largeTitle)
        }
    }
}
With this in place, the name that you added in the Settings would be automatically added to this view too. Really simple, isn’t it?
And we are done for today!
Conclusion – Creating and Propagating Changes in SwiftUI with AppStorage Annotation
In today’s journey through SwiftUI, we’ve explored the power of AppStorage in creating persistent user settings configurations. While leveraging UserDefaults, we’ve emphasized the importance of mindful data management, steering clear of over-reliance and security pitfalls.
From troubleshooting Xcode updates to exploring the AppStorage, each step has enriched our development toolkit. Now armed with insights into suiteName parameters and the seamless integration of AppStorage, we’re equipped to propagate changes efficiently throughout our SwiftUI views.
Let’s continue our coding adventures with confidence and curiosity, embracing the ever-evolving landscape of iOS development.
Fellow iOS Developers, that’s all. I hope you liked reading this article as much as I enjoyed writing it.
If you want to support this blog you can Buy Me a Coffee or say hello on Twitter. I’m available on LinkedIn or send me an e-mail through the contact page.
You can likewise sponsor this blog and help our community to grow.
Thanks for the reading and…
That’s all folks.
Image credit: Featured Painting