Hallo alle mensen, Leo hier. Today we will explore how to customize the navigation bar in SwiftUI.
Have you ever used an app or website and found yourself lost in a sea of pages? You know, when you can’t seem to find your way back to where you started or you can’t figure out how to get to where you want to go? Well, that’s where navigation bars come in to save the day!
Navigation bars are a crucial part of user interface design that helps users move seamlessly through an app. They provide users with a clear path to different pages, sections, or features of an app, making it easy to navigate and find what they need. Plus, they add a touch of style and professionalism to your app or website design.
In this article, we’ll dive into everything you need to know about customizing the navigation bar background color in SwiftUI. And you will see that is not as trivial as should be.
Last week we discussed a comprehensive guide for developers looking to set up an effective development environment in SwiftUI. The article discusses various tools and techniques that can be used to streamline the development process and improve productivity, such as using Xcode, using version control systems like Git, and creating reusable components.
Are you interested in learning how to create visually stunning animations in SwiftUI using masks? Look no further than the article How to Use Mask in SwiftUI with Animation. This article provides a step-by-step guide for implementing mask-based animations in your SwiftUI projects, including how to create custom masks and apply animations to them.
No more talking, let’s code! But first…
Special Thanks – Essential Developer
I want to thank Essential Developer for being the First Sponsor of the blog ever! I started to write this blog three years ago with the goal of learning more and more about Swift and iOS-related topics, and I would never imagine that I could get sponsorship for the content. I’m a big fan of Essential Developer and I can still remember seeing all their youtube videos because the content is SO GOOD.
The journey to this wasn’t easy. This is article number 176 and I spend thousands of hours writing and making this blog. My wife is the main designer of this blog, so all kudos to her too! I want to appreciate all the people that helped until here and I recommend anyone that is learning ANYTHING to start writing a blog about it. Believe me, you will develop 100x faster.
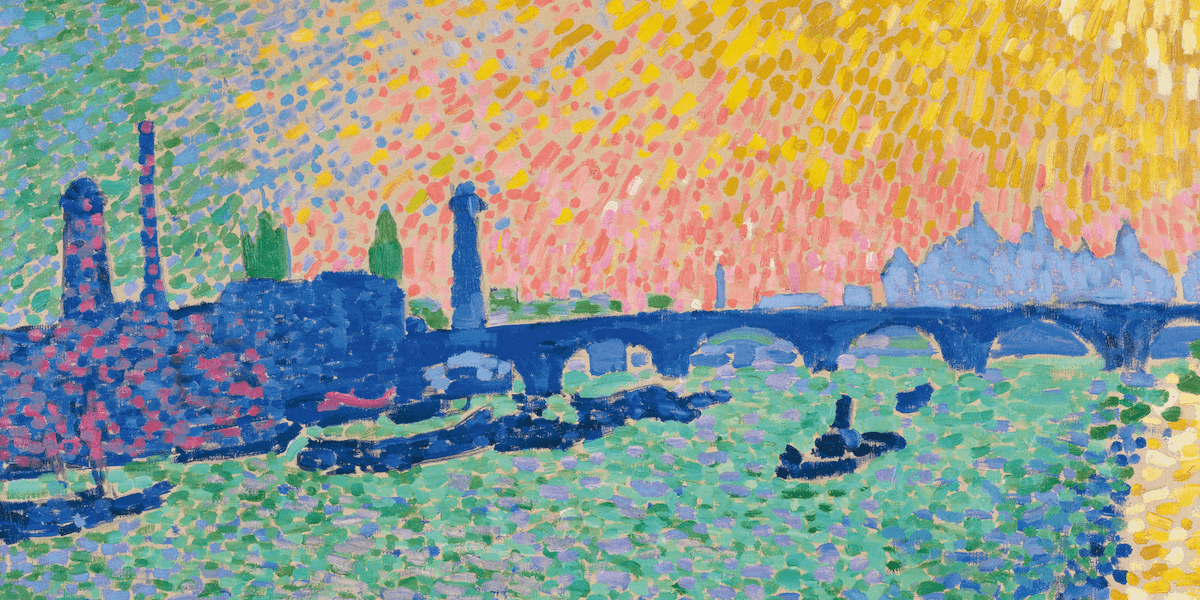
Painting of the Day
Today I chose a 1906 painting called Waterloo Bridge by Andre Derain.
Waterloo Bridge is a painting by Derain that shows what the bridge looks like from Victoria Embankment. On one side of the painting, you can see the Houses of Parliament, and on the other side, there are some industrial buildings. But the main thing in the painting is the bright blue bridge that cuts right through the middle. Derain used some really bright and pure colors to make the painting look like a mosaic, and he did it in a technique called pointillism that he learned from Matisse.
You can see lots of green, blue, and purple in the painting, but there’s also this burst of bright yellow and pink sunlight coming from the top right corner. Derain thought that colors were super important in art and used them to make the painting feel really lively. Waterloo Bridge is part of the collection of the Thyssen-Bornemisza Museum in Madrid.
I chose this painting because it is part of an art movement called Divisionism. Basically, the artists would separate colors into little dots or patches and put them next to each other. When you look at the painting from far away, your eyes blend the colors together and make new colors! It’s like magic! The artists called this technique chromoluminarism because it was all about how the colors interacted with each other and with light. Because of the navigation bar division from the rest of the view content, I thought that this painting makes a lot of sense for this article.
What is the Navigation Bar in SwiftUI?
The navigation bar in SwiftUI is a user interface element that appears at the top of the screen and provides users with a way to navigate through different sections of your app. It typically includes a title, and navigation buttons like a back button, a menu button, or a search button.
Think of it as the steering wheel of your app. Just like how you need a steering wheel to navigate through a car, a navigation bar helps users navigate through your app. It gives them a clear path to different sections, pages, or features, making it easier for them to find what they’re looking for.
And the cool thing is, you can customize the navigation bar to fit the style of your app. You can change the font, the color, the buttons, and even add your own logo or icon. It’s a crucial part of app design and a must-have for any app that wants to provide a smooth and user-friendly experience.
What is the importance of navigation bars in the User Interface?
The Apple Interface guidelines tell a lot about navigation patterns and components. As the title says, the navigation bar is about navigating through a hierarchy of pages. Let’s review what Apple has to say about best practices for using navigation bars in your app.
- Navigation bars should be used consistently throughout your app to provide users with a familiar and intuitive way to navigate.
- The title of the navigation bar should accurately describe the current screen or section of your app.
- Navigation buttons should be placed on the right side of the navigation bar, and their function should be clear and easy to understand.
- The appearance of the navigation bar should be consistent with the overall style and design of your app.
- When designing a navigation bar, consider the accessibility needs of your users, such as providing appropriate contrast, font size, and accessibility labels.
- Search bars can also be included in the navigation bar to allow users to search for specific content within your app.
- When using a search bar, make sure it is clear what the user is searching for and how to submit the search query.
Always look out for those traits when designing your app. A clear, consistent, and easy-to-reason layout is what we should always go forward with within our apps.
Change the Navigation Bar Color in SwiftUI for iOS 13, iOS 14, and iOS 15
I’ll quickly address older iOS versions here. Prior to iOS 16, we had to use Navigation View as our way to navigate through SwiftUI apps.
For iOS 13, you can use the following technique to change the tab bar color for your app. SwiftUI is built upon UIKit, so you can go down to UIKit and change properties there.
Let’s see how to do that:
import SwiftUI
let navBarAppearence = UINavigationBarAppearance() // use as global variable, otherwise SwiftUI may cause problems.
struct ContentView: View {
init() {
navBarAppearence.configureWithOpaqueBackground()
navBarAppearence.backgroundColor = .red
navBarAppearence.titleTextAttributes = [.foregroundColor: UIColor.black]
navBarAppearence.largeTitleTextAttributes = [.foregroundColor: UIColor.black]
UINavigationBar.appearance().standardAppearance = navBarAppearence
UINavigationBar.appearance().scrollEdgeAppearance = navBarAppearence
}
var body: some View {
NavigationView {
VStack {
Image(systemName: "globe")
.imageScale(.large)
.foregroundColor(.accentColor)
Text("Hello, world!")
NavigationLink {
DetailView()
} label: {
Text("Go to Details")
}
}
.padding()
}
}
}
struct DetailView: View {
var body: some View {
ZStack {
ScrollView {
ForEach((0...50), id: \.hashValue) { number in
Text("Details")
}
}
}.navigationTitle("Details")
.navigationBarTitleDisplayMode(.large)
}
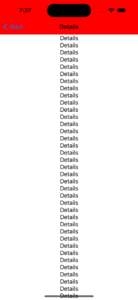
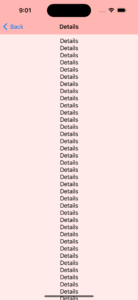
}This is a very simple example, of how to navigate through screens in SwiftUI and how to change the navigation bar color in iOS 13.
As you can see above, when the navigation bar appears, we set the color to red. In iOS 13 we must go down to UIKit because SwiftUI wasn’t enough evolved and we didn’t have APIs to change the color. That’s why
Resulting in:

Two more things that I want to discuss with you. The navigationBarTitleDisplayMode view modifier and previews.
How to do Large or Inline Display Navigation Bar Title in SwiftUI?
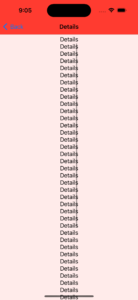
The navigationBarTitleDisplayMode can force a navigation view to use the large title as you see above, or you can always force it to use the inline one. Let’s change the details view to see what happens:
struct DetailView: View {
    var body: some View {
        ZStack {
            ScrollView {
                ForEach((0...50), id: \.hashValue) { number in
                    Text("Details")
                }
            }

        }.navigationTitle("Details")
            .navigationBarTitleDisplayMode(.inline) // <<<<<< change this to inline!
    }
}
Now the details view looks like this:
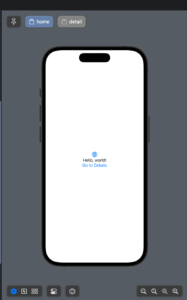
And the second thing I want to mention is something that I learned recently with Karin Prater, we can have multiple named screens in our SwiftUI previews.
How to Organize Your SwiftUI Preview when you Have Multiple Views in the Same File?
In our current file, we have three views, the ContentView, and DetailsView, and now I want a way to easily check my designs in the Xcode previews.
In the preview, we can use more than one view and in the recent iOS, it will open in different sections for each one of the views. You can name those views so it will be easy for you to navigate through them. The only thing you need to do is to add previewDisplayName in the previews, check the code below:
let navBarAppearence = UINavigationBarAppearance()

struct ContentView: View {
    var body: some View {
        NavigationView {
            VStack {
                Image(systemName: "globe")
                    .imageScale(.large)
                    .foregroundColor(.accentColor)
                Text("Hello, world!")
                NavigationLink {
                    DetailView()
                } label: {
                    Text("Go to Details")
                }
            }
            .padding()
        }
    }
}

struct DetailView: View {
    var body: some View {
        ZStack {
            ScrollView {
                ForEach((0...50), id: \.hashValue) { number in
                    Text("Details")
                }
            }

        }.navigationTitle("Details")
            .navigationBarTitleDisplayMode(.inline)
    }
}

struct ContentView_Previews: PreviewProvider {
    static var previews: some View {
        ContentView()
            .previewDisplayName("home") // <<<< add this

        NavigationView {
            DetailView()
        }
        .previewDisplayName("detail") // <<<< add this


    }
}
If you copy-paste the above code into your Xcode it should generate this preview:
Now let’s move to the shiny new way to change background colors.
How to customize the background color of the Navigation stack, tab bars, and toolbars in iOS 16?
Before we dive into the navigation bar background color per se, I want to show something interesting that happened in iOS 14. In that version, we received a view modifier called toolbar. The toolbar can receive toolBarItem and that can be a lot of things, for example, and HStack with an image and Text.
Check the example below:
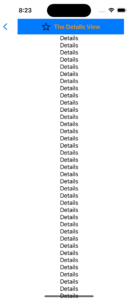
struct DetailView2: View {
    var body: some View {
        ZStack {
            ScrollView {
                ForEach((0...50), id: \.hashValue) { number in
                    Text("Details")
                }
            }

        }.toolbar {
            ToolbarItem(placement: .principal) { // placement is the object position in the navigation bar
                ZStack {
                    Color.blue // you can have a background color of that element (not the full navigation stack)
                    HStack {
                        Image(systemName: "star") // You can add views to your navigation title to make it shine.
                        Text("The Details View")
                            .font(.headline)
                            .foregroundColor(.orange)
                    }
                }
            }
        }
    }
}
The result is:
Let’s check how to change the navigation bar color in the brand-new navigation stack.
How to Change Navigation Stack Background Color?
So you are one of the lucky ones that can use new APIs in your daily work? That’s is really nice!
Now let’s see how to change the Navigation Stack background color in SwiftUI:
import SwiftUI

struct ContentView: View {
    var body: some View {
        NavigationStack {
            VStack {
                Image(systemName: "globe")
                    .imageScale(.large)
                    .foregroundColor(.accentColor)
                Text("Hello, world!")
                NavigationLink {
                    DetailView()
                } label: {
                    Text("Go to Details")
                }
            }
            .padding()
        }
    }
}

struct DetailView: View {
    var body: some View {
        ZStack {
            Color.red // Mark 1 - this is the background color of the whole view
                .opacity(0.1)
                .ignoresSafeArea()

            VStack {
                Rectangle()
                    .frame(height: 0)
                    .background(Color.red.opacity(0.3)) // Mark 2 - this is the background color of the navigation view
                ScrollView {
                    ForEach((0...50), id: \.hashValue) { number in
                        Text("Details")
                    }
                }
            }

        }
        .navigationTitle("Details")
        .navigationBarTitleDisplayMode(.inline)
    }
}
In the code above you can see that the navigation bar color is set as the same as the first Shape that touches the safe area and the color just pass to it. Weird, right? Yeah, I also think that is weird but is the only new way to change the background color of the navigation stack until now.
Actually, that is not entirely true. We have one more way to change the background color that I didn’t show because it only changes when the user scrolls the view.
Changing Navigation Stack Color With iOS 16 toolbarBackground Modifier
In iOS 16 we have a toolbarBackground modifier but that will only apply the color if the system has to dim the view because of a scroll.
Check the code and the result below using the toolbarBackground:
struct DetailView: View {
    var body: some View {
        ZStack {
            Color.red
                .opacity(0.1)
                .ignoresSafeArea()

            VStack {
                ScrollView {
                    ForEach((0...50), id: \.hashValue) { number in
                        Text("Details")
                    }
                }
            }

        }
        .navigationTitle("Details")
        .navigationBarTitleDisplayMode(.inline)
        .toolbarBackground(.red)
    }
}
Generating this result:
And that’s it for today!
Interview Questions on SwiftUI Navigation
Let’s check quick possible interview questions about the SwiftUI navigation bar and programmatic navigation.
Q: What is programmatic navigation in SwiftUI?
A: Programmatic navigation in SwiftUI is a way to navigate between views using code, rather than relying on user interface elements like buttons or links.
Q: Why would I want to use programmatic navigation in my SwiftUI app?
A: Programmatic navigation can be useful for a variety of reasons, such as when you need to navigate to a new view based on some condition or user input, or when you want to dynamically generate views and navigation based on data from an external source.
Q: How do I perform programmatic navigation in SwiftUI?
A: To perform programmatic navigation in SwiftUI, you can use the NavigationLink view and its isActive binding. You can set the isActive binding to true or false to control whether the view is currently active and visible on the screen.
Q: How do I navigate to a new view programmatically in SwiftUI?
A: To navigate to a new view programmatically, you can use the NavigationLink view and set its isActive binding to true. You can also pass data to the new view using the destination modifier.
Q: How do I navigate back to the previous view programmatically in SwiftUI?
A: To navigate back to the previous view programmatically, you can use the presentationMode environment variable and its wrappedValue.dismiss() method. This allows you to dismiss the current view and return to the previous view in the navigation stack.
Q: Can I customize the appearance of a navigation link in SwiftUI?
A: Yes, you can customize the appearance of a navigation link using the navigationLinkStyle modifier. You can create a custom navigation link style that changes the appearance of the link based on your app’s design and branding.
Q: How do I create a navigation stack in SwiftUI?
A: To create a navigation stack in SwiftUI, you can use the NavigationView view and add child views to it using NavigationLink. Each NavigationLink will push a new view onto the navigation stack when tapped.
Q: Can I pass data between views in a navigation stack?
A: Yes, you can pass data between views in a navigation stack by using the destination modifier on a NavigationLink and passing in the data as a parameter.
Q: How do I customize the back button in a navigation bar in SwiftUI?
A: To customize the back button in a navigation bar in SwiftUI, you can use the navigationBarBackButtonHidden modifier to hide the default back button and then add a custom view or button using the navigationBarItems modifier.
Q: Can I change the title of a navigation bar dynamically in SwiftUI?
A: Yes, you can change the title of a navigation bar dynamically in SwiftUI by using the navigationBarTitle modifier and passing in a string or a view that updates based on some condition or user input.
Q: How do I dismiss a modal view in SwiftUI?
A: To dismiss a modal view in SwiftUI, you can use the presentationMode environment variable and its wrappedValue.dismiss() method, which will dismiss the current view and return to the previous view in the navigation stack.
Q: What are the differences between NavigationView and NavigationStack in SwiftUI?
A: Navigation View is how we used to do programmatic navigation in iOS before iOS 16. Navigation View is deprecated and should not be used after iOS 16. The new NavigationStack in SwiftUI is a view that manages a stack of other views and their navigation relationships, differently from Navigation View which has not this stack-based approach.
Summary – The Problems of Changing the Background Color of the Navigation Bar in SwiftUI
As I told you in the introduction. The SwiftUI Navigation Bar has no easy way to change its color, that being iOS 13 or iOS 16 I feel that is something clanky and should be easier. The good news is that we have some workarounds that work pretty well.
I want to know your experience changing the navigation color for SwiftUI, did you find it easy or did you think it should be different?
Today we learned how to change the navigation bar background color for all iOS versions that support SwiftUI. From the earlier stages using UIKit to save our backs to the new ways in iOS 16 with navigation stack.
Fellow Apple Developers, that’s all.
I hope you liked reading this article as much as I enjoyed writing it. If you want to support this blog you can Buy Me a Coffee or say hello on Twitter. I’m available on LinkedIn or send me an e-mail through the contact page.
You can likewise sponsor this blog so I can get my blog free of ad networks.
Thanks for the reading and… That’s all folks.
Image credit: Featured Painting


