Hallo mijn vrienden, Leo hier. Today we will explore the Mask View Modifier in SwiftUI.
Are you an iOS app developer looking to create a great user interface for your app? Well, if you’re not already using SwiftUI, you’re missing out on one of the most powerful tools for building apps for iOS, iPadOS, macOS, and watchOS. SwiftUI offers a streamlined approach to creating views, and one of its most valuable modifiers is the mask view modifier.
Let me tell you a little update on my SwiftUI journey. We are creating a whole tab in our current app using SwiftUI and we are experiencing such a good time. When SwiftUI works it is so perfect, looks like a painting composition in your code. However, when things go wrong for example when you need to get the offset of a scroll view, I’m sure that you would like to not be using SwiftUI anymore, although, for this particular case, we have some non-native workarounds.
I love how fast we can make things in SwiftUI and we are excited to use it more in the future, don’t be discouraged by some rough edges that the framework still has, nothing is perfect in this life.
The mask view modifier is a powerful tool that lets you control the visibility of parts of a view by masking them with another shape or image.
With this modifier, you can create views with complex shapes, cutouts, and transparency effects. You can use any SwiftUI view as a mask, such as a circle, rectangle, or even an image. When you apply the mask view modifier to a view, it overlays the view with the mask, revealing only the parts of the view that intersect with the mask modifier.
So, if you want to create a view with a circular cutout in the middle, all you need to do is apply a circle mask to your view.
Before we dive into the article you may want to check out this article on how to do sequential animations in SwiftUI to learn how to create stunning animations with ease. With step-by-step instructions and helpful examples, you’ll be able to take your animation skills to the next level in no time. We discovered that we have a bunch of native tools to increase our quality of life while using SwiftUI. Lately, the biggest one was the discovery of how to custom style for native views in SwiftUI.
Now we can use custom styling and don’t repeat ourselves in buttons, menus, and other view configurations.
No more talking, let’s code! But first…
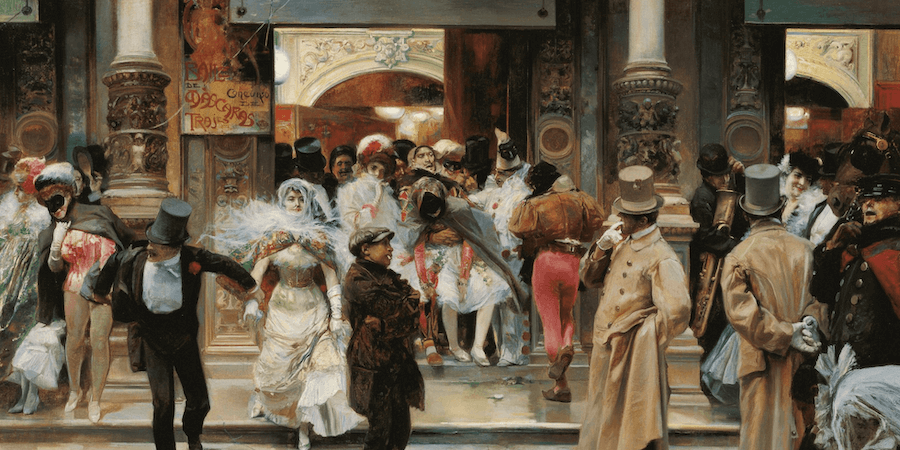
Painting of The Day
The painting I chose today is called Leaving a Masked Ball an artwork by José García y Ramos created in 1905.
José García y Ramos was a Spanish painter who created beautiful and unique works of art that were often inspired by the landscapes and people of his homeland. With a career spanning several decades, he was renowned for his use of bright colors and bold brushstrokes that captured the essence of the Spanish countryside.
Many of García Ramos’ paintings featured scenes of rural life, with farmers and peasants working in fields or tending to livestock. His use of vivid oranges, reds, and blues gave his works a distinctive warmth and energy, and his bold, expressive style drew viewers in and kept them captivated. Whether he was depicting a humble village or a bustling city street, García Ramos’ paintings always captured the beauty and vitality of Spain in a way that was uniquely his own.
I chose this painting because we will talk about masks and nothing better to represent that than a Masked Ball.
The Problem – How to apply a mask in SwiftUI?
You want to a shape as a mask for an image ( or any other kind of view )
Let’s start with what we will do today, and I’m doing this in Xcode 14.2 so if your Xcode is different the position of things in Xcode can differ. We will code three examples of mask modifier so you can have a full understanding of what is and how to use them.
First, we will explore the Mask API, which is really straightforward because has only one parameter. Then we will create a simple example just applying opacity to a view, then we will explore how we can use a mask to create custom complex shapes and cutouts with images and finally we will create animations using what we have learned today. The final project should look like this:
And that is only possible because of the SwiftUI mask modifier.
Really cool, right?
Setup Your SwiftUI Project
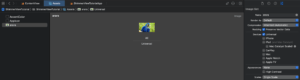
Start a new SwiftUI project. I got this image and added it to the assets of the project.

Just drop in the Assets and I changed the resizing to Preserve Vector Data and Scales to Single Scale. You don’t need to do that because won’t make any difference to what we are doing here, just saying what I did so you won’t be confused by having a different Asset view than me.
Now let’s start with the Mask API exploration.
SwiftUI Mask API Exploration
Copy the following code to your ContentView.
struct ContentView: View {
    var body: some View {
        VStack {
            Image(systemName: "person.3.sequence") // <<<  View Being Masked
                .foregroundColor(Color.blue)
                .font(.system(size: 128, weight: .light))
                .mask {
                    Rectangle() // <<< View that is Masking
                        .opacity(0.1)
                }
        }
    }
}
This should give you this view:
But why? Let’s check the documentation:
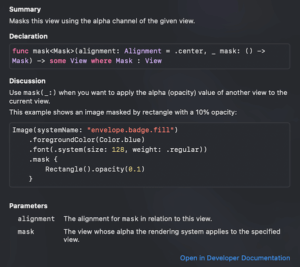
As the documentation says, in our code, we are using a Rectangle Shape View to apply a mask through the image below. What we are creating is literally a view that is going in front of the other view and we are applying the opacity of the mask view in the view being masked.
In our example, the rectangle takes the full space of the view therefore it applies its own opacity to the view below. But what would happen if the rectangle view, aka the masking view, be smaller than the image view, AKA the masked view?
Let’s do that test now:
struct ContentView: View {

    var body: some View {
        VStack {
            Image(systemName: "person.3.sequence") // <<< View Being Masked
                .foregroundColor(Color.blue)
                .font(.system(size: 128, weight: .light))
                .mask {
                    Rectangle() // <<< View that is Masking
                        .opacity(0.1)
                        .frame(height: 50) // masking view is smaller than the masked view
                }
        }
    }
}
This generates the following result:
This is interesting because now we know how to crop parts of the view with a shape.
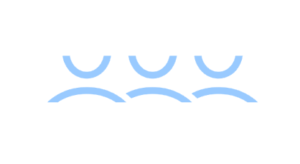
And to finish this API presentation we can also move the masking view around using the alignment parameter. Imagine that you just want to show the heads of the 3-person SF Symbol icon, how would you do that? With the mask alignment is easy!
Check the code below that has the top alignment:
struct ContentView: View {

    var body: some View {
        VStack {
            Image(systemName: "person.3.sequence") // <<< View Being Masked
                .foregroundColor(Color.blue)
                .font(.system(size: 128, weight: .light))
                .mask(alignment: .top) { Rectangle() // <<< View that is Masking, now with top alignment
                        .opacity(0.1)
                        .frame(height: 70)
                }
        }
    }
}
Generating the following funny result:  Likewise, if you just want the body of the 3-person icon, you could use the bottom alignment:
struct ContentView: View {

    var body: some View {
        VStack {
            Image(systemName: "person.3.sequence") // <<< View Being Masked
                .foregroundColor(Color.blue)
                .font(.system(size: 128, weight: .light))
                .mask(alignment: .bottom) { Rectangle() // <<< View that is Masking, now with bottom alignment
                        .opacity(0.1)
                        .frame(height: 65)
                }
        }
    }
}
Creating three beautiful little loaves of bread: 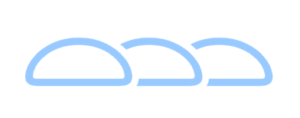 Now let’s make things more interesting than just cropping static parts with a rectangle.
Using Complex Shapes To Create a Mask
Now that we know the power of masks and how to use the alignment modifier, how about using something that is not just a rectangle to create our view mask? Imagine that you want to add an image to a WIFI symbol but you only have the image and the SF Symbol.
With a mask, you can easily create that. Check the code below:
struct ContentView: View {
    var body: some View {
        VStack {
            Image("arara")
                .resizable()
                .scaledToFit()
                .mask(alignment: .center) {
                    Image(systemName: "wifi") // <<< using wifi symbol as mask of the image
                        .resizable()
                }

        }
    }
}
The result is pretty interesting:
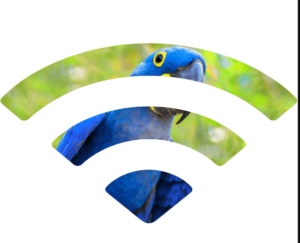
What is happening here? As we are using the WIFI symbol as the mask of the image, the alpha channel of the mask view will be used to show the view below.
In this case, as we only have the alpha channel affecting the areas where the WIFI symbol is drawn and the rest is not included, the result is a parrot-pattern WIFI symbol. You can use any view to create this effect and it will only draw the parts where the alpha channel of the mask view is not zero. Just like the example above.
How to Create Animations using Mask in SwiftUI?
This is where things got interesting. I was inspired to study the mask modifier because in my job we had to implement a shimmer/skeleton view. The easiest way to do that is by applying animation in a mask that has a gradient. But instead, that sparked a curiosity in my mind if we could create more interesting interactions between the mask and the view, and we can! The animation that we will create has three phases.
- Move the mask to the right side of the view and increase the opacity to 1.
- Center the mask from the right side, using a spring animation to make it more vivid.
- When that animation finishes, expand the mask view revealing the view below it.
Using those steps we can generate this:
To do that we will use some state variables and what we learn from the previous article about sequential animations.
Observe the code below:
struct ContentView: View {
    @State var maskXOffset = CGFloat(0)
    @State var maskYOffset = CGFloat(0)
    @State var maskFrameHeight = CGFloat(100)
    @State var maskOpacity = 0.0

    var body: some View {
        VStack {
            Image("arara")
                .resizable()
                .scaledToFit()
                .mask(alignment: .leading) {
                    GeometryReader { proxy in
                        Circle()
                            .frame(width: maskFrameHeight, height: maskFrameHeight)
                            .offset(x: maskXOffset, y: maskYOffset)
                            .opacity(maskOpacity)
                            .onAppear {
                                startAnimation(proxy: proxy) // here we start the animation
                            }
                    }
                }
        }
    }

    private func startAnimation(proxy: GeometryProxy) {
        withAnimation(.default.speed(0.5)) {
            maskOpacity = 1
            maskXOffset += (proxy.size.width - 50)
        }

        withAnimation(.interpolatingSpring(stiffness: 180, damping: 20).delay(0.5)) {
            maskXOffset -= (proxy.size.width/2)
        }

        withAnimation(.default.speed(0.4).delay(1.3)) {
            maskXOffset = -100 // correcting offset while expanding the view
            maskYOffset -= 350  // correcting offset while expanding the view
            maskFrameHeight += 700
        }
    }
}
In the function startAnimation, you can see all the steps that we described in our plan to animate this view.
First, we are setting the opacity of the mask to 1 so it will smoothly appear on the screen at the same time it also goes to the right side of the screen. The Mask is initially on the left side of the screen because we are using the alignment parameter to put it there.
Second, we are using the interpolatingSpring animation with custom stiffness and damping to create a natural feeling of movement and a little delay to just start after the first animation has finished.
The third and final animation is tweaked to give a little breathing space, so we don’t start immediately when the second finishes, but we give some air to the natural bounce finish then we expand the view height while we correct the offset of the view.
If you don’t correct the offset while expanding the view this will happen:
And that makes sense because with the given original offset that is the right mask position for the new size of the view. So be careful with the position when resizing your masks!
Now let’s go to a FAQ about the Mask view modifier.
FAQ – Mask View Modifier in SwiftUI
Q: What is the Mask View Modifier in SwiftUI?
A: The Mask View Modifier is a powerful tool in SwiftUI that lets you control the visibility of parts of a view by masking them with another shape or image. With this modifier, you can create views with complex shapes, cutouts, and transparency effects.
Q: What are some use cases for the Mask View Modifier in SwiftUI?
A: The Mask View Modifier can be used for a variety of purposes, such as creating circular or rounded cutouts in views, creating complex shapes or designs, or adding transparency and visual effects to views. It can be particularly useful for creating unique and eye-catching user interfaces in iOS, iPadOS, macOS, and watchOS apps.
Q: How do I apply the Mask View Modifier to a view in SwiftUI?
A: To apply the Mask View Modifier, you simply need to add the modifier to the view you want to mask, and specify the shape or image you want to use as the mask. For example, if you want to create a circular cutout in a view, you would apply a Circle shape as the mask.
Q: Can I animate the Mask View Modifier in SwiftUI?
A: Yes, you can animate the Mask View Modifier in SwiftUI using the built-in animation tools. You can apply the modifier to a view and then use the animation modifiers to create a dynamic and interactive animation.
Q: Is the Mask View Modifier only available in SwiftUI for iOS?
A: No, the Mask View Modifier is available in SwiftUI for all Apple platforms, including iOS, iPadOS, macOS, and watchOS. It is a powerful and versatile tool that can be used to create stunning user interfaces across all these platforms.
Q: Do I need to have prior experience with SwiftUI to use the Mask View Modifier?
A: While some knowledge of SwiftUI is helpful, you do not need to be an expert in SwiftUI to use the Mask View Modifier. It is a straightforward and easy-to-use tool that can be applied to views with just a few lines of code. And that’s it for today!
Summary – Creating Animations and Exploring Mask View Modifier in SwiftUI
Today we learned a lot about the Mask View modifier.
From exploring its basic API using alignment to positioning the mask to view correctly, passing through some basic examples about opacity and custom mask shapes, to creating a sequential animation using a mask modifier and spring animations.
Mask in the end is one of the several SwiftUI tools that we can use in our daily life as developers. I want to hear from you what do you think about it? Do you think it is very useful or just another tool that is rarely used?
Fellow Apple Developers, that’s all.
I hope you liked reading this article as much as I enjoyed writing it. If you want to support this blog you can Buy Me a Coffee or say hello on Twitter. I’m available on LinkedIn or send me an e-mail through the contact page.
You can likewise sponsor this blog so I can get my blog free of ad networks.
Thanks for the reading and… That’s all folks.
Image credit: Featured Painting


