
Hallo allemaal, Leo hier. Today we will explore the amazing world of multiple environments in one Xcode Project using SwiftUI.
Are you tired of hardcoding configuration settings and data in your SwiftUI app? Do you want to pass values to your app at runtime without the hassle of manually changing your code? Look no further than Xcode environment variables and command line arguments!
In this article, we’ll explore how to use these powerful features to set configuration values and pass parameters to your SwiftUI app at runtime. We’ll cover how to set environment variables in Xcode build settings and how to access them in your SwiftUI code. We’ll also dive into how to use command line arguments to pass values to your app when it’s launched from the command line.
With these tools in your toolbox, you’ll be able to easily configure and customize your SwiftUI app without the need for extensive code changes.
In the past two weeks, we were exploring SwiftUI animations, and animations are something that really talks to my heart. I love to animate things on the screen.
The first article is about sequential animations and how they can be useful for you. The article shows how to create sequential animations in SwiftUI using a simple and effective approach with the withAnimation function. By wrapping multiple animation blocks within a single withAnimation function, developers can chain together different animation effects to create smooth and dynamic user interfaces.
And the second one was exploring animations with the mask view modifier in SwiftUI. There we demonstrate how to use the mask modifier in SwiftUI to create interesting animation effects. By applying a mask to an object, developers can reveal or hide parts of the object in a visually engaging way, and by animating the mask, they can add a dynamic touch to the animation.
So let’s get started and unlock the full potential of Xcode environment variables and command line argument. But first…
Painting of the Day
This 1931 painting was made in a mural and is called Frozen Assets by Diego Rivera.
Rivera fused his love for New York’s towering architecture with a bold takedown of the city’s messed-up economic disparities. Check out the top part of the panel, where you’ll see a killer view of a bunch of skyscrapers that were just built around the time Rivera arrived in the city. In the middle section, he painted a scene of homeless men sleeping in a glass shelter, symbolizing the marginalized workers who helped fuel the city’s explosive growth during a rough economic period. And down below, we see a bank waiting room with a security guard, a teller, and three rich folks itching to check out their fat stacks in the vault.
Rivera’s mind-bending portrayal of the city, where the working class slaves away, the homeless are forgotten, and the rich hoard their cash, hit a raw nerve in 1932, smack dab in the middle of the Great Depression.
I chose this painting today because it represents completely different environments in it. That makes us
The Problem – How to manage multiple Environments in Xcode using SwiftUI?
Imagine you have a project that need to setup different configurations, base URL, config files etc, for different environments.
This will be an interesting topic to deep dive into. I learned a lot researching this article and I hope you do too. There are some main ways to split configurations in Xcode and today we will explore how can we use them in the SwiftUI context.
First, we need to set a base knowledge for what will going to do. When I talk about custom build configuration files I need to know that you will understand exactly what I’m talking about. And the same idea is for all other concepts that we will explore today.
Xcode Features Definitions
It is common for iOS developers to start their careers not knowing what schemes, build configuration files or even arguments passed on Launch are. And that is completely ok because no one knows everything, we are all here to learn. Keep in mind that if you never have to configure different environments for your app, probably you will not know those things.
After reading this article you will have a full landscape of those build configurations regarding changing environments. It is important to notice that we will not dive deep into each one of them but you will understand what they are and what can you do with them.
Let’s start with schemes.
What are Xcode Schemes?
In Xcode, a scheme is a configuration that specifies how to build, run, test, profile, analyze, archive, or debug your app, and each one of those steps can have its own Build Configuration. Those two concepts are the most important features to remember, if you remember those, you are already good to go.
Check the image below to see what are those, when you chose Product > Scheme > Edit Scheme… :
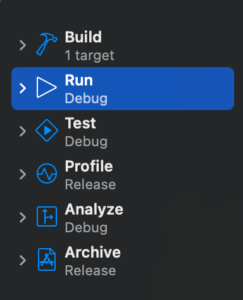
Did you notice that every step has a subtitle? That in this case are Debug or Release? The debug and release are the build configurations for each one of the steps in this example scheme.
A scheme is made up of different components that define the settings and actions to perform when building and running your app. Here are some of the main components:
- Run Destination: specifies the device, simulator, or Mac on which to run your app
- Build Configuration: specifies the build settings to use, like Debug or Release
- Build Targets: specifies the targets to include in the build, like your app, tests, or frameworks
- Build Actions: specifies the actions to perform when building, like compiling, linking, or copying resources
- Run Actions: specifies the actions to perform when running, like launching the app, attaching a debugger, or running a script
- Test Actions: specifies the actions to perform when testing, like running unit tests or UI tests
- Archive Actions: specifies the actions to perform when archiving, like creating an IPA or a DMG file
You can create, edit, duplicate, and delete schemes in Xcode by selecting your project or workspace, choosing Product > Scheme > Manage Schemes, and clicking the plus, minus, or duplicate buttons.
Schemes are useful for managing different configurations of your app, like running it with different settings, running it on different devices, or building it for different environments. You can also use schemes to automate tasks like testing, profiling, or releasing your app.
The schemes are important because they will be the first ones that we will use to separate our QA and Staging environments.
Just to remember one more time schemes are the steps of the build, run, test, etc of your app, and build configurations are what and how those steps will be configured.
Let’s configure schemes to have three different schemes: staging, QA, and Release.
How to add and Edit Default Schemes in Xcode
First, let’s add the staging one. What will we do?
- First add a new scheme, the staging one.
- Edit the other schemes’ names, so we can easily recognize them in the Xcode interface.
- Create a staging build configuration.
- Configure each one of the schemes before starting coding.
How to Add New Scheme to Xcode
Check the images below:
Then add a new scheme:
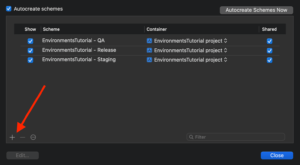
Now just set a new name, in our case “EnvironmentTutorial – Staging” as in the picture above, so you know that this is the staging scheme every time you run that.
You will probably have to add one more because by default Xcode only comes with one scheme. So please repeat the steps and add the Release one too.
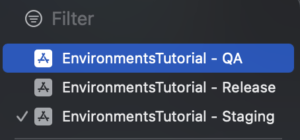
How to edit Schemes Names in Xcode?
You can easily edit in the Manage Schemes screen by clicking two times on the names and editing them:

The next step is to create one more build configuration, we need to create one for staging. First, let’s explore what exactly the build configurations are in Xcode.
What are Build Configurations in Xcode?
In Xcode, a build configuration is a set of build settings that determines how your app is built, compiled, linked, and packaged.
When you create a new Xcode project, it comes with two default build configurations: Debug and Release. These configurations have different settings that affect how your app behaves and performs:
- Debug configuration: optimized for development and testing, with settings that prioritize debugging information, speed, and flexibility. This configuration may include features like debugging symbols, assertions, logging, and optimization flags that help you diagnose and fix issues in your code.
- Release configuration: optimized for distribution and performance, with settings that prioritize size, speed, and stability. This configuration may include features like code stripping, optimization, dead code elimination, and signing that help you create a smaller, faster, and more secure version of your app that is ready for distribution.
You can create your own custom build configurations in Xcode to define your own set of build settings. For example, you might create a Staging configuration that includes specific settings for testing your app on a staging server, or a QA configuration that includes specific settings for testing your app with a QA team.
Each build configuration can include different settings for various areas of your project, such as code signing, optimization, debug information, and more. You can also use build configurations to specify preprocessor macros, compiler flags, linker flags, and other build settings that affect how your app is built and run.
Build configurations are an important part of the build process in Xcode, as they allow you to build your app in different ways, for different purposes, and with different optimizations. By using build configurations effectively, you can ensure that your app is built and run consistently and efficiently across different development and distribution scenarios.
Now let’s create our own build configuration.
How to create a new Build Configuration in Xcode? How to add build configuration files?
Apple has a good tutorial on this and I made a summarized version of it below.
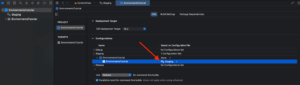
Go to your project > Info > Configurations and click on the plus button. Follow the image below:
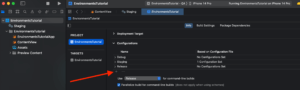
Now just double-click on Debug and rename it to Staging.
Each one of the configurations can have its own configuration file. Let’s create our staging configuration file.
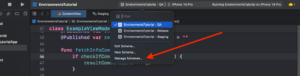
Press command+L and search for configuration, like the image below:
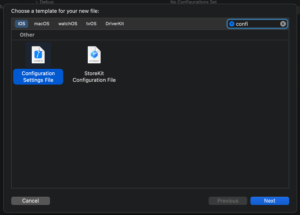
Then I give the name of Staging because it will just have staging configurations and added a flag set that configuration file env to STAGING to it:

All the flags that you can set are in the reference guide from Apple. But for today we just need that one.
After creating the file, and setting the key, we need to add the build configuration file to the correct build configuration, see the image below:
Congratulations, you created your first Build Configuration file! We now jump to one more step before we can dive into coding.
How to Switch Between Environments in Xcode?
We need to add data on each one of the schemes and build configurations so we can use them in the code to switch between environments.
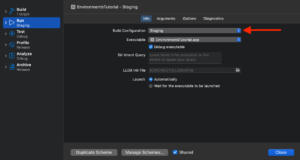
Go now to Product > Scheme > Edit Scheme… and start to edit the staging one. We will edit two things, the Build Configuration, and the arguments, check the images below:
And the add -staging Arguments passed on launch:

Go now to Product > Scheme > Edit Scheme… and start to edit the QA one.
We will just edit the arguments in the Run phase, add “-isQA true” and -qa to the Arguments Passed on Launch. Like the image below:
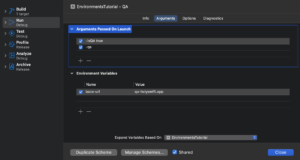
Remember that if you want to change arguments for testing, you need to add them in the Test phase of your scheme.
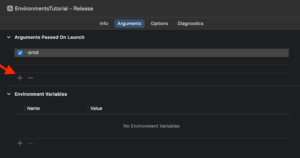
And finally, Go now to Product > Scheme > Edit Scheme… and start to edit the Release one, add -prod to it. Add -prod to the arguments passed on Launch.
We are done with the Xcode setup!
But let’s recap what we have done.
- Learned what are schemes and added two new schemes, the staging, and the release.
- Edited the default scheme to another name to be easier to run in Xcode.
- Created a new build configuration file and set the scheme to use that file
- Edited all the schemes build configurations to have extra arguments so we can switch between them in the code.
Now let’s code! And don’t worry this project will be on GitHub so you check there too.
How to use Xcode Schemes to Select the Environment in SwiftUI?
Head to the default SwiftUI Content View. The first thing we will do is add the view model as our first way of distinguishing your environments in Xcode. Copy-paste the View Model code below:
class ExampleViewModel: ObservableObject {
    @Published var resultCommandLine = ""
    @Published var resultBuildConfiguration = ""
    @Published var resultUserDefaults = ""
    @Published var resultBaseURL = "prod-holyswift.app"

    func fetchInfoCommandLine() { // Mark 1 - Using command line arguments
        if checkIfCommandLineContains("-qa") {
            resultCommandLine = "Command Line qa"
        }

        if checkIfCommandLineContains("-prod") {
            resultCommandLine = "Command Line prod"
        }

        if checkIfCommandLineContains("-staging") {
            resultCommandLine = "Command Line staging"
        }
    }

    func fetchInfoBuildConfiguration() { // Mark 2 - Using Build Configuration
        #if DEBUG
        resultBuildConfiguration = "build configuration QA"
        #else
        resultBuildConfiguration = "build configuration Release"
        #endif

        #if STAGING
        resultBuildConfiguration = "build configuration Staging"
        #endif
    }

    func fetchEnvironmentVariables() { // Mark 3 - Using Using Environment Variables
        if let qaBaseUrl = ProcessInfo.processInfo.environment["base-url"] {
            resultBaseURL = qaBaseUrl
        }
    }

    func fetchInfoUserDefaults() { // Mark 4 - Using User Defaults from command line
        resultUserDefaults = UserDefaults.standard.bool(forKey: "isQA") ? "is QA!" : "not QA!"
    }

    private func checkIfCommandLineContains(_ value: String) -> Bool {
        CommandLine.arguments.contains(value)
    }
}
Each one of the internal functions represents a way to use different environments in your code. Let’s explain each one.
- On Mark 1 we are selecting the environment based on what argument is passed in the command line arguments. That is what we defined in the previous section when we edited the scheme to send “Arguments Passed On Launch”.
- Mark 2 is the default option if you only have two environments, and we are using compiler directives. If you just have Debug and Release, there is little to no reason to mess with other build configurations besides those two. They already are the default option for all iOS projects and I would advise using this way if your project doesn’t need anything fancy/custom.
- Mark 3 is using environment variables. That is also something that we can set in the scheme or in the build configuration.
- Mark 4 is interesting because the same command line arguments that we passed on Mark 1, however, we can also access the value of the argument through User Defaults.
Now you know the four ways to get different environments, let’s apply them in a SwiftUI code.
How to use Command Line Arguments in Xcode?
Now that we have our view model done, we can start to use our command line arguments to check the environment.
struct ContentView: View {
@StateObject var viewModel = ExampleViewModel()
var body: some View {
VStack {
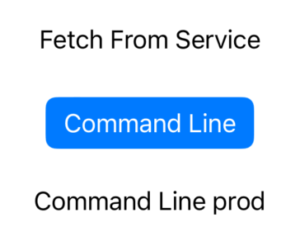
Text("Fetch From Service")
Button("Command Line") {
viewModel.fetchInfoCommandLine()
}
.buttonStyle(.borderedProminent)
.padding()
Text(viewModel.resultCommandLine)
}
.padding()
}
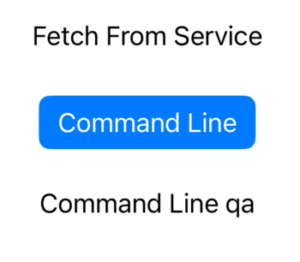
}Now the magic happens. Depending on what scheme you run the result will be different.
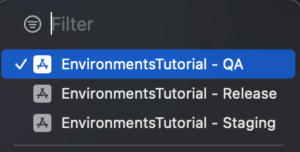
Running QA we will have this:
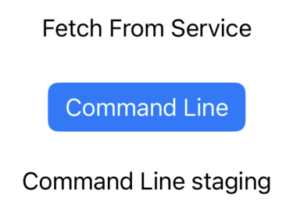
Staging will result in this:
And release will generate this:
Really cool, right?
This is all possible because we set the configuration for each one of the schemes in Xcode!
The function we are running is this:
func fetchInfoCommandLine()  {
    if checkIfCommandLineContains("-qa") {
        resultCommandLine = "Command Line qa"
    }

    if checkIfCommandLineContains("-prod") {
        resultCommandLine = "Command Line prod"
    }

    if checkIfCommandLineContains("-staging") {
        resultCommandLine = "Command Line staging"
    }
}

private func checkIfCommandLineContains(_ value: String) -> Bool {
    CommandLine.arguments.contains(value)
}
And you can use this to change the base URL for your App or anything in your build that will only have an effect in the selected environment.
Now you know one way how to use the arguments passed on Launch. There is one more way you can use those arguments at the end of the article, go there if you are in a hurry.
How to use Build Configurations in Xcode to Select Environment?
As I said earlier, if you just have two environments, debug and release, you don’t have many reasons to create a fancy setup with custom build configurations. Maybe for your case use the default compiler directive “#if DEBUG” is all you need.
Let’s check our test in the SwiftUI view, copy-paste the code below:
struct ContentView: View {
@StateObject var viewModel = ExampleViewModel()
var body: some View {
VStack {
Text("Fetch From Service")
Button("Command Line") {
viewModel.fetchInfoCommandLine()
}
.buttonStyle(.borderedProminent)
.padding()
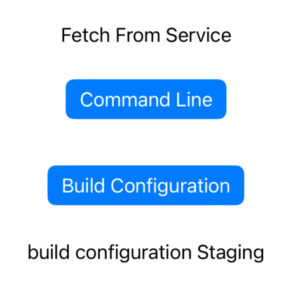
Button("Build Configuration") {
viewModel.fetchInfoBuildConfiguration()
}
.buttonStyle(.borderedProminent)
.padding()
Text(viewModel.resultCommandLine)
Text(viewModel.resultBuildConfiguration)
}
.padding()
}
}And now if you run the Staging environment:
The result is:
This is because of two things. One is our build configuration file:
And then the function in the view model that we use a compiler directive to change the variable value:
func fetchInfoBuildConfiguration() {
    #if DEBUG
    resultBuildConfiguration = "build configuration QA"
    #else
    resultBuildConfiguration = "build configuration Release"
    #endif

    #if STAGING
    resultBuildConfiguration = "build configuration Staging"
    #endif
}
See how we used the STAGING in the custom build configuration file and we used the same value in the code? That’s another way that you can segregate environments in your projects using schemes and Xcode build configuration files.
The same result will happen if you chose the other two schemes.
How to use Xcode Environment Variables in SwiftUI?
In Xcode, you can set environment variables for your SwiftUI project in order to pass data or configuration settings to your application at runtime.
Disclaimer: Note that environment variables set in Xcode are only available at runtime, and they are not included in the built binary of your application. If you need to set environment variables for your app when it’s distributed to users, you’ll need to use a different approach, such as command line arguments or a configuration file.
Let’s go to the third way of using custom values for an environment using SwiftUI, using environment variables.
How To Get Data From the Environment Variables in Xcode using SwiftUI?
I’ll just give one example of this and is an interesting technique. Imagine that you want to override the base URL of your app with the QA one but just for the debug build.
Previously, we set up this value in the QA scheme Environment Variables:
Now in the code, we can access that using this:
@Published var resultBaseURL = "prod-holyswift.app"

func fetchEnvironmentVariables() {
    if let qaBaseUrl = ProcessInfo.processInfo.environment["base-url"] {
        resultBaseURL = qaBaseUrl
    }
}
And adding that to the SwiftUI:
struct ContentView: View {
    @StateObject var viewModel = ExampleViewModel()

    var body: some View {
        VStack {
            Text("Fetch From Service")
            Button("Command Line") {
                viewModel.fetchInfoCommandLine()
            }
            .buttonStyle(.borderedProminent)
            .padding()

            Button("Build Configuration") {
                viewModel.fetchInfoBuildConfiguration()
            }
            .buttonStyle(.borderedProminent)
            .padding()

            Button("Environment Variables") {
                viewModel.fetchEnvironmentVariables()
            }
            .buttonStyle(.borderedProminent)
            .padding()

            Text(viewModel.resultCommandLine)
            Text(viewModel.resultBuildConfiguration)
            Text(viewModel.resultBaseURL)

        }
        .padding()
    }
}
Then when you tap on the Environment Variables Button you will change the base URL of your app!

And that is it! Remember that is not going to your production app, do not depend on this for anything in the release mode.
How to Use Arguments Passed on Launch and User Defaults in SwiftUI?
Finally, we come to the last way of this article on how to segregate environments in your Xcode project for SwiftUI.
The arguments passed on launch can also capture values using User Defaults.
This way you can do something like this:
@Published var resultUserDefaults = ""

func fetchInfoUserDefaults() {
    resultUserDefaults = UserDefaults.standard.bool(forKey: "isQA") ? "is QA!" : "not QA!"
}
And we can use it in the SwiftUI code like this:
struct ContentView: View {
    @StateObject var viewModel = ExampleViewModel()

    var body: some View {
        VStack {
            Text("Fetch From Service")
            Button("Command Line") {
                viewModel.fetchInfoCommandLine()
            }
            .buttonStyle(.borderedProminent)
            .padding()

            Button("Build Configuration") {
                viewModel.fetchInfoBuildConfiguration()
            }
            .buttonStyle(.borderedProminent)
            .padding()

            Button("Environment Variables") {
                viewModel.fetchEnvironmentVariables()
            }
            .buttonStyle(.borderedProminent)
            .padding()

            Button("User Defaults") {
                viewModel.fetchInfoUserDefaults()
            }
            .buttonStyle(.borderedProminent)
            .padding()

            Text(viewModel.resultCommandLine)
            Text(viewModel.resultBuildConfiguration)
            Text(viewModel.resultBaseURL)
            Text(viewModel.resultUserDefaults)

        }
        .padding()
    }
}
Resulting in:
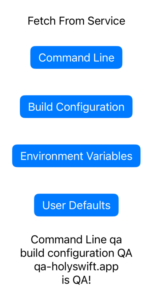
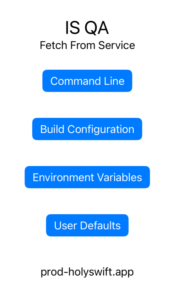
And one more thing. Since this is a user default value, we can use the SwiftUI @AppStorage annotation to also change our views based on the environment configuration.
But how can you change your views based on an environment value in SwiftUI? Check the code below:
struct ContentView: View {
    @StateObject var viewModel = ExampleViewModel()
    @AppStorage("isQA") var isQA = false // add this variable with the User Default Annotation

    var body: some View {
        VStack {
            if isQA { // use the new varibale in the view
                Text("IS QA")
                    .font(.title)
            }

            Text("Fetch From Service")
            Button("Command Line") {
                viewModel.fetchInfoCommandLine()
            }
            .buttonStyle(.borderedProminent)
            .padding()

            Button("Build Configuration") {
                viewModel.fetchInfoBuildConfiguration()
            }
            .buttonStyle(.borderedProminent)
            .padding()

            Button("Environment Variables") {
                viewModel.fetchEnvironmentVariables()
            }
            .buttonStyle(.borderedProminent)
            .padding()

            Button("User Defaults") {
                viewModel.fetchInfoUserDefaults()
            }
            .buttonStyle(.borderedProminent)
            .padding()

            Text(viewModel.resultCommandLine)
            Text(viewModel.resultBuildConfiguration)
            Text(viewModel.resultBaseURL)
            Text(viewModel.resultUserDefaults)

        }
        .padding()
    }
}
Now our view has a new Text that only appears in the QA scheme.
Check below the full code example.
Full Example of Multiple Environments in SwiftUI
The SwiftUI full code example is below:
import SwiftUI

struct ContentView: View {
    @StateObject var viewModel = ExampleViewModel()
    @AppStorage("isQA") var isQA = false

    var body: some View {
        VStack {
            if isQA {
                Text("IS QA")
                    .font(.title)
            }

            Text("Fetch From Service")
            Button("Command Line") {
                viewModel.fetchInfoCommandLine()
            }
            .buttonStyle(.borderedProminent)
            .padding()

            Button("Build Configuration") {
                viewModel.fetchInfoBuildConfiguration()
            }
            .buttonStyle(.borderedProminent)
            .padding()

            Button("Environment Variables") {
                viewModel.fetchEnvironmentVariables()
            }
            .buttonStyle(.borderedProminent)
            .padding()

            Button("User Defaults") {
                viewModel.fetchInfoUserDefaults()
            }
            .buttonStyle(.borderedProminent)
            .padding()

            Text(viewModel.resultCommandLine)
            Text(viewModel.resultBuildConfiguration)
            Text(viewModel.resultBaseURL)
            Text(viewModel.resultUserDefaults)

        }
        .padding()
    }
}

class ExampleViewModel: ObservableObject {
    @Published var resultCommandLine = ""
    @Published var resultBuildConfiguration = ""
    @Published var resultUserDefaults = ""
    @Published var resultBaseURL = "prod-holyswift.app"

    func fetchInfoCommandLine()  {
        if checkIfCommandLineContains("-qa") {
            resultCommandLine = "Command Line qa"
        }

        if checkIfCommandLineContains("-prod") {
            resultCommandLine = "Command Line prod"
        }

        if checkIfCommandLineContains("-staging") {
            resultCommandLine = "Command Line staging"
        }
    }

    private func checkIfCommandLineContains(_ value: String) -> Bool {
        CommandLine.arguments.contains(value)
    }

    func fetchInfoBuildConfiguration() {
        #if DEBUG
        resultBuildConfiguration = "build configuration QA"
        #else
        resultBuildConfiguration = "build configuration Release"
        #endif

        #if STAGING
        resultBuildConfiguration = "build configuration Staging"
        #endif
    }

    func fetchEnvironmentVariables() {
        if let qaBaseUrl = ProcessInfo.processInfo.environment["base-url"] {
            resultBaseURL = qaBaseUrl
        }
    }

    func fetchInfoUserDefaults() {
        resultUserDefaults = UserDefaults.standard.bool(forKey: "isQA") ? "is QA!" : "not QA!"
    }
}

struct ContentView_Previews: PreviewProvider {
    static var previews: some View {
        ContentView()
    }
}
Now let’s try something new…
Interview Questions – Environment Variables in Xcode and SwiftUI
I’ll try to add a section about quick interview questions and answers related to the topic I’m writing about whenever possible to help people out there. Let me know what you think about this, if you think this could be in another article, or if this section shouldn’t even exist at all, I want to know your opinion.
Today is the first one about environment variables in Xcode and SwiftUI.
Q: What are environment variables in Xcode and how do they work in SwiftUI? Is possible to use them in SwiftUI?
A: Yes, you can use environment variables in SwiftUI. Environment variables are values that can be set in the Xcode build settings and passed to your SwiftUI application at runtime. They allow you to pass data or configuration settings to your app without hardcoding them in your code.
Q: How do I set environment variables in Xcode for my SwiftUI project?
A: To set environment variables in Xcode, you need to add a custom flag to your project’s build settings. Under “Other Swift Flags”, add a flag in the format “-DMY_ENV_VAR=”my_value”, replacing “MY_ENV_VAR” with the name of your variable and “my_value” with the value you want to assign to it.
Q: How do I access the value of an environment variable in my SwiftUI code?
A: You can access the value of an environment variable using the ProcessInfo.processInfo.environment dictionary. To get the value of a variable named “MY_ENV_VAR”, for example, you would use ProcessInfo.processInfo.environment["MY_ENV_VAR"].
Q: What are command line arguments, and how do they work in SwiftUI?
A: Command line arguments are values that are passed to your application when it is launched from the command line. They allow you to provide runtime configuration settings or parameters to your application.
Q: How do I pass command line arguments to my SwiftUI application?
A: To pass command line arguments to your SwiftUI application, you need to modify the scheme used to run your app in Xcode. In the scheme editor, go to the “Run” tab and add the arguments you want to pass in the “Arguments Passed On Launch” section.
Q: Can I use both environment variables and command line arguments in my SwiftUI app?
A: Yes, you can use both environment variables and command line arguments in your SwiftUI app. Environment variables are set at build time and are available at runtime, while command-line arguments are passed when the app is launched and are also available at runtime.
And that’s it for today!
Summary – Using Xcode to Change Environment Values
In this article, we’ve explored four different ways to set up different environments for your SwiftUI app. By leveraging command line arguments, custom build configurations, environment variables, and user defaults from command line arguments, you can easily switch between different configurations and settings for your app. The full project you can check in my GitHub.
Command line arguments allow you to pass parameters to your app when it’s launched, while custom build configurations give you fine-grained control over build settings. Environment variables provide a flexible way to set configuration values at build time, and user defaults from command line arguments allow you to override default settings at runtime.
By combining these different approaches, you can create a powerful and flexible environment setup for your SwiftUI app. Whether you’re developing locally, deploying to production, or testing different configurations, these tools will help you streamline your workflow and focus on building great apps. So go forth and experiment with these techniques, and see how they can help you take your SwiftUI development to the next level!
Fellow Apple Developers, that’s all.
I hope you liked reading this article as much as I enjoyed writing it. If you want to support this blog you can Buy Me a Coffee or say hello on Twitter. I’m available on LinkedIn or send me an e-mail through the contact page.
You can likewise sponsor this blog so I can get my blog free of ad networks.
Thanks for the reading and… That’s all folks.
Image credit: Featured Painting


