Hallo spelers en gokkers, Leo hier. Today we will do something I was curious about and is exploring SwiftUI redraw behavior with a simple App.
I started to study SwiftUI recently and I can already say that this framework is a delight to work with. To do simple apps and make things is really straightforward. I’ve been playing with simple views and simple app structures to learn how things communicate and the first new UI API shenanigans. I can say that you should try the latest version of it.
It is interesting the evolution it is taking and I’m pretty happy with my learnings. I started learning using my own recommendations that I say in the section Final Thoughts of the article on how to become an iOS developer. I’m trying to learn with completely free resources and later on I plan to use some paid ones.
One of the things that intrigued me at the beginning of my studies is how the view redraw is triggered and I discovered something interesting that I want to share with you today. This way expects a beginner tutorial on SwiftUI redraws View behavior. A little disclaimer, I’m moving to a new home so maybe the post frequency will be impaired.
Let’s code! But first…
Painting of The Day
The art piece I chose today was the 1959 painting called “New Television Antenna” by Norman Rockwell. As I already featured Norman in my blog previously I’ll just add some trivia about him today.
If you look closely at many of his works and you will find allusions to the Masters. Even the pose of wartime Saturday Evening Post cover girl Rosie the Riveter nods to Michelangelo’s Sistine Chapel portrayal of the Prophet Isaiah. Interesting, right?
I chose this painting because I’m feeling the excitement to learn this new framework same as the people when the first television antennas were installed.
The Problem – Exploring SwiftUI Redraw Behavior with a Simple App
I want to know what is exactly happening with all my views when I change a setting in my app.
Before starting to explore the problem we will face, let’s give you an architecture overview of the sample project. Observe the diagram below: 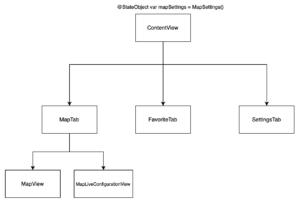
The app will have three tabs: MapTab, FavoriteTab, and SettingsTab and they are all views. The MapTab has two other views the MapView and the MapLiveConfigurationView. All the tabs need to know the object MapSettings.
But what will happen to our application when we change any settings in the SettingsTab? Today we will use Instruments to check how many times a view is redrawn and what to do to solve simple redraw problems. First, let’s set up this project.
Project Setup
We will build upon the last week’s article project and you can find the base project in this GitHub repo. Let’s start making all the tabs. Copy-paste the code below into your ContentView.
struct MapTab: View {
    @ObservedObject var mapSettings: MapSettings

    var body: some View {
        ZStack {
            MapView(mapSettings: mapSettings)
                .edgesIgnoringSafeArea(.all)

        }.overlay(alignment: .bottom) {
            MapLiveConfigurationView(mapSettings: mapSettings)
        }
    }
}

struct FavoriteTab: View {
    var body: some View {
        Text("This is the Favorite")
    }
}

struct SettingsTab: View {
    @ObservedObject var mapSettings: MapSettings

    var body: some View {
        Form {
            Section(header: Text("Background Settings")) {
                Toggle(isOn: $mapSettings.isClearBackground) {
                    Text("Clear Background")
                }
            }
        }
    }
}
This is the code for the three tabs in our app. Observe that we are passing the mapSettings object through the initializer of the views, this way we can have access to the binding object and communicate with them accordingly.
The SettingsTab is just a Form with a section title and a toggle to change the background of the controls to a clear color in the MapTab. So far so good. Let’s go to the MapLiveConfigurationView.
Copy-paste the code below into your project:
struct MapLiveConfigurationView: View {
    @ObservedObject var mapSettings: MapSettings
    @State var mapType = 0
    @State var showElevation = 0
    @State var showEmphasis = 0

    var body: some View {
        VStack {
            Picker("Map Type", selection: $mapType) {
                Text("Standard").tag(0)
                Text("Hybrid").tag(1)
                Text("Image").tag(2)
            }.pickerStyle(SegmentedPickerStyle())
                .onChange(of: mapType) { newValue in
                    mapSettings.mapType = newValue
                }.padding([.top, .leading, .trailing], 16)

            Picker("Map Elevation", selection: $showElevation) {
                Text("Realistic").tag(0)
                Text("Flat").tag(1)
            }.pickerStyle(SegmentedPickerStyle())
                .onChange(of: showElevation) { newValue in
                    mapSettings.showElevation = newValue
                }.padding([.leading, .trailing], 16)

            Picker("Map Elevation", selection: $showEmphasis) {
                Text("Default").tag(0)
                Text("Muted").tag(1)
            }.pickerStyle(SegmentedPickerStyle())
                .onChange(of: showEmphasis) { newValue in
                    mapSettings.showEmphasisStyle = newValue
                }.padding([.leading, .trailing], 16)

        }.background(mapSettings.isClearBackground ? .clear : .black)
    }
}
Apart from last week’s project now we separated the bottom controls into another view so we can have a more encapsulated and easy-to-maintain structure. The @State property that in the past was in the MapTab now is just in the MapLiveConfigurationView because is there that we will manipulate all the view states.
And to wrap up everything that we developed so far, let’s create the TabView itself. The ContentView will be responsible to maintain the mapSettings object for the whole application. Since all tabs use that object it is important that information be available in the most root object that we have and it is important to be a @StateObject because we don’t want to re-instantiate that object every time that SwiftUI redraws our view.
Copy-paste the code below:
struct ContentView: View {

    @StateObject var mapSettings = MapSettings()

    var body: some View {
        TabView {
            MapTab(mapSettings: mapSettings)
                .tabItem {
                    Image(systemName: "house.fill")
                    Text("Home")
                }
            FavoriteTab()
                .tabItem {
                    Image(systemName: "star")
                    Text("Favorite")
                }
            SettingsTab(mapSettings: mapSettings)
                .tabItem {
                    Image(systemName: "gear")
                    Text("Settings")
                }
        }
    }
}
Now we will inspect with Instruments what is happening when we change a configuration in the settings tabs.
We already finished the project setup and your project should look like the video below:
Using Instruments to Investigate View Redraw
Now that we have our project done, the investigation part begins. We want to know what is happening with the views after we toggle the configuration in the SettingsTab. To do that you need to:
- Open the Instruments.
- Go to the SwiftUI icon.
- Run the build through Instruments and check the results.
You can open Instruments by doing two things: you can use the shortcut “command+i” or go like the image below in the Product -> Profile option:
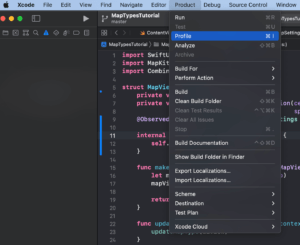
This should open the Instruments app and there you can roll down and find SwiftUI at the bottom: 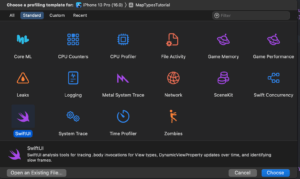
And that’s how you open the Instruments to analyze the calls for the body in your View types, also you can check DynamicViewProperty updates over time and identify slow frames. Is a good tool to master right? After choosing the SwiftUI in the Instruments view you will see this: 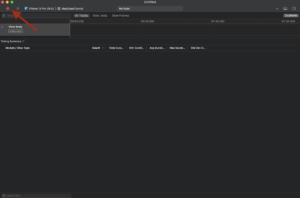
The red arrow is where you have to click to start profiling your app. When we click that the first information will start to come. Let’s check: 
Look how interesting. Although the app has three tabs, none of its body was called upon the app launch. This means that SwiftUI is smart enough to only call the views that will be shown. Opening the FavoritesTab and the SettingsTab will make them appear in the profiler. 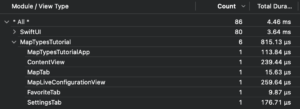
And now let’s test what will happen when we toggle the setting in the SettingsTab.
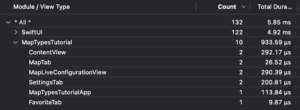
We can see that the four views have their body reevaluated ( view redraws). The ContentView is redrawn because we changed one of their state variables.
SettingsTab is also redrawn because we are using that view and also make sense to redraw that, and the same with MapLiveConfigurationView is the view directly affected by the setting changes.
What about MapTab? Why it is redrawn since we are not redrawing anything of it directly? What is happening here?
SwiftUI Architecture Review
Now let’s go back and check the architecture of our App again:
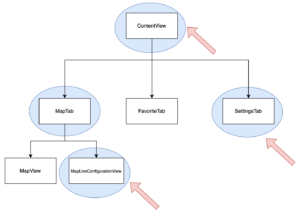
The views that have the blue circle behind them are the views that are being redrawn with the current code setup. This was not intended. I don’t want to redraw more views than necessary, if my app were bigger this could lead to serious performance issues. And of course, if your app is not suffering from performance issues you don’t need to waste your time deep diving into view callout count. You can revisit this when and if this becomes a problem for your app.
That said the red arrows are the expected body redraws. At least for me. I would love to see an implementation that only redraws the MapLiveConfigurationView. To solve that we will have to make some changes in the code.
I realized that I was passing everything by the initializer of the views, which forces all the views in the view hierarchy to also redraw just because they have the object that changes and it is annotated as an observed object. In fact, if you read the @ObservedObject docs it says:
A property wrapper type that subscribes to an observable object and invalidates a view whenever the observable object changes.
And that is pointing to the final answers of today’s explorations. There are two easy ways to solve this:
- One is to pass the settings through the @EnvironmentObject
- Don’t annotate the mapSettings as a @ObservedObject when is not needed.
I will follow the first one because we delegate to SwiftUI to pass the information to the whole view hierarchy through the environmentObject function. Let’s change the code and see the results.
Solving the SwiftUI View Redraw Problem
This is how to solve this view redraw problem. In the content view add the environmentObject function to all the tabs:
struct ContentView: View {

    @StateObject var mapSettings = MapSettings()

    var body: some View {
        TabView {
            MapTab()
                .tabItem {
                    Image(systemName: "house.fill")
                    Text("Home")
                }.environmentObject(mapSettings)
            FavoriteTab()
                .tabItem {
                    Image(systemName: "star")
                    Text("Favorite")
                }.environmentObject(mapSettings)
            SettingsTab()
                .tabItem {
                    Image(systemName: "gear")
                    Text("Settings")
                }.environmentObject(mapSettings)
        }
    }
}
Remove from the MapTab any reference to the mapSettings:
struct MapTab: View {
    var body: some View {
        ZStack {
            MapView()
                .edgesIgnoringSafeArea(.all)

        }.overlay(alignment: .bottom) {
            MapLiveConfigurationView()
        }
    }
}
To all the other views using mapSettings, change it to an @EnvironmentObject variable:
struct SettingsTab: View {

    @EnvironmentObject private var mapSettings: MapSettings // <<< HERE

    var body: some View {
        Form {
            Section(header: Text("Background Settings")) {
                Toggle(isOn: $mapSettings.isClearBackground) {
                    Text("Clear Background")
                }
            }
        }
    }
}

struct MapLiveConfigurationView: View {

    @EnvironmentObject private var mapSettings: MapSettings // <<< HERE

    @State var mapType = 0
    @State var showElevation = 0
    @State var showEmphasis = 0

    var body: some View {
        VStack {
            Picker("Map Type", selection: $mapType) {
                Text("Standard").tag(0)
                Text("Hybrid").tag(1)
                Text("Image").tag(2)
            }.pickerStyle(SegmentedPickerStyle())
                .onChange(of: mapType) { newValue in
                    mapSettings.mapType = newValue
                }.padding([.top, .leading, .trailing], 16)

            Picker("Map Elevation", selection: $showElevation) {
                Text("Realistic").tag(0)
                Text("Flat").tag(1)
            }.pickerStyle(SegmentedPickerStyle())
                .onChange(of: showElevation) { newValue in
                    mapSettings.showElevation = newValue
                }.padding([.leading, .trailing], 16)

            Picker("Map Elevation", selection: $showEmphasis) {
                Text("Default").tag(0)
                Text("Muted").tag(1)
            }.pickerStyle(SegmentedPickerStyle())
                .onChange(of: showEmphasis) { newValue in
                    mapSettings.showEmphasisStyle = newValue
                }.padding([.leading, .trailing], 16)

        }.background(mapSettings.isClearBackground ? .clear : .black)
    }
}

struct MapView: UIViewRepresentable {

    @EnvironmentObject private var mapSettings: MapSettings // <<< HERE

    private var counter = 0
    private var mapRegion = MKCoordinateRegion(center: CLLocationCoordinate2D(latitude: 52.3811, longitude: 4.6373),
                                               span: MKCoordinateSpan(latitudeDelta: 0.003, longitudeDelta: 0.003))

    func makeUIView(context: Context) -> MKMapView {
        let mapView = MKMapView(frame: .zero)
        mapView.region = mapRegion

        return mapView
    }

    func updateUIView(_ uiView: MKMapView, context: Context) {
        updateMapType(uiView)
    }

    private func updateMapType(_ uiView: MKMapView) {
        switch mapSettings.mapType {
        case 0:
            let configuration = MKStandardMapConfiguration(elevationStyle: elevationStyle(), emphasisStyle: emphasisStyle())
            configuration.pointOfInterestFilter = MKPointOfInterestFilter(including: [.atm])
            configuration.pointOfInterestFilter = MKPointOfInterestFilter(excluding: [.bakery])
            configuration.showsTraffic = false
            uiView.preferredConfiguration = MKStandardMapConfiguration(elevationStyle: elevationStyle(), emphasisStyle: emphasisStyle()) // the flat visualization of map
        case 1:
            uiView.preferredConfiguration = MKHybridMapConfiguration(elevationStyle: elevationStyle())// this uses satelite images and road names, can se the globe in realistic
        case 2:
            uiView.preferredConfiguration = MKImageryMapConfiguration(elevationStyle: elevationStyle()) //flat - just images dont see the globe, realistic 3D realistic building can see the globe
        default:
            break
        }

    }

    private func elevationStyle() -> MKMapConfiguration.ElevationStyle {
        if mapSettings.showElevation == 0 {
            return MKMapConfiguration.ElevationStyle.realistic
        } else {
            return MKMapConfiguration.ElevationStyle.flat
        }
    }

    private func emphasisStyle() -> MKStandardMapConfiguration.EmphasisStyle {
        if mapSettings.showEmphasisStyle == 0 {
            return MKStandardMapConfiguration.EmphasisStyle.default
        } else {
            return MKStandardMapConfiguration.EmphasisStyle.muted // muted shows grayed streets and buildings - need to test this
        }
    }
}
And now let’s test the Instrument again to see if we are still redrawing the body of MapTab.
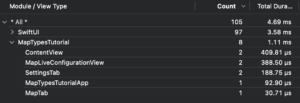
And that’s it! We are now evaluating only the body of three views.
Main Takeouts
After all of these explorations, I take some lessons with me in this new SwiftUI world.
- Be careful using the @ObservedObject in all your views, use it only when it is needed.
- It is not because is working that your code is optimal.
- While working with SwiftUI check what views are redrawing with Instruments and if all your redraws are intended.
And I think that’s it for today!
Further Studying
If you like this in Instrument exploration you also may find it interesting, how to improve your API using opaque types. Is really eye-opening how powerful and expressive Swift can be with its features it is like inverted generic logic, instead of the caller saying what type will return, is the callee that decides that!
Sooner or later you will have to add a timer to your application, and would be nice to have a reference to all timer types in iOS right? You can find all of them here, including timers with the Combine framework.
Summary – Exploring SwiftUI Redraw View Behaviour
I would love to know how can we improve this further. If you have any idea on how to improve this code and redraw even fewer views, just reach out. Today we used the Instruments to know how our simple app was evaluated by SwiftUI view redraw. We learned that @ObservedObject will always invalidate the view if one of the properties changes even if the properties are not used in that specific view.
Fellow developers, that’s all. I hope you liked reading this article as much as I enjoyed writing it. If you want to support this blog you can Buy Me a Coffee or just leave a comment saying hello. You can also sponsor posts and I’m open to freelance writing! You can reach me on LinkedIn or Twitter and send me an e-mail through the contact page.
Thanks for the reading and… That’s all folks.
Image Credit: Wikiart


