
Hallo wandelaars en hardlopers, Leo hier. Today we will make a really fun project exploring all the new MapKit configurations with SwiftUI.
I’m loving learning SwiftUI and although I’m really new to it, I can see why so many people love this framework. The speed and the expressiveness that you can achieve with a few lines of code are impressive.
While studying for this week’s article I had a little bump in the SwiftUI road. The new MapKit configuration is not available for the SwiftUI Map API. That’s a boomer, would be 100 times easier if the new configuration API was available for SwiftUI out of the box and we didn’t have to fall back to the UIViewRepresentable bridge. Anyway, it’s a life that is not a showstopper for us making this in SwiftUI and the goal here is to learn, and that is what we are going to do.
If you are using the old MapKit map type API, the MKMapTYpe, know that this is deprecated from iOS 16 and above. So be careful using that in new projects and would be interesting making a plan to migrate to the new APIs described in this article. You will learn all the different new MapKit configurations using SwiftUI, and why would you use the MKStandard
Our goal today is to make this 3D map visualization in SwiftUI:
Get a coffee and let’s explore together this new MapKit API. But first…
Painting of The Day
The painting I chose is a 1830 art piece called Chartres Cathedral by Jean-Baptiste-Camille Corot. He was a pivotal figure in landscape painting, Camille Corot was an influential and prolific artist, producing thousands of works during his life, and inspiring a great number of forgeries and copies. He was not especially gifted in art at a young age, he decided to change his career from businessman to artist at the age of 26, and in 1821, began with the study of landscapes. The painter focused on two types of landscapes, historical landscapes, containing legendary creatures, and more real landscapes, mostly of Northern Europe, with faithful renditions of flora and fauna, often mixing the two genres together.
In his travels through Italy to study Renaissance paintings, he was entranced by the light of the countryside, which was to influence his color palette throughout his paintings. Although he was also entranced by the Italian women, he wrote that his goal in life was to be committed to painting, and thus he had no time for marriage.
I chose this painting because the cathedral remembers me the cathedral that I show in the videos in this article.
The Problem
You want to let the users configure how the map is displayed to them within your app.
As we will talk about map configurations, first let’s see what are the configurations. There are three ready-to-use objects you can use to configure Apple Maps the way you want. They are MKStandard
They are all inherits from the MKMap
Let’s start implementing the code.
MKMap
First, create a new SwiftUI project.
Now create the MapSettings.swift file and copy-paste the code below:
import SwiftUI

final class MapSettings: ObservableObject {
    @Published var mapType = 0
    @Published var showElevation = 0
    @Published var showEmphasisStyle = 0
}
This class will be responsible to change the settings of our map.
Create the UIViewRepresentable MapKit Wrapper
Now let’s make our UIViewRepresentable wrapper for the MKMapView. As I said, unfortunately, Apple didn’t make the new configurations for the SwiftUI Map view (or I didn’t find one). We hope that one day that will happen.
Create a MapView.swift new file and copy-paste the code below:
import SwiftUI
import MapKit
import Combine

struct MapView: UIViewRepresentable {

    private var counter = 0
    private var mapRegion = MKCoordinateRegion(center: CLLocationCoordinate2D(latitude: 52.3811, longitude: 4.6373),
                                               span: MKCoordinateSpan(latitudeDelta: 0.003, longitudeDelta: 0.003))
    @EnvironmentObject private var mapSettings: MapSettings

    func makeUIView(context: Context) -> MKMapView {
        let mapView = MKMapView(frame: .zero)
        mapView.region = mapRegion

        return mapView
    }

    func updateUIView(_ uiView: MKMapView, context: Context) {
        updateMapType(uiView)
    }

    private func updateMapType(_ uiView: MKMapView) {
        switch mapSettings.mapType {
        case 0:
            uiView.preferredConfiguration = MKStandardMapConfiguration(elevationStyle: elevationStyle(), emphasisStyle: emphasisStyle())
        case 1:
            uiView.preferredConfiguration = MKHybridMapConfiguration(elevationStyle: elevationStyle())
        case 2:
            uiView.preferredConfiguration = MKImageryMapConfiguration(elevationStyle: elevationStyle())
        default:
            break
        }

    }

    private func elevationStyle() -> MKMapConfiguration.ElevationStyle {
        if mapSettings.showElevation == 0 {
            return MKMapConfiguration.ElevationStyle.realistic
        } else {
            return MKMapConfiguration.ElevationStyle.flat
        }
    }

    private func emphasisStyle() -> MKStandardMapConfiguration.EmphasisStyle {
        if mapSettings.showEmphasisStyle == 0 {
            return MKStandardMapConfiguration.EmphasisStyle.default
        } else {
            return MKStandardMapConfiguration.EmphasisStyle.muted
        }
    }
}
This wrapper has some interesting things. The first one is using environmentObject to get changes from the settings. This is very useful because we don’t have to take care ourselves of synchronizing the settings state between the views, SwiftUI takes care of that for you using the environment object.
Observe that the updateUIView function is called every time the SwiftUI knows that an object that could affect the MapView changes, in our case is the mapSettings obsevableObject. This way we can keep that view up to date just by calling our updateMapType function.
In the updateMapType function, you can see that depending on the selected map type, we will set a different map configuration. Each map configuration has its own parameters and we will change the parameters accordingly with the mapSettings object.
Here you can see a lot of new configurations. You can observe that MKStandardMapConfiguration can be used with two parameters: the elevationStyle and the emphasisStyle. But what is elevation style? And what is the emphasis style in MapKit?
MapKit: Elevation Style and Emphasis Style
The Elevation Style only works in MKHybrid
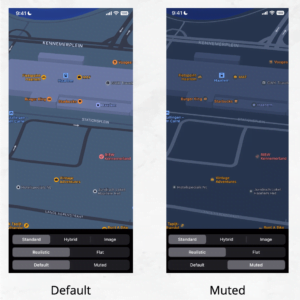
The Emphasis Style only works in the MKStandardMapConfiguration and it changes the emphasis of the streets and the buildings. In practical terms, it makes the color difference between streets, types of streets, and buildings more discreet. If the Emphasis Style is Muted you also can not see the street’s directions.
You can notice the difference in the Emphasis Style in the image below:
The next step is to finish the example using the MapView and the MapSettings that we created in a SwiftUI view.
Create SwiftUI to test new Map Configurations
To create the SwiftUI view, we will use a bunch of pickers so you can see live differences between configurations and our MapView. In the ContentView.swift copy-paste the code below:
import SwiftUI

struct ContentView: View {

    @ObservedObject var mapSettings = MapSettings()
    @State var mapType = 0
    @State var showElevation = 0
    @State var showEmphasis = 0

    var body: some View {
        ZStack {

            MapView()
                .edgesIgnoringSafeArea(.all).environmentObject(mapSettings)

        }.overlay(alignment: .bottom) {

            VStack {
                Picker("Map Type", selection: $mapType) {
                    Text("Standard").tag(0)
                    Text("Hybrid").tag(1)
                    Text("Image").tag(2)
                }.pickerStyle(SegmentedPickerStyle())
                    .onChange(of: mapType) { newValue in
                        mapSettings.mapType = newValue
                    }.padding([.top, .leading, .trailing], 16)

                Picker("Map Elevation", selection: $showElevation) {
                    Text("Realistic").tag(0)
                    Text("Flat").tag(1)
                }.pickerStyle(SegmentedPickerStyle())
                    .onChange(of: showElevation) { newValue in
                        mapSettings.showElevation = newValue
                    }.padding([.leading, .trailing], 16)

                Picker("Map Elevation", selection: $showEmphasis) {
                    Text("Default").tag(0)
                    Text("Muted").tag(1)
                }.pickerStyle(SegmentedPickerStyle())
                    .onChange(of: showEmphasis) { newValue in
                        mapSettings.showEmphasisStyle = newValue
                    }.padding([.leading, .trailing], 16)

            }.background(.black)
        }
    }
}
And now we just need to test everything to make sure all work!
Run your app and you should see this screen:
Let’s play with the results.
MKStandard
The video below shows all the configurations for MKStandard
As you can see, realistic and Flat properties don’t change the map. Because the standard map is the flattest basic map. It represents the default iOS map, which is a street map that depicts the position of all roads and road names.
MKImagery
This is a really cool configuration. It shows all the satellite data pictures from a place and you can also have a grasp of the 3D landscape of a map. Check the video below:
The imagery was a cool addition to iOS. You can out of the box create cool 3D effects with it. As you can see in the video above, the realistic mode is a 3D view of your map and the flat is just the satellite pictures. Note also that you don’t have street names and points of interest in this mode.
MKHybrid
The Hybrid map configuration as the name suggests is a mix of standard configuration and the imagery configuration. Check the video below:
You have the cool 3D effect that you also have in the image, at the same time you don’t lose the street names and interest points. Really cool, isn’t it?
More Map Configuration Options – Show Traffic and Filter Interest Points
If that is enabled in the map region you could also set if the traffic is shown on the map or not. To do that just put the configuration object into a variable and set the show traffic preference. Is good to know that this property is only available to MKStandardMapConfiguration and MKHybridMapConfiguration.
let configuration = MKStandardMapConfiguration(elevationStyle: elevationStyle(), emphasisStyle: emphasisStyle())
configuration.showsTraffic = false // or true, whatever you need
And you can add or remove interest points from the map using the MKPointOfInterestFilter. To do that you just create a new filter with the interest points you want to add or exclude and add it to your configuration. This property is only available to MKStandardMapConfiguration and MKHybridMapConfiguration. For example, if you want to exclude all bakeries on your map but include all ATMs you could do something like this:
let configuration = MKStandardMapConfiguration(elevationStyle: elevationStyle(), emphasisStyle: emphasisStyle())
configuration.pointOfInterestFilter = MKPointOfInterestFilter(including: [.atm])
configuration.pointOfInterestFilter = MKPointOfInterestFilter(excluding: [.bakery])
And that’s it!
Continue Studying
If you are eager to learn more about MapKit, you can check this article about removing the default user location callout bubble annotation. You will learn how to intercept the creation of that annotation and return nothing if is the current user location.
Animations are a great way to give life to your apps and we can mix animations and MapKit. You can learn how to create an animated delivery person in MapKit. This way you can add to your apps the functionality that all delivery apps have when you order your food from them, that is you can follow the delivery person until reaching their destination.
Summary – New MapKit Configurations with SwiftUI
Today we could check how to use the new MapKit configurations using SwiftUI. We studied how to implement MKStandardMapConfiguration, MKHybridMapConfiguration, and MKImageryMapConfiguration objects and we provided visual live video examples of each configuration. You could also learn what is the show traffic property and filter point of interest on your maps.
We also give an example of how to use UIKit maps in your SwiftUI code and communicate changes with it using environmentObjects. You can download the whole project in my github repo.
That’s all my people, I hope you liked reading this article as much as I enjoyed writing it. If you want to support this blog you can Buy Me a Coffee or leave a comment saying hello. If you like the content and need to create marketing awareness for thousands of iOS developers you can sponsor this blog. You can reach me on LinkedIn, or Twitter, or send me an e-mail through the contact page.
Thanks for reading and… That’s all folks.
Credits:


