Hallo alle mensen, Leo Hier. This week’s article is about using decorator pattern to add architectural non-intrusive analytics in Swift.
Today we will talk about a little more advanced architecture topic. We will discuss cohesion and coupling while we will walk through all the solutions. The most important lesson today is that we will apply the Separation of Concerns (SoC) principle into our architecture.
When we all start coding it’s pretty common to put everything in one place. When the young developer starts to gain experience, and learn that it’s important to separate concerns, therefore the code is easier to test and maintain. Also is important to split things logically because you increase the readability of your code and when you do that your future you or your future colleagues will be grateful.
We will not cover method swizzling magic here, and yes is another way to add non-intrusive analytics to your app. But be aware that can also lead to undesired and unpredictable behaviors of your app. Be careful.
Let’s begin with this architectural journey through SoC and decorator pattern.
But first… the painting.
Painting of The Day
This is an art piece by the master Vincent Van Gogh, called Bridge and Houses on the Corner of Herengracht-Prinsessegracht.
Van Gogh is generally considered the greatest after Rembrandt, and one of the greatest of the Post-Impressionists. The striking color, emphatic brushwork, and contoured forms of his work powerfully influenced the current of Expressionism in modern art.
I chose this work because I love the architecture where I live now. It’s so nice to walk around the neighborhood and see beautiful houses with great architectural coherence.
The Problem – Decorator Pattern to Add Architectural Non-Intrusive Analytics in Swift
You want that your architecture sends some analytics data but don’t want that to change the behavior of pre-existing structures.
So you start your Monday and your Product Owner starts the daily meeting saying: “I want to have analytics data on all of our login”. Your brain doesn’t even let him/her finish the thought train and start to think about how can you add analytics to your project.
Today we will start with a very very basic structure, and we will evolve to a more intricate one with each step. Disclaimer: This is not a final solution for every problem, everything can and should be adapted for your context and needs. Take it as food for thought.
Implementations – Code Example
We will start with how basic implementations occur.
Implementation Level 1 – The massive View Controller
As said before when we start our developers’ life, we tend to put everything in the same place. It’s not unusual to have this kind of class:
class HomeViewController {

    // all views configurations

    // all class configurations

    // hundreds (even thousands) of lines of code

    func doLogin(username: String, psw: String) {
        // do all analytics part here
        // do all the async login logic here
    }
}
The architecture design is this:
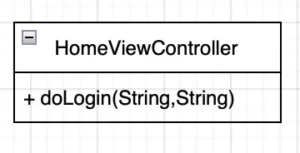
As you can see the HomeViewController is doing too much. It is solely responsible for: Creating the views, configuring the views on the screen, managing the views lifecycle, doing the login, and doing the analytics and I’m sure that you know how extensive this list can become.
You get the point.
And then it’s amazing because all this code works. The Swift compiler doesn’t care if it’s everything in one place. Although I’ve already heard a story that a guy who put more than 10k lines of code in a view controller and the Xcode didn’t open it anymore without crashing and he had to open that file in another source editor. Lol.
In short, you should always look up things that start to become giant in your source code. This is always a smell that you could refactor into smaller and easier pieces to maintain. As a rule of thumb if you have a function that is bigger than your screen maybe it’s time to break it into smaller functions. Of course, take it into account if you have a giant screen or a very small font in your Xcode but you get the idea.
The first refactor will extract the code from the ViewController. Let’s do that.
Implementation Level 2 – Splitting into Logic Layer and UI Layer
Now we start to separate the concerns. Here is a good place to talk about that design principle. Let’s start with a wiki’s definition:
In computer science, separation of concerns (SoC) is a design principle for separating a computer program into distinct sections. Each section addresses a separate concern, a set of information that affects the code of a computer program.
This technique results in more freedom degrees for some aspects of our app’s design and maintainability. When concerns are well-separated, there are more opportunities for module upgrades, reuse, and independent development.
Hiding the implementation details of modules behind a protocol enables improving or modifying a single concern’s section of code without having to know the details of other sections and without having to make corresponding changes to those other sections.
The disadvantage is that when our interfaces change, we have to change everything that depends on it, but this is something we already have to do without the protocol communication.
So now our code looks like this:
class HomeViewController {

    let homeViewModel: HomeViewModel = HomeViewModel()

    func doLogin(username: String, psw: String) {
        // analytics logic here
        homeViewModel.doLogin(username: username, psw: psw) { result in
            // analytics logic here
            print("The login of \(username) was : \(result ? "successful" : "failed")")
        }
    }
}

class HomeViewModel {
    func doLogin(username: String, psw: String, completion: @escaping (Bool) -> Void) {
        // all the rest of the logic to login or not a user

        let loginResult = Bool.random()
        completion(loginResult)
    }
}
Now our design looks like this:

Way better right? Yes of course it’s better. But it could be improved. Remember the separation of concerns principle? Well, if we want to apply it we have to do two things.
One makes all the communication with other modules through a common protocol and the other one is to enable the HomeViewController to receive all its external dependencies.
Let’s do it.
protocol HomeViewModelService {
    func doLogin(username: String, psw: String, completion: @escaping (Bool) -> Void)
}

class HomeViewController {

    let homeViewModelService: HomeViewModelService

    init(homeViewModelService: HomeViewModelService) {
        self.homeViewModelService = homeViewModelService
    }

    func doLogin(username: String, psw: String) {
        homeViewModelService.doLogin(username: username, psw: psw) { result in
            print("The login of \(username) was : \(result ? "successful" : "failed")")
        }
    }
}

class HomeViewModel: HomeViewModelService {
    func doLogin(username: String, psw: String, completion: @escaping (Bool) -> Void) {
        // all the rest of the logic to login or not a user

        let loginResult = Bool.random()
        completion(loginResult)
    }
}
Now the architecture looks like this:
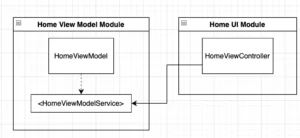
Our architecture is now starting to be flexible. We have decoupled the login logic from the UI Logic. Almost every architecture out there has at least those two layers of separation of concerns.
The advantages are: if/when the logic changes you don’t have to change UI code. In the same way, if the UI changes you don’t have to change the application logic code.
Meanwhile, the most notable feature that you get injecting all the external resources through initializers is the easy Unit Test capabilities. Now if you want to unit test even the HomeViewController you can do it easily just by creating a stub object of its initializer protocols. This is the subject of other posts.
Let’s continue to evolve our architecture.
Implementation Level 3 – Adding a service layer
Although we already achieved an interesting level of architecture in the UI layer, by injecting all the external dependencies into the `HomeViewController` we can go even further.
If you check the HomeViewModel now it has to know how to log in as a user. This is not very good for the rest of our app. Imagine that other modules of the app also have to know how to log in to a user.
This is why we will now separate the login logic from the HomeViewModel. The strategy will be the same we used in the HomeViewController, we will create and inject all the new external dependencies through protocols. First, we will create the LoginService protocol and a struct to conform to it.
See the code below:
protocol LoginService {
    func doLogin(username: String, psw: String, completion: @escaping (Bool) -> Void)
}

struct LoginServiceImpl: LoginService {

    func doLogin(username: String, psw: String, completion: @escaping (Bool) -> Void) {
        // all the rest of the logic to login or not a user

        let loginResult = Bool.random()
        completion(loginResult)
    }
}
Now adapt your HomeViewModel to the new LoginService:
struct HomeViewModel: HomeViewModelService {

    let loginService: LoginService

    init(loginService: LoginService) {
        self.loginService = loginService
    }

    func doLogin(username: String, psw: String, completion: @escaping (Bool) -> Void) {
        loginService.doLogin(username: username, psw: psw, completion: completion)
    }
}
At this point you can already test your architecture using:
let loginService = LoginServiceImpl()

let homeViewModel = HomeViewModel(loginService: loginService)

let homeViewController = HomeViewController(homeViewModelService: homeViewModel)

homeViewController.doLogin(username: "Pepijn", psw: "123456")
Resulting in:

The result is random so it’s not relevant for our study today.
Now the app architecture looks like this:

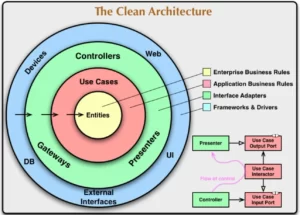
So far it’s ok. See how the arrows just point to the inner layers, no dependencies are going up. This is what clean architecture looks like. The outside layer just knows one layer below it. As described in this brilliant post.
Although we created a problem. To build the `HomeViewController` the composition root of it should know the login service, the HomeViewModelService, and the HomeViewController. This is not very nice to handle architecture and could become a problem in the future. And if we draw the composition root of our architecture now, it turns out to be like this:
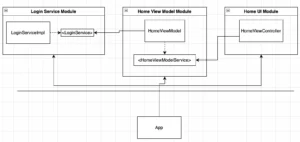
We will not attack this problem today, but for sure in a future post, we will talk about how to clean the composition root. But be aware that this is also a problem to be solved.
Now let’s add start to solve the problem statement.
Implementation Level 4 – Where do we put the Analytics?
Now we have that sweet three layers of architecture. We now have to answer the question to the problem. How will we add analytics into this architecture?
Let’s think about all the layers:
We have the UI Layer:
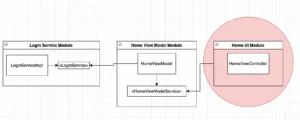
If we put the analytics there we could respond to each user interaction and the response from the server. Is this true? We don’t know. Because the UI Layer only talks with the ViewModel layer it doesn’t know if the view model is using a real login or a fake offline login. Also, we don’t know if the error messages were mapped to something else. Finally, if we add here we are coupling UI Logic to analytics logic, and this is not wanted, right? Remember the separation of concerns.
Next, we have the View Model Layer:
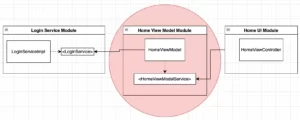
This class is responsible to have all the data that is crucial for the UI Layer to build. It can map a type to another type, can orchestrate a lot of services, can check caches, implement Location Services or DataSources, etc.
If we add the analytics here, it will be another responsibility for this class. Should this class be responsible to provide all the view data and also the analytics? It can be. Although is not the best solution for our case you can use this layer to log analytics. But if you use this layer know that you will be coupling the view state with login analytics, and doesn’t sound beautiful right?
And finally, we have the Service Layer:
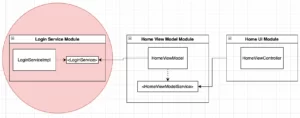
The `LoginService` is responsible to have the logic to log in to the user. Having the analytics here implies that everything within the app would be logged. If/when other modules start to use this service module, we will have a side effect that they also will be logged. And this is not a good architectural trait. Remember: all of our architectural decisions have side effects, the difference between a good and a bad side effect is how easy to maintain/handle the feature. So as we don’t want that undesired side effects we will discard and put the analytics logic there.
The “Final” Solution to Decorator Pattern to Add Architectural non-intrusive analytics in Swift
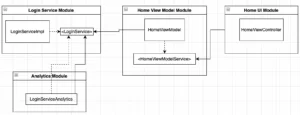
Using decorator patterns you can solve this problem in a non-intrusive way. While you keep the maintainability and flexibility of your code, you will add analytics only in the calls from the HomeViewModel.
To use the decorator pattern you just need to create a struct that conforms to the LoginService protocol and you can decorate it with your logging functions.
For example:
struct LoginServiceAnalytics: LoginService {
    var isUserLoginValid: Bool = false
    let loginService: LoginService

    func doLogin(username: String, psw: String, completion: @escaping (Bool) -> Void) {
        log(text: "[\(username)] User login attempt")
        loginService.doLogin(username: username, psw: psw) { loginResult in
            log(text: "[\(loginResult) was the result of the login]")
            completion(loginResult)
        }
    }

    func log(text: String) {
        // this could be any logging provider ( just imagine a login provider here)
        print("\(Date()) - \(text)")
    }
}
This will be our Analytics Service. It will go in the service layer because it just needs to know the LoginService.
The final architecture draw is this:
Full Code Example
And the full code of how you can use Decorator Pattern to Add Architectural non-intrusive analytics in Swift can be found below, copy and paste it to your Playgrounds and have fun!
protocol LoginService {
    func doLogin(username: String, psw: String, completion: @escaping (Bool) -> Void)
}

protocol HomeViewModelService {
    func doLogin(username: String, psw: String, completion: @escaping (Bool) -> Void)
}

class HomeViewController {

    let homeViewModelService: HomeViewModelService

    init(homeViewModelService: HomeViewModelService) {
        self.homeViewModelService = homeViewModelService
    }

    func doLogin(username: String, psw: String) {
        homeViewModelService.doLogin(username: username, psw: psw) { result in
            print("The login of \(username) was : \(result ? "successful" : "failed")")
        }
    }
}

struct HomeViewModel: HomeViewModelService {

    let loginService: LoginService

    init(loginService: LoginService) {
        self.loginService = loginService
    }

    func doLogin(username: String, psw: String, completion: @escaping (Bool) -> Void) {
        loginService.doLogin(username: username, psw: psw, completion: completion)
    }
}

struct LoginServiceImpl: LoginService {

    func doLogin(username: String, psw: String, completion: @escaping (Bool) -> Void) {
        // all the rest of the logic to login or not a user

        let loginResult = Bool.random()
        completion(loginResult)
    }
}

struct LoginServiceAnalytics: LoginService {
    var isUserLoginValid: Bool = false
    let loginService: LoginService

    func doLogin(username: String, psw: String, completion: @escaping (Bool) -> Void) {
        log(text: "[\(username)] User login attempt")
        loginService.doLogin(username: username, psw: psw) { loginResult in
            log(text: "[\(loginResult) was the result of the login]")
            completion(loginResult)
        }
    }

    func log(text: String) {
        // this could be any logging provider ( just imagine a login provider here)
        print("\(Date()) - \(text)")
    }
}

let loginService = LoginServiceImpl()
let loginServiceAnalytics = LoginServiceAnalytics(loginService: loginService)
//
let homeViewModel = HomeViewModel(loginService: loginService)
let homeViewModel2 = HomeViewModel(loginService: loginServiceAnalytics)

let homeViewController = HomeViewController(homeViewModelService: homeViewModel)
let homeViewController2 = HomeViewController(homeViewModelService: homeViewModel2)

homeViewController.doLogin(username: "Ana", psw: "123456")
print("\n\n")
homeViewController2.doLogin(username: "Mike", psw: "123456")
With the final result of:

And that’s it! Did you realize how easy it was to add an analytics layer since our architecture was hard to change and was very welcome to new features? All because we used protocol-oriented programming and one design pattern. How great this was?
Continue Studying
To continue studying architecture I would recommend you to read the chain of responsibility pattern that Apple uses extensively in our API and frameworks. The UIKit is entirely based on that to handle touches for example.
Also, you can read about how to use the coordinator pattern with tab bars. This is a very interesting topic because you have to deal with various UINavigation stacks at once and still deal with abstracting everything from your views.
Summary – Decorator Pattern to Add Architectural non-intrusive analytics in Swift
Today we explored how you can use a clean architecture with a design pattern to solve an analytics problem. This post used a very basic architecture and we evolved into a more clean sophisticated one. I hope this helps everyone to see the importance of using known patterns and protocols to make your and your developer colleagues easier.
That’s all my people, I hope you liked reading this article as much as I enjoyed writing it. If you want to support this blog you can Buy Me a Coffee or leave a comment saying hello. You can also sponsor posts and I’m open to freelance writing! You can reach me on LinkedIn or Twitter and send me an e-mail through the contact page.
Thanks for reading and… That’s all folks.
Credits:


