Hello ladies and gentlemen, Leo here. The day has come and we will talk about Coordinators and Tab Bars in Swift and how they can greatly work together.
This will be a very long and interesting(I hope) post because the subject today is… Architecture, more specifically coordinator pattern. The coordinator pattern comes to help the situation where you need to decouple the flow of your app from your view controllers. This seems awkward at first because the view controller needs to how what to call, e.g. you have a Home screen that needs to go to the Cart screen this way the Home screen needs to know what to call but it doesn’t need to know HOW to call, and there is when the coordinator comes handy.
This article will solve a very very specific problem that we had and maybe this could be used by others. The problem involves tab bars, coordinators, and deep navigation between those. And a little disclaimer is needed: this isn’t intended to be a final solution or the best/most abstraction of this pattern, this is only something that solved a problem we had, and it will always be working in progress like everything in programming (well at least not the @frozen swift’s APIs ones).
Use this post as inspiration for your future architectures and it’s ALL open to debate.
That said…
The Painting
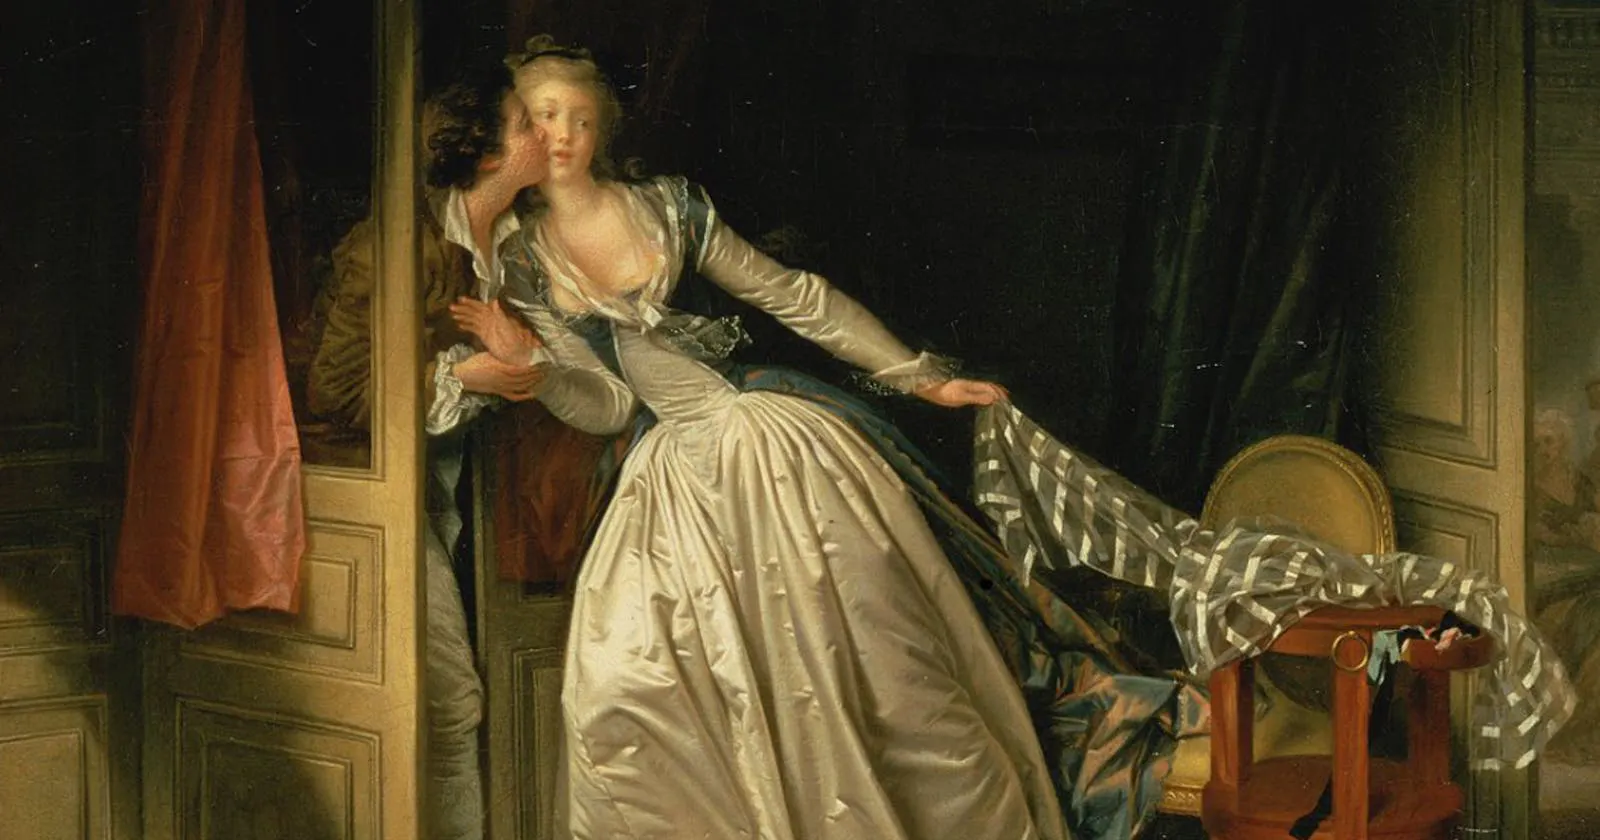
The painting chosen to be represent this is The Stole Kiss (1788) from Jean-Honore Fragonard. This painting represents two things, the lovers on the left kissing in the backstage and the public social party on the right. Your ViewControllers never know what coordinators do behind the scenes, don’t they?
So let’s code!
Problem – Coordinators and Tab Bars: A Love Story
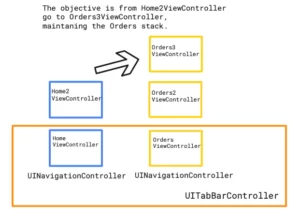
Imagine that you have a tab bar with two tabs and each tab is a navigation controller. The Home Tab has 2 levels deep and the Orders Tab has 3 levels deep. The problem is to navigate from the second level deep view controller of home Tab to the 3 level deep Orders tab maintaining the hierarchical sequence of orders tab, this means that the return button should return to level 2 of level tab and so on.
First of all, to visualize better the problem we are trying to solve look at the picture below:

To solve this problem we will use coordinators with child coordinators. An important disclaimer is that we won’t be implementing the full strict sense of coordinators, if you want a deep dive into them just check this awesome blog post from the coordinator inventor and you will understand where we found inspiration to do our coordinators.
Coordinators were idealised back in 2015 and it’s a brilliant idea. And you can imagine them as glorified delegates that the view controller use to delegate its navigation flow. The advantages of this approach are: reusable view controllers because with coordinators there’s no link between view controllers anymore, isolated view controllers that gives you more freedom to rearrange them in your app’s flow, and you are in full control of your app’s flow this means that you can easily plug-and-play view controllers to build new flows easily.
It’s easy to buy into the idea of using coordinator in your app. But how they look like? Our version is a very very simplified one but you can go full complex on coordinators adding the router pattern to it to like this lib. It’s not our case.
The Architecture – Coordinators and Tab Bars
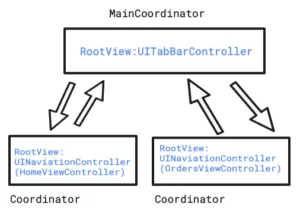
Our parent and child coordinator will look like this:

Every child will have a reference to the parent coordinator and the parent has a reference to the child. This is important because we need the capability to navigate between app flows. By the way, the concept of app flow is important here. We will have in the main coordinator a func that will be responsible to change the flow so we can navigate easily between tabs.
The first piece of our *Coordinators Fiesta* is the Coordinator itself:
protocol FlowCoordinator: AnyObject {
    var parentCoordinator: MainBaseCoordinator? { get set }
}

protocol Coordinator: FlowCoordinator {
    var rootViewController: UIViewController { get set }
    func start() -> UIViewController
    @discardableResult func resetToRoot() -> Self
}
Here we separate the coordinator from its parent because this way we have the possibility to create flows that don’t involve a viewController on its own. For example, we can have a DeepLinkCoordinator that only inherits the parentCoordinator and uses other available coordinators to make it flows, like an orchestrator pattern. The discardableResult and the Self will be discussed later on this post.
Above you can see every coordinator has: a parentCoordinator, its own ViewController, a function called Start that returns a ViewController, and a function called resetToRoot to be possible to manipule the state of the coordinator flow outside of it.
All the protocols we will create will follow the rule: the protocol name will contain Base and the concrete type won’t. So the MainCoordinator is the concrete type of MainBaseCoordinator.
The following architecture types we will observe are the MainBaseCoordinator, the HomeBaseCoordinated, and the OrdersBaseCoordinated. Let’s check them out:
protocol MainBaseCoordinator: Coordinator {
    var homeCoordinator: HomeBaseCoordinator { get }
    var ordersCoordinator: OrdersBaseCoordinator { get }
    var deepLinkCoordinator: DeepLinkBaseCoordinator { get }
    func moveTo(flow: AppFlow)
    func handleDeepLink(text: String)
}

protocol HomeBaseCoordinator: Coordinator {
    func goToHome2ScreenWith(title: String)
    func goToFavoritesFlow()
    func goToDeepViewInFavoriteTab()
}

protocol OrdersBaseCoordinator: Coordinator {
    @discardableResult func goToOrder2Screen(animated: Bool ) -> Self
    @discardableResult func goToOrder3Screen(animated: Bool) -> Self
}
Here is where the magic begins to unveil. All these coordinators have a function to work together to make it possible to go to any screen from anywhere. As the HomeBaseCoordinator and the OrdersBaseCoordinator have access to the MainBaseCoordinator via the Coordinator protocol, we can switch flows anytime we want.
And the last piece of the architecture is the HomeBaseCoordinated and OrdersBaseCoordinated protocols. Those are very important pieces because they tell the ViewController implementing them what flow they belong to. So every time we add a new UIViewController to the app, we can assign one of those to guarantee that our flows are cohesive. The code below is the declarations:
protocol HomeBaseCoordinated {
    var coordinator: HomeBaseCoordinator? { get }
}

protocol OrdersBaseCoordinated {
    var coordinator: OrdersBaseCoordinator? { get }
}
This finishes all the protocols we need to work as protocol oriented as we can with this coordination approach. And now we’ll start to implement all theirs concrete types so don’t worry I won’t let you hanging there alone with a bunch of protocols. The whole project is on GitHub if you want to rush things up but I think you will miss the fun parts.
Gonna conform to them’all : The Support Files
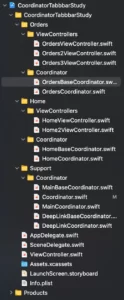
The final project structure will look like this:

First, remove the main.storyboard file and all references to it from the info.plist file. We will work with view code in this example. To fast remove just go to info.plist and use the “command+f” shortcut to open find and search for Main, it will find the two occurrences, and just click in the minus sign of it.
Now let’s prepare the SceneDelegate to receive the MainCoordinator.start(), and it will be very very simple.
func scene(_ scene: UIScene, willConnectTo session: UISceneSession, options connectionOptions: UIScene.ConnectionOptions) {

    guard let windowScene = (scene as? UIWindowScene) else { return }

    window = UIWindow(windowScene: windowScene)
    window?.rootViewController = MainCoordinator().start()
    window?.makeKeyAndVisible()
}
That’s all we need to start our application flow. The beauty of this is that we can change all the applications without even touch in the SceneDelegate. Great isn’t it?
Let’s create all the Support files:
Create a MainCoordinator.swift file and copy-paste this:
protocol MainBaseCoordinator: Coordinator {
    var homeCoordinator: HomeBaseCoordinator { get }
    var ordersCoordinator: OrdersBaseCoordinator { get }
    var deepLinkCoordinator: DeepLinkBaseCoordinator { get }
    func moveTo(flow: AppFlow)
    func handleDeepLink(text: String)
}

protocol HomeBaseCoordinated {
    var coordinator: HomeBaseCoordinator? { get }
}

protocol OrdersBaseCoordinated {
    var coordinator: OrdersBaseCoordinator? { get }

}
Create a Coordinator.swift file and copy/paste this:
protocol FlowCoordinator: AnyObject {
    var parentCoordinator: MainBaseCoordinator? { get set }
}

protocol Coordinator: FlowCoordinator {
    var rootViewController: UIViewController { get set }
    func start() -> UIViewController
    @discardableResult func resetToRoot() -> Self
}

extension Coordinator {
    var navigationRootViewController: UINavigationController? {
        get {
            (rootViewController as? UINavigationController)
        }
    }

    func resetToRoot() -> Self {
        navigationRootViewController?.popToRootViewController(animated: false)
        return self
    }
}
The extension is just syntax sugar for our coordinators. You don’t need this if you don’t like it. The @discardableResult and the Self is important because we want to be able to construct paths that are very readable to future developers using the API. This approach let us to write: coordinator.resetToRoot().goToCart().goToCheckout() for example.
Create a file called MainCoordinator.swift that will be our first concrete type (yay) and copy/paste this:
enum AppFlow { // Mark 1
    case MostViewed
    case Favorites
}

class MainCoordinator: MainBaseCoordinator { // Mark 2

    var parentCoordinator: MainBaseCoordinator? // Mark 3

    // Mark 4
    lazy var homeCoordinator: HomeBaseCoordinator = HomeCoordinator()
    lazy var ordersCoordinator: OrdersBaseCoordinator = OrdersCoordinator()
    lazy var deepLinkCoordinator: DeepLinkBaseCoordinator = DeepLinkCoordinator(mainBaseCoordinator: self)

    // Mark 5
    lazy var rootViewController: UIViewController = UITabBarController()

    // Mark 6
    func start() -> UIViewController {

        let homeViewController = homeCoordinator.start()
        homeCoordinator.parentCoordinator = self
        homeViewController.tabBarItem = UITabBarItem(title: "Home", image: UIImage(systemName: "homekit"), tag: 0)

        let ordersViewController = ordersCoordinator.start()
        ordersCoordinator.parentCoordinator = self
        ordersViewController.tabBarItem = UITabBarItem(title: "Orders", image: UIImage(systemName: "doc.plaintext"), tag: 1)

        (rootViewController as? UITabBarController)?.viewControllers = [homeViewController,ordersViewController]

        return rootViewController
    }

    // Mark 7
    func moveTo(flow: AppFlow) {
        switch flow {
        case .MostViewed:
            (rootViewController as? UITabBarController)?.selectedIndex = 0
        case .Favorites:
            (rootViewController as? UITabBarController)?.selectedIndex = 1
        }
    }

    // Mark 8
    func handleDeepLink(text: String) {
        deepLinkCoordinator.handleDeeplink(deepLink: text)
    }

    // Mark 9
    func resetToRoot() -> Self {
        homeCoordinator.resetToRoot()
        moveTo(flow: .MostViewed)
        return self
    }
}
Let’s deep dive into this implementation:
- Mark 1 it’s the enum that is used to change to other app flow. This is important because when a child needs to change to another app flow ( in our case to another tab) the child coordinator doesn’t need to know what exactly the other flow is, it only needs to say: Hey let’s go to another flow! And the parent coordinator takes responsibility for it.
- Mark 2 is the declaration of conformance to the MainBaseCoordinator.
- Mark 3 is where we declare the Parent but the main coordinator doesn’t have a parent. It will be always nil. But it has to be there because the MainBaseCoordinator conforms to the Coordinator. Something that we can work better in future evolutions.
- Mark 4 is very important here we declare that the MainCoordinator has child coordinators. And it’s important to have declared there because all the children can use other coordinators via the parent Coordinator. And they are lazy because I want to guarantee that this can be never nil.
- Mark 5 is where we declare the root of all applications the UITabBarController. This is interesting because in the future we can change all the root paths and we will only work inside the start func of the MainCoordinator.
- Mark 6 we start every child coordinator with its own start() function and set them to the TabBar view controllers.
- Mark 7 is the method that I’ve mentioned that all the coordinators can use to change the app flow. It receives an AppFlow enum type and there we can decide what to do with it.
- Mark 8 is just a proof of concept and is interesting because the main coordinator can also handle the deep link string we would receive on AppDelegate just by sending it to a deepLinkCoordinator. Very cool right? 🙂
- Mark 9 is just a overwrite of the resetToRoot, and in this case, has a custom reset. We can call this resetToRoot the default app state in terms of navigation because it is a resetToRoot in the MainCoordinator.
Now just two more files and we are done with the Support Files:
Create a DeepLinkBaseCoordinator.swift and copy/paste this:
protocol DeepLinkBaseCoordinator: FlowCoordinator {
    func handleDeeplink(deepLink: String)
}
If you notice the DeepLinkBaseCoordinator has conformance only to the FlowCoordinator this means that it won’t have a rootViewController for itself. This represents only a navigation flow. This means that it will take advantage of all other flows, to create its own via parentCoordinator property.
And the DeepLinkCoordinator.swift and copy/paste this:
class DeepLinkCoordinator: DeepLinkBaseCoordinator {

    func handleDeeplink(deepLink: String) {
        print(" handle deep link here \(deepLink)")
    }

    var parentCoordinator: MainBaseCoordinator?

    init(mainBaseCoordinator: MainBaseCoordinator) {
        self.parentCoordinator = mainBaseCoordinator
    }
}
Gonna conform to them’all: The View Files
The view files will be separated by flows. First, let’s create the home flow. Create a folder called Home and create other two folders inside it, Coordinator and ViewControllers.
Inside the Coordinator folder creates a file called HomeBaseCoordinator and copy/paste this:
protocol HomeBaseCoordinator: Coordinator {
    func goToHome2ScreenWith(title: String)
    func goToFavoritesFlow()
    func goToDeepViewInFavoriteTab()
}
This is an example of how we can send data to another ViewController. The * goToHome2ScreenWith* function receives a title that will be used on Home2Screen. This is a way to do a command-query separation technique.
Create now a HomeCoordinator.swift that will conform to the protocol above:
import UIKit

class HomeCoordinator: HomeBaseCoordinator {

    var parentCoordinator: MainBaseCoordinator?

    lazy var rootViewController: UIViewController = UIViewController()

    func start() -> UIViewController { // Mark 1
        rootViewController = UINavigationController(rootViewController: HomeViewController(coordinator: self))
        return rootViewController
    }

    func goToHome2ScreenWith(title: String) { // Mark 2
        let home2ViewController = Home2ViewController(coordinator: self)
        home2ViewController.title = title
        navigationRootViewController?.pushViewController(home2ViewController, animated: true)
    }

    func goToFavoritesFlow() { // Mark 3
        parentCoordinator?.moveTo(flow: .Favorites)
    }

    func goToDeepViewInFavoriteTab() { Mark 4
        parentCoordinator?.moveTo(flow: .Favorites)
        DispatchQueue.main.asyncAfter(deadline: .now()+0.1) { [weak self] in
            self?.parentCoordinator?.ordersCoordinator
                .resetToRoot()
                .goToOrder2Screen(animated: false)
                .goToOrder3Screen(animated: false)
        }
    }
}
This is very special, it’s the answer for all this post we need to explain in detail:
- Mark 1 it’s where we create the ViewController and return it to the creator with the coordinator embedded.
- Mark 2 it’s creating a home2ViewController and pushing to the navigationRootViewController that is a UINavigationController. Here we are setting the title in the HomeCoordinator but it would be better set in the init of it. It’s just a PoC.
- Mark 3 enables all the ViewControllers controlled by the HomeCoordinator to move to another flow in the app, in this case, go to another tab.
- Mark 4 is where the magic happens. In this function, we are calling the moveTo of the parent and using all the methods in the OrdersCoordinator to build the stack we want in the flow we want.
Creating HomeViewController
Inside the ViewControllers folder create a file called HomeViewController.swift and copy/paste this:
import UIKit

class HomeViewController: UIViewController, HomeBaseCoordinated {
    var coordinator: HomeBaseCoordinator?

    var goToHome2button: UIButton!

    init(coordinator: HomeBaseCoordinator) {
        super.init(nibName: nil, bundle: nil)
        self.coordinator = coordinator
        title = "Home"
    }

    required init?(coder: NSCoder) {
        fatalError("init(coder:) has not been implemented")
    }

    override func viewDidLoad() {
        super.viewDidLoad()
        view.backgroundColor = .red

        configureButton()
    }

    private func configureButton() {
        goToHome2button = UIButton()
        view.addSubview(goToHome2button)
        goToHome2button.translatesAutoresizingMaskIntoConstraints = false

        goToHome2button.setTitle(" Go to Next Screen ", for: .normal)
        goToHome2button.layer.borderColor = UIColor.black.cgColor
        goToHome2button.layer.borderWidth = 2
        goToHome2button.backgroundColor = .black
        goToHome2button.addTarget(self, action: #selector(goToHome2), for: .touchUpInside)

        NSLayoutConstraint.activate([
            goToHome2button.centerXAnchor.constraint(equalTo: view.centerXAnchor),
            goToHome2button.centerYAnchor.constraint(equalTo: view.centerYAnchor)
        ])
    }

    @objc private func goToHome2() { // Mark 1
        coordinator?.goToHome2ScreenWith(title: "Top Title")
    }
}
The only remarkable thing here is that we are using the coordinator in the function goToHome2 to abstract the next screen at Mark 1. This makes our ViewController totally isolated from the app navigation logic. Very neat and clean.
Create a Home2ViewController.swift and copy/paste the following:
import UIKit

class Home2ViewController: UIViewController, HomeBaseCoordinated {
    var coordinator: HomeBaseCoordinator?

    var goToFavoriteButton: UIButton!
    var goToFavoriteDeepViewButton: UIButton!

    init(coordinator: HomeBaseCoordinator) {
        super.init(nibName: nil, bundle: nil)
        self.coordinator = coordinator
        title = "Home 2"
    }

    required init?(coder: NSCoder) {
        fatalError("init(coder:) has not been implemented")
    }

    override func viewDidLoad() {
        super.viewDidLoad()
        view.backgroundColor = .systemOrange

        configureButtonGoToFavorite()
        configureGoToFavoriteDeepViewButton()
    }

    private func configureButtonGoToFavorite() {
        goToFavoriteButton = UIButton()
        view.addSubview(goToFavoriteButton)
        goToFavoriteButton.translatesAutoresizingMaskIntoConstraints = false

        goToFavoriteButton.setTitle(" Go to favorite tab ", for: .normal)
        goToFavoriteButton.layer.borderColor = UIColor.black.cgColor
        goToFavoriteButton.layer.borderWidth = 2
        goToFavoriteButton.backgroundColor = .black
        goToFavoriteButton.addTarget(self, action: #selector(goToFavoriteTab), for: .touchUpInside)

        NSLayoutConstraint.activate([
            goToFavoriteButton.centerXAnchor.constraint(equalTo: view.centerXAnchor),
            goToFavoriteButton.centerYAnchor.constraint(equalTo: view.centerYAnchor)
        ])
    }

    private func configureGoToFavoriteDeepViewButton() {
        goToFavoriteDeepViewButton = UIButton()
        view.addSubview(goToFavoriteDeepViewButton)
        goToFavoriteDeepViewButton.translatesAutoresizingMaskIntoConstraints = false

        goToFavoriteDeepViewButton.setTitle(" Go to deep view in favorite tab ", for: .normal)
        goToFavoriteDeepViewButton.layer.borderColor = UIColor.black.cgColor
        goToFavoriteDeepViewButton.layer.borderWidth = 2
        goToFavoriteDeepViewButton.backgroundColor = .red
        goToFavoriteDeepViewButton.addTarget(self, action: #selector(goToDeepViewInFavoriteTab), for: .touchUpInside)

        NSLayoutConstraint.activate([
            goToFavoriteDeepViewButton.topAnchor.constraint(equalTo: goToFavoriteButton.bottomAnchor, constant: 20),
            goToFavoriteDeepViewButton.centerXAnchor.constraint(equalTo: view.centerXAnchor)
        ])
    }

    @objc private func goToFavoriteTab() { //Mark 1
        coordinator?.parentCoordinator?.moveTo(flow: .Favorites)
    }

    @objc private func goToDeepViewInFavoriteTab() { // Mark 2
        coordinator?.goToDeepViewInFavoriteTab()
    }
}
Here we are calling in Mark 1 the parentCoordinator directly. This is just an option because you can create a function inside the HomeCoordinator that encapsulates this behavior, but as the Coordinator protocol has a parentCoordinator, we can access this directly. No wrong answers here. And in Mark 2 we are doing all that stuff described in the HomeCoordinator that we need to do to change tabs and create/show the new flow state.
We will start now creating the other tab (Orders) views. Let’s create the order flow. Create another folder in the root of the project called Orders and create another two folders inside it, Coordinator and ViewControllers.
Inside Orders-> Coordinator folder create a file called OrdersBaseCoordinator.swift and copy/paste this:
protocol OrdersBaseCoordinator: Coordinator {
    @discardableResult func goToOrder2Screen(animated: Bool ) -> Self
    @discardableResult func goToOrder3Screen(animated: Bool) -> Self
}
The return Self is required because we want to call function concatenation possibility when using this coordinator.
Create a file called OrdersCoordinator.swift and copy/paste this:
class OrdersCoordinator: OrdersBaseCoordinator {

    var parentCoordinator: MainBaseCoordinator?
    var rootViewController: UIViewController = UIViewController()

    func start() -> UIViewController {
        rootViewController = UINavigationController(rootViewController: OrdersViewController(coordinator: self))
        return rootViewController
    }

    func goToOrder2Screen(animated: Bool = false) -> Self {
        navigationRootViewController?.pushViewController(Orders2ViewController(coordinator: self), animated: animated)
        return self
    }

    func goToOrder3Screen(animated: Bool = false) -> Self {
        navigationRootViewController?.pushViewController(Orders3ViewController(coordinator: self), animated: animated)
        return self
    }
}
Nothing really special going on here. Just the function pushViewController is being used to create the stack.
And finally, let’s create the orders ViewControllers files. First, go to the Orders -> ViewControllers folder, create an OrdersViewController.swift, and copy/paste this:
import UIKit

class OrdersViewController: UIViewController, OrdersBaseCoordinated {

    weak var coordinator: OrdersBaseCoordinator?
    var goToOrders2button: UIButton!

    init(coordinator: OrdersBaseCoordinator) {
        super.init(nibName: nil, bundle: nil)
        self.coordinator = coordinator
        title = "Orders"
    }

    required init?(coder: NSCoder) {
        fatalError("init(coder:) has not been implemented")
    }

    override func viewDidLoad() {
        super.viewDidLoad()

        view.backgroundColor = .systemTeal
        configureButton()
    }

    private func configureButton() {
        goToOrders2button = UIButton()
        view.addSubview(goToOrders2button)
        goToOrders2button.translatesAutoresizingMaskIntoConstraints = false

        goToOrders2button.setTitle(" Go to Orders 2 ", for: .normal)
        goToOrders2button.layer.borderColor = UIColor.black.cgColor
        goToOrders2button.layer.borderWidth = 2
        goToOrders2button.backgroundColor = .black
        goToOrders2button.addTarget(self, action: #selector(goToHome2), for: .touchUpInside)

        NSLayoutConstraint.activate([
            goToOrders2button.centerXAnchor.constraint(equalTo: view.centerXAnchor),
            goToOrders2button.centerYAnchor.constraint(equalTo: view.centerYAnchor)
        ])
    }

    @objc private func goToHome2() {
        coordinator?.goToOrder2Screen(animated: true)
    }
}
Nothing fancy just plain old use of the coordinator injected in the init.
Create an Orders2ViewController.swift file in the same folder of the ViewController above and copy/paste this code:
class Orders2ViewController: UIViewController, OrdersBaseCoordinated {

    weak var coordinator: OrdersBaseCoordinator?
    var goToOrders3button: UIButton!

    init(coordinator: OrdersBaseCoordinator) {
        super.init(nibName: nil, bundle: nil)
        self.coordinator = coordinator
        title = "Orders 2"
    }

    required init?(coder: NSCoder) {
        fatalError("init(coder:) has not been implemented")
    }

    override func viewDidLoad() {
        super.viewDidLoad()

        view.backgroundColor = .systemGray
        configureButton()
    }

    private func configureButton() {
        goToOrders3button = UIButton()
        view.addSubview(goToOrders3button)
        goToOrders3button.translatesAutoresizingMaskIntoConstraints = false

        goToOrders3button.setTitle(" Go to Orders 3 ", for: .normal)
        goToOrders3button.layer.borderColor = UIColor.black.cgColor
        goToOrders3button.layer.borderWidth = 2
        goToOrders3button.backgroundColor = .black
        goToOrders3button.addTarget(self, action: #selector(goToOrders3Screen), for: .touchUpInside)

        NSLayoutConstraint.activate([
            goToOrders3button.centerXAnchor.constraint(equalTo: view.centerXAnchor),
            goToOrders3button.centerYAnchor.constraint(equalTo: view.centerYAnchor)
        ])
    }

    @objc private func goToOrders3Screen() {
        coordinator?.goToOrder3Screen(animated: true)
    }
}
And the final ViewController, create the Orders3ViewController.swift file and copy/paste the following code:
class Orders3ViewController: UIViewController, OrdersBaseCoordinated {

    weak var coordinator: OrdersBaseCoordinator?

    init(coordinator: OrdersBaseCoordinator) {
        super.init(nibName: nil, bundle: nil)
        self.coordinator = coordinator
        title = "Orders 3"
    }

    required init?(coder: NSCoder) {
        fatalError("init(coder:) has not been implemented")
    }

    override func viewDidLoad() {
        super.viewDidLoad()

        view.backgroundColor = .systemGreen
    }
}
That’s it! You completed the coordinator pattern with tab bars! Congratulations! The result must be something like the gif below:
In the gif first, you see the home tab flow, second, you see the orders tab flow and after that, the home flow goes very to a very deep view inside the orders tab flow.
And we are done!
Continue Studying iOS Architecture
If you want to break your app into even smaller and more abstracted chunks you could use the microapp suggested architecture with Swift Package Manager (SPM). That will speed up your builds and also give you the freedom to develop independent features without concerning merges conflicts.
And if you are looking for a way to abstract the initialization configuration of your types, you could try using a generic factory pattern. That way the objects that are using your complex initialization objects don’t need to worry how to initialize them.
Summary – Coordinators and Tab Bars: A Love Story
Today we’ve done our goal which was to navigate between different tab bars, maintain the stack, and all with protocols! Again, this is not a final solution and it’s just to inspire others.
If you prefer you can just go to my GitHub and clone the project to check it. But I strongly recommend you to read this to understand all the reasoning about the architecture.
This article couldn’t be done without the help of my dear friends Lucas Serrano, Tales Conrado and André Faria .
That’s all my people, I hope you liked reading this article as much as I enjoyed writing it. If you want to support this blog you can Buy Me a Coffee or leave a comment saying hello. You can also sponsor posts and I’m open to freelance writing! You can reach me on LinkedIn or Twitter and send me an e-mail through the contact page.
Thanks for reading and… That’s all folks.
Credits: image


