
Hallo allemaal, Leo hier. Today we will give some life quality improvement advice using User Breakpoints in Xcode and this is probably one of the most important articles I’ve ever written because this can save a huge amount of your time.
I don’t know if it is common sense or was just me that didn’t know about this kind of breakpoint. I already knew that you can have various types of breakpoints with Xcode. For example, you can have a Symbolic Breakpoint that you can use to break the flow of your App when any of that symbol is called which is useful for catching auto-layout errors. Or you can also add the Swift Error Breakpoint only for catching any kind of error thrown by your App. Or even the Runtime Issue Breakpoint that catches any problem that your App could be doing that is not safe, for example, updating the UI outside of the main thread.
The thing is, at least for me, they are all very niche cases but I recently was watching an amazing talk by Krzysztof Zabłocki in Swift Heroes 2022 about developer experience in Xcode and one of the tips in the video was useful this week in a bug hunting. I don’t know if the official name is user breakpoints, it is just the way Krzysztof called it and I’ll adopt that naming. In the end, they are just breakpoints with custom actions made by the user.
The bug conditions were kinda painful to reproduce every time, and in one of the iterations, I forgot to put enough prints in the objects that would let me restart all the bug flow again which I didn’t want. But then, I thought about what I’d seen in that talk and I could have all the info I needed to solve the bug. Today we will explore that and much more.
Let’s code! But first…
Painting of The Day
The painting I chose today is called The Stone Breakers, an 1849 painting Gustave Courbet.
Gustave Courbet was a controversial French painter, who bridged the gap between Romanticism and the Impressionist school of painters. He was controversial not only because he addressed social issues with his work, such as peasants and the working condition of the poor, and the rural bourgeoisie, but also because of the unsentimental way in which he portrayed them.
Unlike the Romantic school of painters, Courbet did not use smooth lines and soft forms. Instead, he employed spontaneous brush strokes and roughness of paint texture, which indicated that he was observing his subject directly from life, thus challenging the theoretical ideas of the way art should be painted. Because of his development of a realistic form of painting, Courbet was a celebrity and considered a genius, socialist, and savage. He also encouraged the perception of himself as an unschooled peasant.
I chose this painting because the rocks have break points when the stone breakers finished their work, the same way we can add breakpoints to our code.
The Problem – Save Your Time With User Breakpoints in Xcode
I want to share two tips with you today. One is to save time when dealing with forms, and the second one is to make your life debugging easier by introducing runtime code in your debug sessions.
User breakpoints are an interesting way to insert code in runtime, they can execute any operation you want with the objects and references that line has. For example, if you want a specific string always have a certain value when it goes through your code, you can do it using user breakpoints.
Let’s start with the first tip but first let’s prepare our code.
Code Example – Prepare your Project
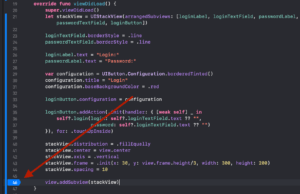
Start a new iOS project with storyboards, and copy/paste the code below in the ViewController.swift file.
import UIKit
class ViewController: UIViewController {
let loginLabel = UILabel()
let loginTextField = UITextField()
let passwordLabel = UILabel()
let passwordTextField = UITextField()
let loginButton = UIButton()
override func viewDidLoad() {
super.viewDidLoad()
let stackView = UIStackView(arrangedSubviews: [loginLabel, loginTextField, passwordLabel, passwordTextField, loginButton])
loginTextField.borderStyle = .line
passwordTextField.borderStyle = .line
loginLabel.text = "Login:"
passwordLabel.text = "Password:"
passwordTextField.isSecureTextEntry = true
var configuration = UIButton.Configuration.borderedTinted()
configuration.title = "Login"
configuration.baseBackgroundColor = .red
loginButton.configuration = configuration
loginButton.addAction(.init(handler: { [weak self] _ in
self?.login(login: self?.loginTextField.text ?? "",
password: self?.loginTextField.text ?? "") // this is intentionally a bug
}), for: .touchUpInside)
stackView.distribution = .fillEqually
stackView.axis = .vertical
stackView.frame = .init(x: 30, y: view.frame.height/3, width: 300, height: 200)
stackView.spacing = 10
view.addSubview(stackView)
}
func login(login: String, password: String) { // fake login logic here
var login = login.map(String.init)
guard login.count > 1 else { return }
login.remove(at: 1)
guard password.count > 5 else { return }
let mappedPass = password.map { $0.uppercased() }.joined()
// service.login(login,password) example continue login logic
}
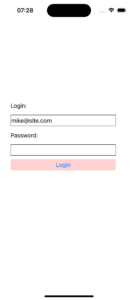
}The result in your simulator should be this:
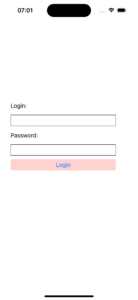
It is just a prototype of a generic login screen and some fake login validation logic with that in place we can start our debug session tips with the first tip.
First Tip: How to test with forms quickly – Set Default Values in Runtime
Breakpoints are way more powerful than you might think and one of the interesting features is that they don’t need to stop your App when you go through. This means that you can add debugger console actions to them without even having the hustle of stopping every time.
The goal here is simple: we want to automatically set values to the form without changing any line of code.
Why? We don’t want to have to review our code after finishing debugging and the breakpoints are local this way you will never take the risk of committing print statements or debug code to the branch by mistake. In our login screen, imagine that you always want to put the same login/password pair to test the application logic.
This is painful, why would you do that manually if you can just use a User Breakpoint to do that for you?
Adding custom user breakpoints in Xcode
Let’s see how you can do that with a few steps:
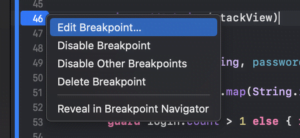
- Set the breakpoint to the end of the viewDidLoad function, just click on the line number to set the breakpoint.
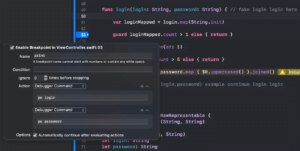
- Now right-click on the breakpoint and select “Edit breakpoint…” to open this screen. (is it just me or the ellipsis are kinda funny?)
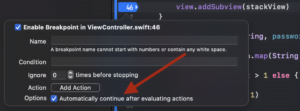
- And you will have this after clicking it:
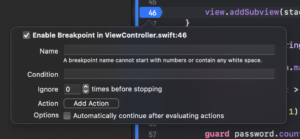
- From now on every time we say breakpoint edit popup we are talking about the image above. Remember what we said about breakpoints that don’t stop your App? It is in this popup that you can set that. Now check the “Automatically continue after evaluating actions” checkbox.
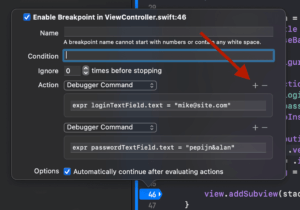
- It is time to add our first action. Click in “Add Action”, copy-paste this code and check the image how it should like in your Xcode:
expr loginTextField.text = “[email protected]”

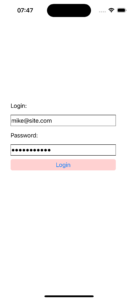
- Now build, run and you will see that the Login text field is already set. Without having to change one line of code!
- And if you also don’t want to type the password you can add in the same breakpoint more actions, just press the + button above the action and add this code (check the image below):
expr passwordTextField.text = “pepijn&alan”
- Run your app and you don’t need to repeatedly type the login and password never more!
That was the first tip. If you spend like 5 seconds typing every time those things, that can potentially save hours of your development in a month. Every time you input something for testing you now can think if you really should be typing that or just adding a user breakpoint to do that for you.
Let’s go to the second tip.
Second Tip: How to Add Print Statements in Runtime
The situation is classic.
You got a bug to solve that has a hard condition to test, for example, imagine that involves apple store cancelation, or a racing condition difficult to reproduce. And you are halfway to reproduce the bug when suddenly you realize that you forgot to put an essential print statement for your debugging session. What would you do?
If you restart the process all the time setting up the code will be lost, but if you continue like this you could not have enough information to fix the bug. Looks like a really good use case for our User Breakpoints!
As we’ve seen above you can add any kind of code to the user breakpoints, we can surely add print statements. Our code today has a bug introduced with the loginButton.AddAction that we are using two times the login as input.
This is a very simple example but remember that you can print things you want in runtime. In this case, we want to print what is being passed to the login function as parameters, so we will use the PO command.
We could do something like this:
And if you put that in your code you should see printing in the log:
[email protected]
[email protected]
Meaning that we are passing two times the login variable to the login function. And that’s all folks!
Last Advice when Using Custom User Breakpoints
The last piece of advice about debugging with this kind of strategy: be careful where you will put the breakpoint because Xcode is not smart enough to parse the scope variables. Try to put your breakpoints in guard and if statements. For me, this debug strategy works better with ifs and guards.
More Xcode Tips
If you enjoyed this Xcode productivity advice you might also like how to easily create protocols for your types using Xcode-generated interfaces. In that article, you will learn how to transform a type into a protocol with a simple Xcode command.
Also, you might want to check how to change the Xcode font size article, which is very useful when you are in video conferences and need to quickly show your code with a bigger font.
Summary – Save Your Time With User Breakpoints in Xcode
As I mentioned before, I think this is one of the most important articles I’ve ever written. Last week, I used the User breakpoint technique I mentioned in tip 2 of this article to solve a bug and was very happy about the outcome. I would recommend you try those techniques and let me know what you think. I’m pretty sure that you will love them.
Today we studied how to introduce code in runtime with Xcode in two really common use cases. One for automatically filling in login and password and another to print objects when you don’t want to restart your app. If you ever wondered if it is possible to add code after you started the simulator, yes it is!
Fellow developers, that’s all. I hope you liked reading this article as much as I enjoyed writing it. If you want to support this blog you can Buy Me a Coffee or just leave a comment saying hello. You can also sponsor posts! Reach me on LinkedIn, or Twitter, or send me an e-mail through the contact page.
Thanks for the reading and… That’s all folks.
Image Credit: Wikiart


