
Hallo dames en heren, Leo Hier. The topic today is how to quickly Generate Swift Protocols with Xcode Feature.
Today we will walk through how easily you can transform any type you have in a protocol in very small steps. It’s not rare we iOS developers to have to transform a concrete type into a protocol. Thinking of decoupling layers and SOLID this is a great way to go. Also using the protocol to communicate between objects enables testability and that for itself is a big win.
Xcode is the number 1 tool for any platform development, it’s very handy to know how can we leverage its power for our benefit.
Let’s code! But first…
Painting of The Day
Today’s art piece is called Witches’ Kitchen by Cornelis Saftleven. He was a Dutch Golden Age painter. He was born into a family of artists and learned to paint from his father Herman, along with his brothers Abraham and Herman Saftleven the Younger.
His subject matter was varied, from rural genre scenes to portraits, beach scenes, and biblical and mythological themes. His images of Hell may be his most individual contribution to Dutch painting. Equally innovative were his satires and allegories. Saftleven excelled at painting animals and often portrayed animals as active characters, occasionally with a hidden allegorical role.
I choose this painting because we will talk about *tricks* today, and we all know that all witches know some hidden tricks.
The Problem – Generate Swift Protocols with Xcode Feature
Imagine you have a type, in this example the UserManager, that you want to transform into a protocol. How can Xcode help you do that?
First, let’s set up the code. Create a new project on your Xcode and remove all the storyboards. Then update the sceneDelegate with this code:
func scene(_ scene: UIScene, willConnectTo session: UISceneSession, options connectionOptions: UIScene.ConnectionOptions) {
    guard let windowScene = (scene as? UIWindowScene) else { return }

    let window = UIWindow(windowScene: windowScene)
    window.rootViewController = ViewController(userManager: UserManager())

    self.window = window
    window.makeKeyAndVisible()
}
Now let’s create our UserManager, the class ( but it could be a struct) that will have a protocol in the future. Create a new file called UserManager.swift and copy/paste the code below:
import Foundation

class UserManager {
    var userNames: [String] = ["Leo","Mike","Pep","Alan","Lucas"]
    private let id = UUID()

    func getUsers() -> [String] {
        // more complicated logic here
        return userNames
    }

    func updateUserName(at index: Int, userName: String) -> Bool {

        guard userName.count > 2, index < userNames.endIndex else { return false }

        userNames.remove(at: index)
        userNames.insert(userName, at: index)
        return true
    }

    func deleteUserName(userName: String) -> Bool {

        guard let index = userNames.firstIndex(where: { $0 == userName }) else { return false }

        userNames.remove(at: index)

        return true
    }

    func lastUser() throws -> String? {
        userNames.last
    }

    // other functions here...

}

extension UserManager: Equatable {
    static func == (lhs: UserManager, rhs: UserManager) -> Bool {
        lhs.id == rhs.id
    }
}
The exact content of each function is a placeholder, don’t focus on that.
Now edit your view controller so we can inject the UserManager on the initializer:
import UIKit

class ViewController: UIViewController {

    let userManager: UserManager

    init(userManager: UserManager) {
        self.userManager = userManager
        super.init(nibName: nil, bundle: nil)
    }

    required init?(coder: NSCoder) {
        fatalError("init(coder:) has not been implemented")
    }

    override func viewDidLoad() {
        super.viewDidLoad()
        view.backgroundColor = .red

        print(userManager.getUsers())
    }
}
We finished the initial setup, that’s all we need.
The Xcode Feature to Generate Protocols for You
Now the magic begins. Go to the UserManager file and use this shortcut:
Control + Command + ⬆️ (arrow up)
Xcode will take time on this screen and after that will generate for you what we want:

The final result is this:
import Foundation

internal class UserManager {

    internal var userNames: [String]

    internal func getUsers() -> [String]

    internal func updateUserName(at index: Int, userName: String) -> Bool

    internal func deleteUserName(userName: String) -> Bool

    internal func lastUser() throws -> String?
}

extension UserManager : Equatable {

    /// Returns a Boolean value indicating whether two values are equal.
    ///
    /// Equality is the inverse of inequality. For any values `a` and `b`,
    /// `a == b` implies that `a != b` is `false`.
    ///
    /// - Parameters:
    /// - lhs: A value to compare.
    /// - rhs: Another value to compare.
    internal static func == (lhs: UserManager, rhs: UserManager) -> Bool
}
With this in hand, you can copy its contents to another file and start to transform it into a protocol. Create a new file called UserManaging.swift and copy the contents of the generated interface.
Now we have to turn it into a protocol. The steps are:
- Change the
class UserManagername toprotocol UserManaging. - You can clean up the
internalaccess modifier with a replace tool.
![]()
3. You will need to explicit add { get } or { get set }`specifier.
4. In this example you can erase equatable extension and userNames var.
The final protocol looks like this:
protocol UserManaging {
func getUsers() -> [String]
func updateUserName(at index: Int, userName: String) -> Bool
func deleteUserName(userName: String) -> Bool
func lastUser() throws -> String?
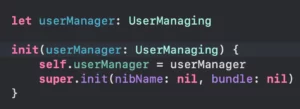
}Now make UserManager conform to it:
![]()
And your view controller receives the protocol in the initializer:
And the first part of refactoring is done!
Extra Mile – Interface Segregation Principle
Whenever you do this kind of approach you always have to remember the Interface Segregation Principle which states that:
Many client-specific interfaces are better than one general-purpose interface.
This way we can split our newly created protocol even more because the only function that is used is the getUsers. This way our final protocol could be like this:
protocol ViewControllerUserProviding {
    func getUsers() -> [String]
}
And if you change that to UserManager and the ViewController:
![]()
And:
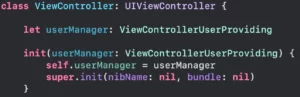
Now our refactoring is perfect. The view controller doesn’t need to know anything then one function from the UserManager.
And that’s it!
Summary – Generate Swift Protocols with Xcode Feature
Today we learn how to use an Xcode shortcut to generate protocols and how can you refactor a Service injection in the way the injected type only knows what it really needs to know. This will become so natural to you that you would become way more effective as a developer.
That’s all my people, I hope you liked reading this article as much as I enjoyed writing it. If you want to support this blog you can Buy Me a Coffee or leave a comment saying hello. You can also sponsor posts and I’m open to freelance writing! You can reach me on LinkedIn or Twitter and send me an e-mail through the contact page.
Thanks for reading and… That’s all folks.
Credits:


