
Hallo bakkers en brandweerlieden, Leo hier. Today we will talk about how to implement BackgroundTask in SwiftUI and how to test it.
In 2019, Apple released an API called BackgroundTask. The main goal was to keep your app’s content fresh and perform operations that will take a few minutes to finish while it is running in the background. Something to take into consideration is that this API might require a powered device and network connectivity to execute longer tasks. And now we have it for SwiftUI!
The usage is simple, just two steps. When the app launches, tasks are registered with launch handlers, which means the code pieces that will handle the background tasks, and scheduled tasks as needed. Keep in mind that scheduling tasks for the background are not something that the system will execute like a cron job.
You will specify that a task should be run from time to time, and the system will decide if that schedule makes sense for your user. For example, if you schedule a task to be refreshed every 3 hours, but iOS knows that your user just opens your app in the morning and at night, it will only run the background task in the morning just before your user use the app and at night. You should never rely on this scheduling for something critical for your app. Also, remember that an app can only schedule 1 refresh task at a time and 10 processing tasks scheduled at any time, as the doc says.
Today we will implement that API in SwiftUI.
Let’s code! But first…
Painting of The Day
The painting today is an 1881 art piece called Mending the nets by Winslow Homer. Throughout his long career, Homer captured the changing tides of American life and livelihood.
Whereas his contemporary Thomas Eakins looked to the heroic personalities of athletes, doctors, and professors, Homer sought instead to capture essential archetypes through the games of rural schoolteachers, windswept land, and seascapes, to the stout figures of fishing men and women.
Themes of mortality repeatedly haunt Homer’s oeuvre from his Civil War paintings to his middle career hunting series and, in the end, his late ruminations on the life of sailors and the sea. Homer’s deceptively simple compositions often presented precarious situations and served as poignant reminders of the fragility of life.
I chose this painting because the fishing work is the main job that you use fishing nets. But also a very important task is the background task of mending the nets after the fishing sessions. Got it?
Problem – New BackgroundTask in SwiftUI and How to Test It
You want to use the Background task in SwiftUI and easily test it.
Let’s check the steps to get this working. As I said before you just need to do two things
- Set up your project to receive background tasks.
- Make your code schedule and respond to that tasks.
We will begin with the project setup part.
Project Setup
Open your Target, go to Signing and Capabilities, and clock in the “+ Capability” as shown in the image below: 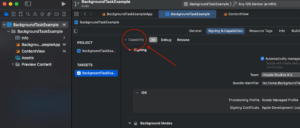
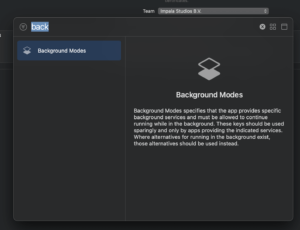
Then write Background in the search and should appear: Background Modes as shown in the image below:
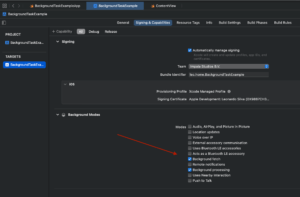
Now check “Background fetch” and “Background processing”. In the Signing & Capabilities tab, check the image below:
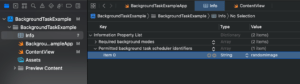
And finally, add to your info.plist file the key called “Permitted background task scheduler identifiers” and the value with the name of the task that you want to perform in the background. Like the example below:
We can now start to code.
Code Example – Scheduling a Background Task in SwiftUI
Let’s start with the project setup and I’ll explain the process while we build our project. As I said we now have two main goals, schedule a task and run a piece of code that will respond to that task when the system calls the update. Our task will do:
- Make an API call in the background to a random image service API and fetch that image.
- If the data fetch is ok we want to send a local notification to the user so that he can open the app and see the new changes.
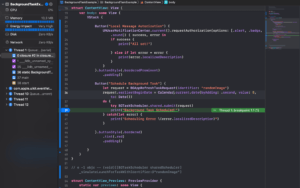
First, start a new SwiftUI project. And we will write the code to schedule the task. We will create an ImageStore to receive the UIImage data and pass it forwards, copy and paste the code below:
import SwiftUI
import BackgroundTasks

class ImageStore: ObservableObject {
    @Published var randomImage: UIImage?
}

struct ContentView: View {

    @ObservedObject var imageStore: ImageStore

    var body: some View {
        VStack {

            Button("Local Message Autorization") {
                UNUserNotificationCenter.current().requestAuthorization(options: [.alert, .badge, .sound]) { success, error in
                    if success {
                        print("All set!")

                    } else if let error = error {
                        print(error.localizedDescription)
                    }
                }
            }.buttonStyle(.borderedProminent)
                .padding()

            Button("Schedule Background Task") {
                let request = BGAppRefreshTaskRequest(identifier: "randomImage") // Mark 1
                request.earliestBeginDate = Calendar.current.date(byAdding: .second, value: 30, to: Date()) // Mark 2
                do {
                    try BGTaskScheduler.shared.submit(request) // Mark 3
                    print("Background Task Scheduled!")
                } catch(let error) {
                    print("Scheduling Error \(error.localizedDescription)")
                }

            }.buttonStyle(.bordered)
                .tint(.red)
                .padding()

        }
    }
}
In the first button, we ask the user to send local notifications. And the second one is where we are scheduling the background task. Let’s explain the marks on the second button.
Mark 1 is creating the background task request, this is where you will specify the identifier that you will use later to invoke code in your app in the background.
Mark 2 is setting the scheduling date. This is where you tell iOS when to update the app in the background. Remember, that this is a SUGGESTION to the iOS because it takes other things into consideration and this is by no means a hard scheduled date. You can and you should expect this won’t be triggered when you want it. In this case, we are indicating to the iOS that he can call this background task 30 seconds after we press the button. If you want to always reschedule the function call, when you respond to the background task, reschedule it.
Mark 3 is sending the request to the Scheduler so it can be kept by the system. This is the last step of the process and now we are good when the background task scheduler calls our app on the scheduled date in Mark 2.
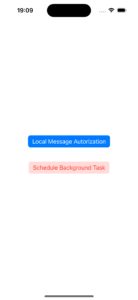
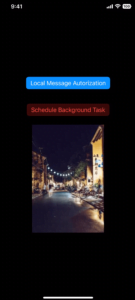
The result should be as you see below:
Code Example – Responding to the Background Task in SwiftUI
This is where things get interesting. Now we will use the new SwiftUI API to respond to the background task.
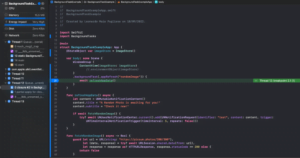
In your @main struct copy and paste the code below.
import SwiftUI
import BackgroundTasks

@main
struct BackgroundTaskExampleApp: App {
    @StateObject var imageStore = ImageStore()

    var body: some Scene {
        WindowGroup {
            ContentView(imageStore: imageStore)
        }
        .backgroundTask(.appRefresh("randomImage")) { // Mark 1 This is where you respond the scheduled background task
            // you can also reschedule the background task HERE if you want to keep calling from time to time, just send BGTaskScheduler.shared.submit(request) here again and again.
            await refreshAppData() // use an async function here
        }
    }

    func refreshAppData() async { // this is the functio that will respond your scheduled background task
        let content = UNMutableNotificationContent()
        content.title = "A Random Photo is awaiting for you!"
        content.subtitle = "Check it now!"

        if await fetchRandomImage() {
            try? await UNUserNotificationCenter.current().add(UNNotificationRequest(identifier: "test", content: content, trigger: UNTimeIntervalNotificationTrigger(timeInterval: 5, repeats: false)))
        }
    }

    func fetchRandomImage() async -> Bool { // async random fetch image
        guard let url = URL(string: "https://picsum.photos/200/300"),
              let (data, response) = try? await URLSession.shared.data(from: url),
              let response = response as? HTTPURLResponse, response.statusCode == 200 else {
            return false
        }

        imageStore.randomImage = UIImage(data: data)

        return true
    }
}
In your project the @main will have another name, mine is BackgroundTaskExampleApp. On the Mark 1 comment is where everything happens. There we are saying to iOS: “Hey if you wake up the app the function that should respond to the `randomImage` identifier is this”. And that’s how we can manipulate things after the BackgroundTask is triggered by the system.
In our case, we are doing two things. In the async function called refreshAppData we are using the fetchRandomImage to get a random image and add it to the imageStore. Then if that fetch is successful we send a local notification to the user saying that he has a new random image, and we automatically update the UI with the new image.
And that’s it! That’s how you can easily implement Background Tasks with the new SwiftUI.
How to test and debug BackgroundTask in SwiftUI
To test and debug background tasks you should use an Apple trick. Since we cannot control when the system will call our background task, Apple provided a way that we can call the task by ourselves.
Follow the steps below:
- Set a breakpoint after calling “try BGTaskScheduler.shared.submit(request)”
- Enter in the LLDB console the following command with YOUR TASK IDENTIFIER, the one that is the BGAppRefreshTaskRequest:
e -l objc — (void)[[BGTaskScheduler sharedScheduler] _simulateLaunchForTaskWithIdentifier:@”YOUR_TASK”]
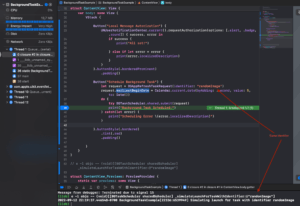
- After that, let your app run and you can expect your background task closure to be called.
And that’s how you can test and debug your background tasks without having to wait for the system to call them for you. Very nice, isn’t it? And the final result should be this (of course with another image):
Bugs in the Beta API
There’s a known bug in the API, and it is expected because it is beta. If you try to use the new backgroundTask directly with a Scene that has an environmentObject function the code will not compile anymore and you will not know that is because of your backgroundTask. In other words, your project will not compile anymore if you try to use the code below:
var body: some Scene {
    WindowGroup {
        ContentView(imageStore: imageStore)
            .environmentObject(imageStore) // adding this the project will not compile anymore
    }
    .backgroundTask(.appRefresh("randomImage")) {
        await refreshAppData()
    }
}
An easy workaround (until the bug is not solved) is erasing the ContentView with AnyView:
var body: some Scene {
    WindowGroup {
        AnyView(ContentView(imageStore: imageStore) // erase the ContentView
            .environmentObject(imageStore)) // With the View erased it compiles!
    }
    .backgroundTask(.appRefresh("randomImage")) {
        await refreshAppData()
    }
}
And that’s all folks!
Continue Studying
Today we used a hidden LLDB command to make possible background tasks testing, but there are other LLDB commands too. I’m talking about checking the PO command article. There I explain what is the PO command and how useful it can be for your development and debugging.
Have you ever wondered if there are ghosts in Swift? Of course, there are not! But for sure there are Phantom types, and they are really useful for API design in Swift. Check how you can use them to improve your API expressivity.
Summary – New BackgroundTask in SwiftUI and How to Test It
Today we checked how to use background tasks with Swift. We learned how to reschedule them every time you want and problems with the beta API that you can come across. If you want to check the whole project check my GitHub repo.
There is a lot more you can do with background tasks, for example, what to do if a background task takes too long to complete? How to handle that situation? You can check the WWDC22 video for more ideas on what to do. Fellow developers, that’s all.
I hope you liked reading this article as much as I enjoyed writing it. If you want to support this blog you can Buy Me a Coffee or just leave a comment saying hello. You can also sponsor posts and I’m open to freelance writing! You can reach me on LinkedIn or Twitter and send me an e-mail through the contact page.
Thanks for the reading and… That’s all folks.
Image Credit: Wikiart


