
Hallo allemaal, Leo hier. Today we will explore a little bit of TipKit Framework and the core of the discussion is not how to use it but the situations in which it is not recommended to use TipKit.I’ve done this quick tip component sometimes in my iOS developer life. It is true that this component is becoming more and more common in today’s apps but this is not something new. Quick tips are here way before even computers when people attached post-its in stuff with small actionable messages. I have heard some stories about places where people get confused about if the doors should be pushed or pulled and people started to add post-its to the doors.Back in the day, the quick tip had a king and if you used Microsoft Word at the beginning of the 2000s you will remember Clippy. He was the quick tips master and I guess that the new AI era could bring it back to all its past glory.Also, I’m learning a lot about how to work in a codebase that hundreds of developers work on. When you are working on a project with 2 or 3 people, you don’t realize how much synchronization is important when you scale that to hundreds of developers. For example: how do you solve the problem of translations? Or how should the assets of the app be in the app or they should be in the server decreasing the app size? How to manage architecture at scale? How to keep a good release pace that is not too short and not too long?Is interesting to see how things work in a giant environment and I’m very happy and grateful for this opportunity.Recently I have had to talk about carrousel animations in SwiftUI and we have a great time looking at how powerful is the transition API for your apps. You can animate any kind of appearing and disappearing behavior of your views with one line of code. I’m glad that is becoming easier and easier to animate things in iOS because is something that I spend a lot of time trying to do it right.Also, is not only important to know the SwiftUI framework per se but also the main capabilities that iOS can provide, such as push notifications options. I learned a lot about all the types of push notifications in iOS and I guess you would be also interested in it.No more talking, let’s code! But first…  Now let’s see how easily you can add quick tips to your project in less than 1 min.
With this in place, we can use the TipKit whenever we want in the app.The second step is to create the new Tip. Let’s add the new struct that will be our quick tip:
The Tip protocol has a lot of interesting stuff. You can add images as you see above, titles, subtitles, and other things like rules.The last step is just using your newly created Tip in any SwiftUI view that you want:
In our example, we are using the Text view but you could put it in any kind of view that you wanted.The popoverTip function has two more parameters that you could explore that is the arrow direction and a closure to determine what to do in case of an action that happens inside the tips.And that is all you need to do to implement new tips to your apps. Really cool, isn’t it? The next topic is about what is not recommended to do with your new framework.
Now let’s see how easily you can add quick tips to your project in less than 1 min.
With this in place, we can use the TipKit whenever we want in the app.The second step is to create the new Tip. Let’s add the new struct that will be our quick tip:
The Tip protocol has a lot of interesting stuff. You can add images as you see above, titles, subtitles, and other things like rules.The last step is just using your newly created Tip in any SwiftUI view that you want:
In our example, we are using the Text view but you could put it in any kind of view that you wanted.The popoverTip function has two more parameters that you could explore that is the arrow direction and a closure to determine what to do in case of an action that happens inside the tips.And that is all you need to do to implement new tips to your apps. Really cool, isn’t it? The next topic is about what is not recommended to do with your new framework.  There are myriad marketing solutions for your apps, but TipKit is definitely not one of them. The whole idea of selling stuff or trying to make the user aware of a marketing campaign goes against the idea of TipKit. For marketing in the apps you could use: banners, popups, modals, interstitials, push notifications, etc.Just remember that quick tips were made for educational purposes, if you are not teaching something to the user you probably are not using it correctly.
  This is pretty interesting. When something goes wrong we need to tell the user that what was expected is not going to happen, at least for now. How can you imagine that TipKit fits on this? Doesn’t look like a good fit, right?Yes, you can and should communicate when something expected by the user went wrong but you have other tools to do it. For example, alerts, banners, popups, view with empty states etc. Imagine that you have the information you want to give to the user, and looks like a quick tip would be the best way to deliver it. One last question that you have to ask yourself is if the data is actionable, for example, imagine that you fix a bug that the user doesn’t even know existed. It is nice to tell users that you are actively maintaining the app. However, it doesn’t make sense to turn this info into a quick tip because it is not actionable.Being actionable is exactly what differentiates a toast from a quick tip, and you should know when to use each one.Be careful using TipKit with data that is not actionable, your quick tips should be related with something that the user should know and act upon it.
  Well if you have to write a tutorial in your quick tip, it is not quick anymore, right? The quick tip should be always something quick, teachable, and easy to use.Imagine if you add something like how to change a password inside the app in the quick tip. First, if the user mistakenly taps anywhere else on the screen he/she would be lost without any explanation about the flow that you were trying to teach him. The volatility of the quick tip view makes it special bad for long information, so please don’t do this with your users.And that’s it for today!
Painting of The Day
The painting I chose for today is from 1668 and it’s called “School Teacher”, made by Jan Steen. Jan Steen’s unique approach to art became a defining feature of the 17th-century Dutch Golden Age. While many of his peers focused on mastering one genre, Steen’s versatility allowed him to explore various subjects, making his oeuvre eclectic and rich. This diversity, however, never compromised the quality of his work.Even today, Steen’s works are celebrated for their vividness, intricate details, and the lively spirit that he so masterfully captured on canvas.I chose this painting because it features a teacher giving a quick tip to the children. Got it?The Problem – The DOs and don’t when using TipKit
You want to use quick tips in your project.First, let’s see how easy is to add a quick tip to your project. The final quick tip that we will create is this:
 Now let’s see how easily you can add quick tips to your project in less than 1 min.
 Steps to Add TipKit to Your App
There are just 3 steps to add a simple quick tip to your app:- Call Tips.configure() static function from your app start.
- Create a struct that conform to Tip protocol.
- Add that new struct to a View that you want to show your tip.
How to Add Quick Tips in SwiftUI using TipKit?
Now let’s go to the code sample. Create a new SwiftUI project using Xcode 15 beta 5 and upwards.The first step is to configure the root of your app to use TipKit. Copy and paste the code below:import SwiftUI
import TipKit
@main
struct TipKitTutorialApp: App {
var body: some Scene {
WindowGroup {
ContentView()
.task {
try? await Tips.configure() // add this to the root of the app
}
}
}
}
struct MyTip: Tip {
    var title: Text {
        Text("Your tip text here!")
    }

    var message: Text? {
        Text("And the Subtitle here!")
    }

    var asset: Image? {
        Image(systemName: "figure.table.tennis")
    }
}import SwiftUI
import TipKit
struct ContentView: View {
var body: some View {
VStack {
Image(systemName: "globe")
.imageScale(.large)
.foregroundStyle(.tint)
Text("Hello, world!")
.popoverTip(MyTip()) // using the new quick tip here!
}
.padding()
}
}The Not Recommended Way to Use TipKit in SwiftUI
If you are following this article you now are thinking: “Yeey, this tool is so powerful I’ll use it everywhere that I need to send a message to the user”, I’m sorry to deliver the bad news but that was not the case. TipKit was designed and created with an educational purpose in mind. This way if you are using it with any other goal, you are using this tool in the way that was not intended.There are four main not advisable ways to implement quick tips in your app: Promotional, Error cases, Data are not Actionable, and, Too Much/Too Complicated Info in the tip. Let’s understand each one of those.Why not use TipKit for Promotional purposes?
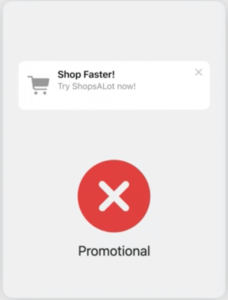 There are myriad marketing solutions for your apps, but TipKit is definitely not one of them. The whole idea of selling stuff or trying to make the user aware of a marketing campaign goes against the idea of TipKit. For marketing in the apps you could use: banners, popups, modals, interstitials, push notifications, etc.Just remember that quick tips were made for educational purposes, if you are not teaching something to the user you probably are not using it correctly.
 Why not use TipKit for Error Showing?
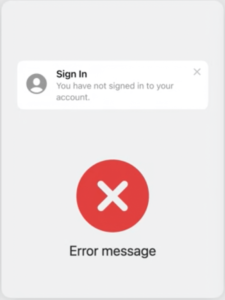 This is pretty interesting. When something goes wrong we need to tell the user that what was expected is not going to happen, at least for now. How can you imagine that TipKit fits on this? Doesn’t look like a good fit, right?Yes, you can and should communicate when something expected by the user went wrong but you have other tools to do it. For example, alerts, banners, popups, view with empty states etc.
 Why not use TipKit for Data That is Not Actionable?
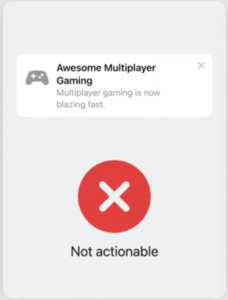 Imagine that you have the information you want to give to the user, and looks like a quick tip would be the best way to deliver it. One last question that you have to ask yourself is if the data is actionable, for example, imagine that you fix a bug that the user doesn’t even know existed. It is nice to tell users that you are actively maintaining the app. However, it doesn’t make sense to turn this info into a quick tip because it is not actionable.Being actionable is exactly what differentiates a toast from a quick tip, and you should know when to use each one.Be careful using TipKit with data that is not actionable, your quick tips should be related with something that the user should know and act upon it.
 Why not use TipKit for Information that is too complex/big?
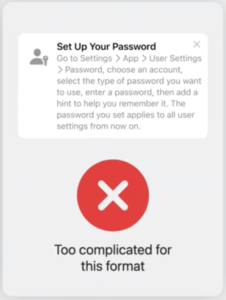 Well if you have to write a tutorial in your quick tip, it is not quick anymore, right? The quick tip should be always something quick, teachable, and easy to use.Imagine if you add something like how to change a password inside the app in the quick tip. First, if the user mistakenly taps anywhere else on the screen he/she would be lost without any explanation about the flow that you were trying to teach him. The volatility of the quick tip view makes it special bad for long information, so please don’t do this with your users.And that’s it for today!


