
Hallo broeken en jassen, Leo hier. Today we will explore Push Notifications options in SwiftUI.
It has been a while since I tried to wrap up this article, I started to write it almost 3 months ago. But you know that a lot of stuff happened and I just had time to come back to it now. I have a story to tell. Last month I was traveling to my home country and I did a lot of things. I sold my old collection of MTG, Yu-gi-oh, and Pokemon.
I also found my old table tennis racket and I thought that I shouldn’t bring it with me, because here I don’t play table tennis at all… Well, that was a mistake. Now I’m playing table tennis almost every day of the week after work and I profoundly regret my decision. Now I’m asking my mom to send the racket so I can play with my old and beloved racket. The good thing is that I now can play table tennis which was my passion for all my teenage years. This sport is so cool.
Lately, I’ve been writing a little bit about basic architecture using Swift language. Even the biggest architectures emerge from very simple rules, such as redux where everything in the app should be only variations of a central state, or MVVM where you shouldn’t have View code in other layers than the View, etc. But there are also micro-architectural decisions that in the long term also define your architecture and the article is about one of that micro-decisions.
And continuing my series about SwiftUI animations, now you can learn the difference between explicit and implicit animations in SwiftUI.
No more talking, let’s code! But first…
Painting of the Day
The painting I chose for today is “The Secret School” a 1885 art piece by Nikolaos Gyzis. Regarded as one of Greece’s most influential 19th-century painters, Nikolaos Gyzis (1 March 1842 – 4 January 1901) gained renown for his piece Eros and the Painter, his inaugural genre painting.
After its last showcase in Greece in 1928, it was auctioned off at Bonhams in London in May 2006. Gyzis was a principal figure of the “Munich School”, a significant Greek art movement of the 19th century.
I chose this painting because knowledge is something that should be passed on to the next generations. All the iOS writers/video makers/etc that share content are creating the way for the next generations of iOS developers.
The Problem: Push Notifications in Swift
You want to know all the push notifications options type in iOS environment and how to use then with SwiftUI.
Ever wondered how your favorite apps seem to know just the right time to drop you a message? You might have just received a notification about a new match in a dating app or a flash sale on an e-commerce app. These real-time alerts popping up on your device are what we call ‘push notifications’. Quite nifty, right? Well, in the iOS world, push notifications play a big role in keeping users engaged and informed.
They’re like those little nudges that remind you to check your phone, and Swift, the powerful programming language from Apple, provides us with everything we need to implement them in our apps. Also, they have a crucial role in marketing, helping the brands to keep users engaged in the long term. Before we dive deep into the code, let’s take a second to appreciate the User Notifications Framework in Swift.
This is the magic toolbox that makes it all happen. It’s what we use to schedule, manage, and display notifications to the user, whether they’re local or remote (push notifications). It’s like the secret sauce to keeping users in the loop with what’s happening in the app, even when they’re not actively using it. In the next sections, we’re going to peel back the layers of this intriguing feature.
So, grab your favorite beverage, get comfy, and let’s explore the exciting world of push notifications with SwiftUI!
UNUserNotificationCenter: The Core of Push Notifications
Alright, so you know how every good story has a hero? In our tale of push notifications, that hero is the UNUserNotificationCenter. It’s the epicenter, the control hub, the… well, you get it. The UNUserNotificationCenter is what we interact with when we want to manage all aspects of notifications. This includes scheduling notifications, removing delivered ones, or handling user interactions with notifications.
You can think of it as the manager of a really busy restaurant, always keeping track of orders (notifications) and making sure they get to the right tables (devices) at the right time. In a nutshell, UNUserNotificationCenter is our go-to guy when dealing with anything notification related in our apps.
It’s like the Dumbledore of the iOS notifications world, always there to help us out when we need to get our user’s attention.
Requesting Push Notification Authorization in Swift
It’s time to roll up our sleeves and jump into the code! We’re about to dive into the function that’s going to help us request push notification permissions. We’ll call it requestPushNotificationAuthorization().
It might sound a bit fancy, but it’s actually pretty straightforward.
func requestAuthorization(options: UNAuthorizationOptions = []) async throws -> Bool
Now, before we dive in, let’s set the stage. First off, you need to know that users have to grant your app the permission to send them notifications. You can’t just start bombarding them with updates without their say-so.
That’s where our requestPushNotificationAuthorization() function comes into play. Alright, here’s something cool about our function. Notice the word async in there? That’s because, in Swift, we’re now living in the future with asynchronous programming. This means our function can do its work in the background without blocking the rest of our app.
It’s like sending out a robot to do your chores while you kick back and relax. Well, not exactly, but you get the idea. Our requestPushNotificationAuthorization() function is going to call on our old friend, the UNUserNotificationCenter, and ask it (politely, of course) to request authorization for us. This involves telling it which notification options we want to use. But we’ll get into that a bit more in the next section. For now, just remember this: our function is like the messenger between us (the app) and the user.
It’s asking the user if we can send them push notifications, and waiting to hear what they say. It’s like asking someone out on a date – you’ve got to do it politely, and you have to be ready for any answer!
Understanding Authorization Options for Push Notifications
It’s to some action. Start a new SwiftUI project and let’s check each one of the UNAuthorizationOptions and how can you gain with them. In the code below we will ask for all the authorzation types just for educational purposes.
In your app you should check what you really need and just ask for them. Copy and paste the code below and we will explain in the next section:
import SwiftUI
import UserNotifications
import Combine

struct ContentView: View {
    @StateObject var notificationService = NotificationService()

    var body: some View {
        VStack {
            Image(systemName: "figure.gymnastics")
                .resizable()
                .foregroundColor(.red)
                .frame(width: 100, height: 100)

            Text("Hello, Gymnastics!")
                .font(.title)

            Button("Request Permission") {
                Task {
                    await notificationService.requestPushNotificationAuthorization()
                }
            }
            .buttonStyle(.borderedProminent)
            .padding()

            Stepper("Badge Number \(notificationService.badgeNumber != 0 ? notificationService.badgeNumber.description : "")", value: $notificationService.badgeNumber, in: 0...Int.max)

        }
        .fullScreenCover(isPresented: $notificationService.showSettingsPage, content: {
            // your settings page here
            VStack {
                Text("Settings Page").font(.title)
                Text("All your settings here").font(.subheadline)
                Button("Dismiss") {
                    notificationService.showSettingsPage = false
                }
                .padding()
                .buttonStyle(.borderedProminent)
            }
        })
        .padding()
    }
}

final class NotificationService: NSObject, ObservableObject, UNUserNotificationCenterDelegate {

    @Published var showSettingsPage = false
    @Published var badgeNumber = 0
    var cancellables = Set<AnyCancellable>()

    override init() {
        super.init()
        UNUserNotificationCenter.current().delegate = self

        $badgeNumber
            .drop(while: {$0 < 1})
            .sink { badgeNumber in
            UIApplication.shared.applicationIconBadgeNumber = badgeNumber
        }.store(in: &cancellables)
    }

    func requestPushNotificationAuthorization() async {
        do {
            try await UNUserNotificationCenter.current().requestAuthorization(options: [
                .alert,
                .sound,
                .badge,
                .carPlay,
                .provisional,
                .criticalAlert,
                .providesAppNotificationSettings])

        } catch {
            print(error)
        }
    }

    func userNotificationCenter(_ center: UNUserNotificationCenter, openSettingsFor notification: UNNotification?) {
        showSettingsPage = true
    }
}
Build and run, and you should see this: 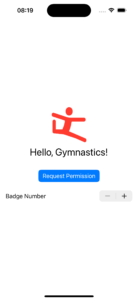
The blue button as you can imagine, requests notification permission for the user.
After you ask and grant the notification permission, if you use the stepper you will see that we can add and remove the badge number from the app, check the video below:
And we are also going to check how to create a link in the iPhone Settings page directly to inside your app, like the image below:
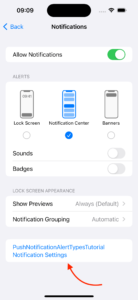
Let’s explain exactly what is going on.
Understanding Authorization Options for Push Notifications
Alrighty, it’s time to get into the nitty-gritty stuff. We’re going to take a close look at each of the authorization options available for push notifications in Swift.
The code to ask all of the Authorization Options is this:
try await UNUserNotificationCenter.current().requestAuthorization(options: [ .alert, .sound, .badge, .carPlay, .provisional, .criticalAlert, .providesAppNotificationSettings])
This is where it gets really interesting! Let’s check each one of them.
Alert Push Notification Option
First off, we have the .alert option. This one is straightforward. It lets your app display pop-up messages on the user’s screen. It’s like the town crier of your app, shouting out the latest news and updates.
Badge Push Notification Option
Next up is the .badge option. This option lets your app display a number on the app icon. It’s a subtle way to notify users of updates, like new messages or events.
If you’ve seen those little red numbers on app icons, that’s the badge at work. It’s like a quiet tap on the user’s shoulder, letting them know there’s something new to check out. In our example we are setting the badge using the Stepper:
Stepper("Badge Number \(notificationService.badgeNumber != 0 ? notificationService.badgeNumber.description : "")", value: $notificationService.badgeNumber, in: 0...Int.max)
The stepper is getting and setting the bind to the badgeNumber inside our notification service. There we just had to bind the publisher of the @Published variable with the new badgeNumber, like in the code bellow:
$badgeNumber // getting the publisher from the @Published var
    .drop(while: {$0 < 1}) // not using the first value, you can remove this one if you want
    .sink { badgeNumber in
        UIApplication.shared.applicationIconBadgeNumber = badgeNumber // setting the badge number
    }.store(in: &cancellables)
And that’s how we are easily setting the app icon badge in SwiftUI.
CarPlay Push Notification Option
Then we have the .carPlay option. This one’s a bit more specialized. If you want your app’s notifications to show up when the user’s device is connected to CarPlay app, this is the option you need.
We won’t explore today how to create a CarPlay app because it is not the goal of this article, also you need special entitlements that needed to be requested from Apple.
Provisional Push Notification Option
The .provisional option is a bit sneakier/shady. It lets your app send notifications silently, without asking for permission first.
The notifications will show up in the notification center, but they won’t disturb the user with sounds or alerts. The provisional push notifications look like this: 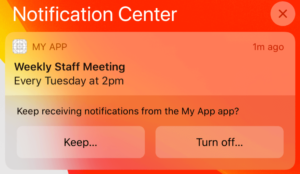
This is like a trial notification. When you explicitly seek permission to send notifications, users are required to make a choice to either allow or deny permission even before they have encountered any notifications from your app.
Even if you provide contextual information before requesting authorization, users may lack sufficient details to make an informed decision and might consequently decline the authorization. To address this, you can utilize provisional authorization, which allows you to send notifications on a trial basis. With this approach, users have the opportunity to evaluate the notifications and then decide whether to grant authorization.
Under provisional authorization, the system delivers notifications discreetly, without interrupting the user with sounds, banners, or appearing on the lock screen. Instead, these notifications are solely accessible within the notification center’s history. Additionally, these notifications include buttons that prompt the user to either keep or disable the notification.
Critical Alert Push Notification Option
The .criticalAlert option is for when you have something really important to tell the user. These notifications can break through the user’s Do Not Disturb settings and make a sound, even if the device is on silent.
It’s like having a fire alarm in your app – you only use it when it’s absolutely necessary. For this to work you need to send in your push notification payload the interruption-level key with the value “critical”.
Sound Push Notification Option
Speaking of sounds, the .sound option lets your app play a sound to signal a new notification. It’s a great way to get the user’s attention, even if they’re not looking at their screen.
It’s like your app’s personal doorbell, letting the user know when there’s a new update. A lot of users, including myself, find this annoying so don’t be sad if no one ever turns on the notification sound of your app.
If you want to customize the sound that the user will hear you need to add the sound key in the push notification payload and the value is the name of a sound file in your app’s main bundle or in the Library/Soundsfolder of your app’s container directory. Specify the string “default” to play the system sound. Use this key for regular notifications. For critical alerts, use the sound dictionary instead. For information about how to prepare sounds, see UNNotification.
Provides App Notification Settings Option
Last but not least, we have the .providesAppNotificationSettings option. This one’s a little different. It doesn’t affect the notifications themselves, but it lets the user access your app’s notification settings directly from the system settings.
It’s like giving the user a shortcut to control how your app notifies them. I learned about this while doing this article. It was not intuitive that you need notification permission to make a new option appear in the Settings app like the image below:
To make that you need:
- to ask the
.providesAppNotificationSettingspermission. - use an object to implement the UNUserNotificationCenterDelegate protocol.
- In that protocol you have the userNotificationCenter(_ center: UNUserNotificationCenter, openSettingsFor notification: UNNotification?) function that you will have to implement to make your app react to the user button tap on iPhone Settings.
That translates into this code in the NotificationService:
final class NotificationService: NSObject, ObservableObject, UNUserNotificationCenterDelegate {

    @Published var showSettingsPage = false

    func requestPushNotificationAuthorization() async {
        do {
            try await UNUserNotificationCenter.current().requestAuthorization(options: [
                .alert,
                .sound,
                .badge,
                .carPlay,
                .provisional,
                .criticalAlert,
                .providesAppNotificationSettings]) //

        } catch {
            print(error)
        }
    }

    func userNotificationCenter(_ center: UNUserNotificationCenter, openSettingsFor notification: UNNotification?) {
        showSettingsPage = true // In our case we just need to set this variable to true, so our View can show the settings.
    }
}
And the SwiftUI view we can bind the @Published showSettingsPage variable to the fullScreenCover function, this way whenever the variables change to true, we automatically show the settings for the app.
.fullScreenCover(isPresented: $notificationService.showSettingsPage) {
    // your settings page here
    VStack {
        Text("Settings Page").font(.title)
        Text("All your settings here").font(.subheadline)
        Button("Dismiss") {
            notificationService.showSettingsPage = false
        }
        .padding()
        .buttonStyle(.borderedProminent)
    }
}
With this setup, you can easily call the Settings page from anywhere in the app if you put this code in the root of your SwiftUI app!
So there you have it, all the authorization options for push notifications in Swift and each one gives your app a different way to interact with the user, so you can choose the ones that best fit your app’s needs.
Now let’s talk about error handling in push notifications with SwiftUI.
SwiftUI Error Handling with Push Notifications Permission Request
Error handling is vital for push notifications in SwiftUI apps, enhancing reliability and ensuring notifications consistently reach users. It also boosts user engagement by minimizing disruptions, thereby improving user retention rates. Proper error handling is key for effective debugging,
aiding in the quick identification and resolution of issues, whether they stem from network problems, incorrect payloads, or client-side difficulties. And all of that is good for a great user experience with your app!
If you look closely at our requestPushNotificationAuthorization function you will realize that it has a catch block.
Check below:
func requestPushNotificationAuthorization() async {
    do {
        try await UNUserNotificationCenter.current().requestAuthorization(options: [
            .alert,
            .sound,
            .badge,
            .carPlay,
            .provisional,
            .criticalAlert,
            .providesAppNotificationSettings])

    } catch {
        // use this catch to make a proper error handling
        print(error)
    }
}
Inside that catch block, you need to make sure to your app responds well to a failed requestAuthorization. If users don’t give permission for your app or something wrong happens, you can handle this situation in a few ways:
- Clear Explanation: Users are more likely to grant permissions if they understand why it’s necessary. When you ask for permission, clearly explain why your app needs to send push notifications and how it will benefit the user.
- In-App Prompts: If the user denies permission, you can use in-app prompts at relevant times to explain why notifications would be beneficial in the current context. For example, if your app is a messaging service, you could display a prompt explaining that enabling notifications will let the user know when they receive new messages.
- Settings Reminder: Occasionally remind the user that they have the option to enable push notifications in the app or device settings. However, you should be careful not to do this too often as it could annoy the user.
- Fallback Methods: Have alternative methods to deliver important information. This could be through email, SMS, or in-app messaging.
And that is it for today!
Conclusion – SwiftUI Push Notifications Options Tutorial
In conclusion, implementing push notifications in SwiftUI is a potent tool for boosting user engagement and providing real-time updates. The UNUserNotificationCenter is the hero of our push notification story, facilitating every aspect of notifications from scheduling to user interaction.
The vast variety of authorization options in Swift, such as alert, badge, sound, CarPlay, provisional, critical alert, and providesAppNotificationSettings, allows developers to create a custom user experience, tailoring notifications to specific app needs and user preferences. However, it’s important to implement these options judiciously to ensure a seamless and unobtrusive user experience.
Fellow Apple Developers, that’s all.
I hope you liked reading this article as much as I enjoyed writing it. If you want to support this blog you can Buy Me a Coffee or say hello on Twitter. I’m available on LinkedIn or send me an e-mail through the contact page.
You can likewise sponsor this blog so I can get my blog free of ad networks.
Thanks for the reading and… That’s all folks.
Image credit: Featured Painting


