
Hallo jassen en jurken, Leo hier. Today we will talk about a very interesting SwiftUI Struct called ViewThatFits.
Creating screens in iOS was never so easy. Today we have SwiftUI which is a declarative paradigm where you just need to write what you want to show that the framework “kinda” does the rest for you. If you are lucky enough to use a high iOS minimum version this task becomes more straightforward.
You could have available out-of-the-box: charts, easy-to-use navigation, metal shaders, and much more.
All of those topics I still need to cover in this blog when I have time, especially the navigation stack.
One thing that I want to comment on is how important is the role of motivation for the ones starting a new career. When I was starting my iOS journey I had a good friend that was my mentor (thanks Andre!), and all the motivation that came from that friendship was/is invaluable.
I’m saying this because if you are a more experienced developer you could do the same thing for other people. Doesn’t hurt to give a compliment to someone on LinkedIn that is showing their journey throughout their Swift and SwiftUI Courses. Or even other people’s projects that are in the initial state, giving a compliment could change the whole life of that person.
I love the iOS community and I think is one of the healthiest ones to be, let’s continue this ball rolling!
Coming back to the new features that make our life easy in SwiftUI is TipKit. I really think that our job as iOS developers is more than just translating requirements into code, but also guiding the company that we work to a design that looks like native. And caring about user experience is all that we discuss in the article about mistakes to avoid when using TipKit.
Motion is part of our real life. The curious thing is that when we see something animated in our apps we feel amazed. For years we were used to interfaces that had few to no animations and everything was static ( I’m looking to you Microsoft). Nowadays is hard to think about an interface with zero animations and animating a selection of an item is what we did in this article.
To this lesson be effective we need first to learn how SwiftUI layout its views with ideal sizes and proposed sizes. Then we will check a code example of how powerful is ViewThatFits.
No more talking let’s code!
Painting of the Day – Smiling Young Man Squeezing Grapes
This is a 1622 painting by Gerard van Honthorst.
Gerard van Honthorst, or as some might know him, Gerrit van Honthorst, graced our world from 4 November 1592 to 27 April 1656. This genius became an icon for his magically lit scenes, thus earning the cheeky nickname, Gherardo delle Notti – our very own “Gerard of the Nights”.
Now, a bit about his origin story: Born in scenic Utrecht, he began his journey under the watchful eyes of his father, a decorative painter. Then, leveling up, he trained with the legendary Abraham Bloemaert.
I chose this painting because he is squeezing grapes as the ViewThatFits does with the view that fits in the proposed size!
The Problem – How to Build a View That Adapts To Different Layouts Depending on the Space They Have To Be Displayed?
You are given a layout that has a view that needs to behave differently depending on the frame it was inserted.
So imagine this situation. You have a SwiftUI cell view that you also want to reuse in several sizes. One way to do this is to check the size before invoking the cell and then creating the correct cell for that size. This solves the problem but is not very scalable. Imagine that you have to handle all the possible screen sizes and frames. We know that path very well and we try to avoid hardcode stuff as much as we can.
In this environment, ViewThatFits was born. With this struct, you can just declare your views and it automatically will select the first one that the size fits where it was set.
Check the Image below that we will be coding today:
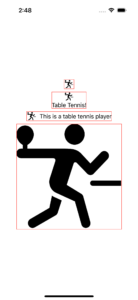
What if I told that in that all four views in the image above are the same view in SwiftUI and I didn’t have to calculate the size of anything? This is the power of the ViewThatFits struct.
Come on and dive with me in this new world.
What Is The ViewThatFits Struct In SwiftUI?
This struct lifts all the heavy lift for you when trying to match what view will fit in a given space on your screen. What it does is check all the child views that you provided and then select the FIRST one that the ideal size in the constrained axes fits the proposed size.
“Hey Leo, fancy words bro, what do ideal size and proposed size even mean?”. Patience young grasshopper, this is the next topic.
What is the Ideal Size and Proposed Size in SwiftUI? What Differences do they have?
When working with SwiftUI, it’s essential to understand the different sizing paradigms it introduces to handle layout. Two critical concepts in this arena are proposed size and ideal size.
Let’s dive in and explore the differences between these two terms.
Proposed Size
In SwiftUI, when a view is asked to compute its size, it receives a proposed size from its parent. This proposed size provides the view with information about how much space is available or preferred for it. It’s a suggestion, not a hard constraint.
To better understand this, think of a parent’s view telling their child view, “I think you should be about this size, but let me know what you think.”
A view can choose to:
- Adopt the proposed size entirely.
- Use only parts of the proposed size.
- Ignore the proposed size and define its own size, based on its content or other criteria.
This system allows for dynamic layouts that adapt based on available space and content size.
This relates to ViewThatFits because this is the first part of the work. Receiving the proposed size from the parent view. Now let’s discover what our ViewThatFits struct will do with this information from the parent view.
Ideal Size
The ideal size is a term associated with SwiftUI views that have intrinsically determinable sizes based on their content. It represents the size a view would like to be to optimally display its content if there are no external constraints.
For example, an Image view with a specific image will have an ideal size that matches the dimensions of that image. Another example is a Text view, whose ideal size is based on the font, text content, and any modifiers applied to it.
This is the second part of the puzzle that ViewThatFits solves. With the proposed size of the parent view, now our handy ViewThatFits struct can check each one of the views that you send to it, and the first that fit it will show!
Key Differences Between Proposed Size and Ideal Size
As you could observe above, they are two different subjects. Besides the proximity of the naming, they are not related to each other at all!
The three main differences that I could think of are:
- Origin: The proposed size is given to a view by its parent or container, while the ideal size is inherently determined by the view’s content and properties.
- Flexibility: The proposed size is more of a suggestion, which views can choose to adopt, modify, or ignore. In contrast, the ideal size is a static value derived from the view’s intrinsic content.
- Usage: The proposed size is more commonly encountered when customizing layout behaviors in custom views or when working with container views like HStack or VStack. On the other hand, the ideal size is a fundamental concept when working with views that have a natural, content-based size.
Let’s see how to implement that in code!
ViewThatFits SwiftUI Example
Check the code below and see the full power of the ViewThatFits struct.
First, let’s create a view that can adapt to any size that is proposed to it! We will use the ViewThatFits to make the actual choice of which view will appear. Also, remember that the ViewThatFits will always choose the first one that fits in the proposed size, so it is better to always declare from the biggest to the smallest.
Check the implementation of our adaptable view below:
import SwiftUI

struct MyAdaptableView: View {
    var body: some View {
        VStack {
            ViewThatFits {
                Image(systemName: "figure.table.tennis") // biggest view that could appear
                    .resizable()
                    .frame(width: 300, height: 300)

                HStack { // second biggest width view that could appear
                    Image(systemName: "figure.table.tennis")
                        .imageScale(.large)

                    Text("This is a table tennis player")
                }

                VStack { // third biggest width view that could appear
                    Image(systemName: "figure.table.tennis")
                        .imageScale(.large)
                    Text("Table Tennis!")
                }

                Image(systemName: "figure.table.tennis") // smallest width view that could appear
                    .imageScale(.large)
            }
        }
        .border(Color.red)
    }
}
In the code above we are showing an example where the view adapts its content based on the proposed view width. The biggest the width available bigger will be the view.
Now let’s use it in our view and see the results:
struct ContentView: View {
    var body: some View {
        VStack {
            MyAdaptableView()
                .frame(width: 20)
            MyAdaptableView()
                .frame(width: 100)
            MyAdaptableView()
                .frame(width: 250)
            MyAdaptableView()
                .frame(width: 300)
        }
    }
}
As you can check, using our adaptable view is really easy. And depending on the width that we provide to it, it can choose what view it will show!
And all of that results in the image at the beginning of the article.
How cool is that? I think this can help us to create Views that are really flexible and can improve the readability of our code decreasing the number of views doing similar layouts.
Summary – Using ViewThatFits in Your Projects
In the constantly evolving world of iOS development, SwiftUI has undeniably brought forth a revolution in how we approach interface design. The introduction of the ViewThatFits struct simplifies adaptive layout construction, eradicating the tedious task of handling different screen sizes and frames manually.
By comprehending the nuances between proposed and ideal sizes, developers can leverage the power of SwiftUI to automatically select the most fitting view based on its parent’s dimensions. This not only aids in the creation of more responsive apps but also reduces redundancy in code, promoting cleaner, more maintainable projects.
To those diving into SwiftUI, embrace tools like ViewThatFits and watch as your coding efficiency and interface adaptability soar.
Fellow Apple Developers, that’s all.
I hope you liked reading this article as much as I enjoyed writing it. If you want to support this blog you can Buy Me a Coffee or say hello on Twitter. I’m available on LinkedIn or send me an e-mail through the contact page.
You can likewise sponsor this blog so I can get my blog free of ad networks.
Thanks for the reading and… That’s all folks.
Image credit: Featured Painting


