
Hallo speelgoed en cadeautjes, Leo hier.
Have you already thought about what is the end game for developers? I mean, in all my experience working with developers that are more than 40 years old is really rare. Even rare is working with software engineers that have more than 50, and I think I never worked with a 60+ years old developer. I was discussing this with my wife and she said that maybe it’s because it is a new area and people didn’t have time to get old.
I know that my sample size is tiny and maybe in older programming languages the average age should be higher, for example in the COBOL community. Also, I just work in some specific industries, maybe other areas have more seasoned software engineers. I was surprised when I discovered that the average age of a software engineer in the US is around 40 years old. I would like to see the breakdown per industry and/or language that is used most.
I was listening to a podcast that was talking about choices that we make in our life, and how the environment influences that. For example, my decision to become a software developer was based on two pieces of information: it is an area that always is hiring and you earn a lot of money.
When I was a teenager, 15 years ago, I was not on the path to engineering, I was quite the opposite as you can see in the video below:
I gave up on the pianist career on the day that I was supposed to sign up for the musician college because I didn’t see how that could be a stable future in the country in which I was born. If I had grown up in another context Holy Swift wouldn’t even exist and I probably would have a blog or YouTube channel about piano/music/art/who knows.
One day I’ll study music again.
What do you think about that? If you have 20ish do you see yourself coding for the next 40 years? I know that most of you are probably younger than me, but I wanted to share this thoughts.
In more Swifty news, last week we learned how to use alignment guides in SwiftUI. I was always in kinda doubt about how that thing really worked, so I took some time to learn properly and tried my best to show my mental model in that article.
And talking about curiosity, something that is quite mysterious is why we need “or not” to use the @testable in the testing module. I wrote this article to solve that question and learn also the drawbacks of using it.
No more talking, let’s code! But first…
Painting of The Day
The art piece of today is called Portrait of Bindo Altoviti, an 1512 painting by the master Raphael.
This painting showcases the Italian Renaissance artist’s experimentation with style, influenced notably by Leonardo.
Depicting Bindo Altoviti, a cultured Roman banker of Florentine descent, the painting stands out for its unique portrayal and lighting contrasts. Initially kept within the Altoviti family, it was sold in 1808 and eventually acquired by Samuel Henry Kress after leaving Nazi Germany, now residing in Washington’s National Gallery of Art.
A related bronze bust by Cellini is displayed in Boston’s Isabella Stewart Gardner Museum.
I chose this painting because looks like Bindo is monitoring us.
The Problem – Monitoring
You need to know on the fly if the user loses the connection, or if there’s a connection available to start a network call.
Today we will talk about NWPathMonitor. You can use this object to read the network status, which network you are using and more.
The idea here is to write the tiniest possible NetworkMonitor, we will use just 15 lines of code we will use the new @Observable annotation to make it reactive. We want our network monitor to have two features: check if there internet is available and check for cellular/mobile data, which means that the user may be in a low-data environment ( 3G, 4G etc).
In your project create a class NetworkMonitor and copy paste the code below:
import Observation
import Network

@Observable
final class NetworkMonitor {
    var hasNetworkConnection = true
    var isUsingMobileConnection = false // low data usage ( 3G / 4G / etc )

    private let networkMonitor = NWPathMonitor()

    init() {
        networkMonitor.pathUpdateHandler = { [weak self] path in
            self?.hasNetworkConnection = path.status == .satisfied
            self?.isUsingMobileConnection = path.usesInterfaceType(.cellular)
        }

        networkMonitor.start(queue: DispatchQueue.global())
    }
}
The code above is quite simple and intuitive. In the initializer, we set a closure that receives a path. The path object is the one that has the most updated info about the network status, such as: which interface we are using, if the iPhone is connected to the internet, etc.
If you want to read if the iPhone has an internet connection you just need to read the status object inside the path and check if it is satisfied, like we did here path.status == .satisfied .
In the same manner, we want also to read if the user is using cellular data or not. For that, we need to check the InterfaceType and search for cellular like this “path.usesInterfaceType(.cellular)“.
And this is all you have to do to create your Network monitor.
Using the Network Monitor Anywhere in Your SwiftUI Project
To use it you go to the root of your project and add two lines of code, one to start the network monitor and the other to inject into the environment:
import SwiftUI

@main
struct TestableTutorialApp: App {

    @State var networkMonitor = NetworkMonitor() // this

    var body: some Scene {
        WindowGroup {
            ContentView()
                .environment(networkMonitor) // this
        }
    }
}
Let’s setup the view now.
How to Show an Alert if the User Doesn’t Have Internet Connection
Then in your classes, you can easily read it using the .onChange modifier. Just add a state var to check if we are showing or not and that’s it!
Check the example below:
struct ContentView: View {
    @Environment(NetworkMonitor.self) private var networkMonitor: NetworkMonitor
    @State private var showNetworkAlert = false

    var body: some View {
        VStack(alignment: .leading) {
            Rectangle()
                .frame(width: 50, height: 200)

            Text("Your very Important View Here")
                .font(.largeTitle)
                .padding(.vertical)
        }
        .onChange(of: networkMonitor.hasNetworkConnection, { oldValue, newValue in
            showNetworkAlert = !newValue
        })
        .alert("NO INTERNET",
               isPresented: $showNetworkAlert,
               actions: {
            Text("Close")
        })
        .padding()
        .border(.red)
    }
}
With that in place you can test run the test view above and you will get this alert:
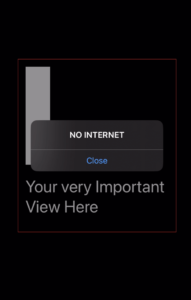
And with just 15 lines of code your app now has a pretty slim and useful network monitor that you can use throughout all your views. Really cool, isn’t it?
And we are done for today.
Summary – How to Monitor iPhone Network Status in SwiftUI?
In summary, monitoring the iPhone’s network status using SwiftUI and NWPathMonitor is not just about ensuring connectivity for your app’s functionality; it’s also about enhancing user experience by proactively managing expectations and mitigating frustrations associated with network-related issues.
This approach exemplifies how a small piece of code can significantly impact the overall performance and perception of an app. By integrating a network monitor, developers can offer a more reliable and user-friendly application, ensuring that users are informed and can act accordingly when network issues arise.
Fellow iOS Developers, that’s all. I hope you liked reading this article as much as I enjoyed writing it.
If you want to support this blog you can Buy Me a Coffee or say hello on Twitter. I’m available on LinkedIn or send me an e-mail through the contact page.
You can likewise sponsor this blog and help our community to grow.
Thanks for the reading and…
That’s all folks.
Image credit: Featured Painting


