Hallo Dames en Heren, Leo hier. Today we will create a very cool project that involves geometry and SwiftUI, a circular text view.
I had the idea to do this while biking back from work one of the other days and I saw an advertising sign with a letter in a circular path. I don’t quite remember what advertising was but that called my attention.
I thought that would be a cool idea to try to do that in SwiftUI. I knew that we have the rotationEffect in SwiftUI that we can use to rotate views, and turns out that was the right solution all the time.
SwiftUI is a very powerful framework and it enables you to do really cool things with just a small code. For example, you can set automatically the corner radius of inner views based on the corner radius of outer views using ContainerRelativeShape.
Another interesting thing that I was playing around with lately is Date formatters. Working with Date is never easy, and it is so hard that languages usually have more than 1 native library that deals with Date. In iOS we have Date and Calendar, Java had Date and then Calendar, and now DateTime. Just to exemplify how not trivial is that. In that field, Swift provides us with a really good way to compare dates using RelativeDateTimeFormatter. The output is human readable and you never need to worry about comparing dates anymore!
No more talking, let’s code! But first…
Painting of The Day
Today I chose a 1900 art piece called Dewey’s Arch by Childe Hassam.
Frederick Childe Hassam, a bigwig in the American Impressionist painting scene, was famous for his urban and coastal scenes. From a young age, Childe showed a knack for art, but his parents didn’t really cotton on to his talent. He was a bit of a sporting champ too, doing well in boxing and swimming at school. But when a fire in 1872 destroyed his dad’s business, Childe ditched school to work, even turning down his uncle’s offer to fund a Harvard education.
He ended up working in publishing, where he mastered wood engraving and began his journey into oil painting, although watercolors were his real jam. By 1882, he was flying solo as an illustrator, and soon started displaying his work in exhibitions.His buddy Celia Thaxter convinced him to drop his first name, and the rest, as they say, is history!
I chose it because we are going to talk about a lot of arcs today. So I wanted to get some painting that depicts that.
The Problem – How to Create a Text that Follows a Circular Path in SwiftUI?
You need to create a label that is circular. So when you write it should follow a non straight path.
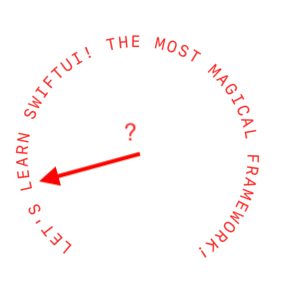
To illustrate better what we want to achieve today check the image below:

Now you are asking yourself “How to do that?”. First, we need to understand a little bit of geometry on this. More important than the final code, is you being able to understand why this works.
Circle Geometry and SwiftUI
If you thought that you would never use Radius, Radians, or circumference in your life anymore, think twice. The way we achieve this effect is by using a lot of geometry concepts.
We need to know the exact position of each letter in the circle. In the image below for example we are trying to know the angle of the “L” letter there:
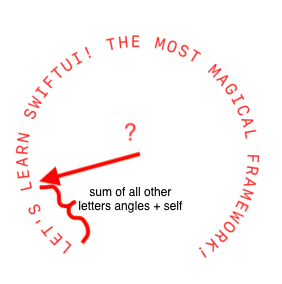
If you think a little more you will notice that the angle of the letter “L” is the sum of the angle of all other letters, like in the image below:
As the first letter will always start at the angle zero and we just rotate the whole view at the end, we just need to calculate based on the circumference what is the proportion of that letter width plus all the previous letters’ widths and then transform that in Radians. And that is exactly what we need to position the letter in the right place.
But why Radian?
Because of the radian formula:
360° = 2π
In our case, we already know that 360 degrees would be equal to our full circumference. We want just a fraction of it that represents the desired angle, therefore:
(percentage of the circumference) * 2 * π
For example: if we want to know the position of a letter that is in the middle of the circle. The sum of the widths of the letters would be approximately half of the total circumference. With that in hand, we can discover the radians just by multiplying the percentage by 2 * pi.
A step by step to do a circular path text in the SwiftUI algorithm would be:
- Get the circumference using radius * 2 * pi.
- Calculate the sum widths of the current letter + the previous letters.
- Divide the sum of all widths by the circumference value getting the percentage of 1 radian.
- Transform that into radians.
Now you know why it works, let’s implement it in the code and I’ll explain step by step.
Code Example – Creating Circular Text View
Checkout the code below:
import SwiftUI

struct CircularTextView: View {
    @State var letterWidths: [Int:Double] = [:]

    @State var title: String

    var lettersOffset: [(offset: Int, element: Character)] {
        return Array(title.enumerated())
    }
    var radius: Double

    var body: some View {
        ZStack {
            ForEach(lettersOffset, id: \.offset) { index, letter in // Mark 1
                VStack {
                    Text(String(letter))
                        .font(.system(size: 13, design: .monospaced))
                        .foregroundColor(.red)
                        .kerning(5)
                        .background(LetterWidthSize()) // Mark 2
                        .onPreferenceChange(WidthLetterPreferenceKey.self, perform: { width in  // Mark 2
                            letterWidths[index] = width
                        })
                    Spacer() // Mark 1
                }
                .rotationEffect(fetchAngle(at: index)) // Mark 3
            }
        }
        .frame(width: 200, height: 200)
        .rotationEffect(.degrees(214))
    }

    func fetchAngle(at letterPosition: Int) -> Angle {
        let times2pi: (Double) -> Double = { $0 * 2 * .pi }

        let circumference = times2pi(radius)

        let finalAngle = times2pi(letterWidths.filter{$0.key <= letterPosition}.map(\.value).reduce(0, +) / circumference)

        return .radians(finalAngle)
    }
}

struct WidthLetterPreferenceKey: PreferenceKey {
    static var defaultValue: Double = 0
    static func reduce(value: inout Double, nextValue: () -> Double) {
        value = nextValue()
    }
}

struct LetterWidthSize: View {
    var body: some View {
        GeometryReader { geometry in // using this to get the width of EACH letter
            Color
                .clear
                .preference(key: WidthLetterPreferenceKey.self,
                            value: geometry.size.width)
        }
    }
}

struct ContentView_Previews: PreviewProvider {
    static var previews: some View {
        CircularTextView(title: "Let's learn SwiftUI! The most magical Framework!".uppercased(), radius: 125)
    }
}
The code above has a lot of tricks let’s explain them one by one.
- In Mark 1 we are adding each one of the letters as a single Text View. This is the first trick, what appears to be one single Text View is in fact one Text View. At the end of this single letter text view we are using a spacer that will push the letter always to the top of the view then when we rotate we create this clock impression.
- In Mark 2 is another SwiftUI trick. For each one of the letters, we are using a background view with a GeometryReader that we called LetterWidthSize. This background view is very important because the view length changes we set a new PreferenceKey value. When that happens we can get the value in the @State variable. This is how we are getting the widths of each one of the letters in the phrase.
And the final Mark 3 mathemagic is the one we explained at the beginning of this article. The function fetchAngle receives an index. With that index, we know the position of the letter and we can calculate the percentage of a Radian. This deserves special attention.
The function calculates the angle at which each letter should be rotated. It first calculates the circumference of the circle, then it calculates the sum of the widths of all letters up to the current position, divides it by the circumference, and multiplies it by 2π to convert it to radians.
Here is the step-by-step breakdown:
let times2pi: (Double) -> Double = { $0 * 2 * .pi }: This line defines a closure (an anonymous function) calledtimes2pithat takes aDoubleas input and returns the input multiplied by 2π (which is the radian equivalent of a full circle or 360 degrees).let circumference = times2pi(radius): This line calculates the circumference of the circle. The radius of the circle is given as an argument, and the circumference is calculated using the formula2πr, whereris the radius of the circle. This is done by calling the previously defined closuretimes2piwithradiusas the argument.let finalAngle = times2pi(letterWidths.filter{$0.key <= letterPosition}.map(\.value).reduce(0, +) / circumference): This line calculates the rotation angle for the letter at the given position.letterWidths.filter{$0.key <= letterPosition}: This filters theletterWidthsdictionary to only include letters up to the current position..map(\.value): This transforms the filtered dictionary into an array containing only the widths of the letters..reduce(0, +): This adds up all the widths in the array, giving the total width of all letters up to and including the current position.- The total width is then divided by the circumference and multiplied by 2π (using the
times2piclosure), to convert the width into an angle in radians. The division by the circumference is done to normalize the total width to the range of the circle’s circumference.
return .radians(finalAngle): The final calculated angle is then returned as anAnglevalue in radians.
Some things that are important to notice are: We are using a font that is monospaced, because if not the spacing between letters would be inequal and the final result is kinda weird also the Kerning function to create the right spacing.
If you are still confused, you can read the beginning of the article again.
The final result of this view is:
And that’s all folks!
Summary – Creating Circular Text on a Path in SwiftUI
In this article, we’ve explored an intriguing concept – creating a circular text view using SwiftUI. Drawing inspiration from an advertising sign, we’ve seen how simple geometric concepts such as Radius, Radians, and Circumference can be utilized to achieve a visually appealing effect. With SwiftUI’s powerful features, we were able to construct our circular text view by rotating individual letters around a central point.
We dived into the importance of calculating the exact position of each letter in the circle, understanding how the sum of the angles of preceding letters impacts the current letter’s position. We leveraged the radian formula to convert the sum of the widths of the letters (as a percentage of the circle’s circumference) into radians, thereby determining each letter’s placement.
The article provided a detailed explanation of the code, highlighting key SwiftUI functionalities like rotationEffect, GeometryReader, and PreferenceKey. We saw how a monospaced font ensures equal spacing between letters and guarantees a satisfying result. The final code, though containing a few tricks, is a testament to the power and simplicity of SwiftUI.
In conclusion, whether you’re looking to make your app stand out with a unique design or simply want to experiment with SwiftUI and geometry, creating a circular text view is a fascinating and educational project. Remember, a dash of creativity and the right set of tools can transform ordinary text into a captivating visual element!
Fellow Apple Developers, that’s all.
I hope you liked reading this article as much as I enjoyed writing it. If you want to support this blog you can Buy Me a Coffee or say hello on Twitter. I’m available on LinkedIn or send me an e-mail through the contact page.
You can likewise sponsor this blog so I can get my blog free of ad networks.
Thanks for the reading and… That’s all folks.
Image credit: Featured Painting


