
Hello everyone, Leo here. Today we will explore a design tool called Judo.
Ah, no-code technologies! They’ve come a long way, haven’t they? It seems like just yesterday when the idea of creating websites and apps without writing a single line of code was a far-fetched dream. But fast forward to today, and no-code platforms have evolved into powerful, user-friendly tools that are transforming the tech world.
No longer reserved for tech wizards, they’re opening doors for creative minds from all walks of life to bring their ideas to life. It’s incredible to see how far we’ve come in just a short time, and one can’t help but wonder, “What’s next?”.
Today we will talk about a no-code tool that will help you to build interfaces with SwiftUI in no time! But first…
Painting of the Day
The painting I chose today is an 1888 art piece called The Langlois Bridge at Arles by Vincent Van Gogh. He is one of the most influential figures in the history of Western art and found inspiration in a variety of sources.
However, one of the lesser-known but deeply impactful influences on his work was Japonism – a fascination with Japanese art and culture that swept across Europe in the late 19th century. Van Gogh was profoundly attracted to the distinct aesthetics, bold color usage, and unique perspectives found in Japanese ukiyo-e prints, and this admiration significantly shaped his artistic style.
Van Gogh’s embrace of Japonism can be seen in numerous aspects of his work. The vibrant color palettes, strong outlines, and flat areas of color that characterized his later paintings were all reflective of Japanese woodblock prints. His iconic masterpiece, “The Starry Night,” can be seen as a nod to the stylized, swirling patterns found in Japanese artwork.
I chose this painting today because Judo is all about bridging the gap between designers and developers and nothing better than a bridge painted in Japonism style to represent that!
Special Thanks to Judo
I’d like to take a moment to express my immense gratitude to Judo for sponsoring this article. Their support helps keep this blog running and allows me to continue sharing valuable insights and information with the iOS development community.
Partnerships like these enable us to grow, learn, and stay informed about the latest tools and trends in our field. So, a heartfelt thank you to Judo for their generous sponsorship and for creating such an innovative tool for us iOS developers.
Now let’s dive into this really innovative design tool!
Judo: Simplifying and Streamlining iOS Development
![]()
As an iOS developer, you know that staying updated on the latest tools is essential for creating high-quality applications.
Today, we’re diving into the Judo App, a Mac app that proposes to change the way developers work on their iOS projects. Judo is setting a new standard for iOS development and design with its innovative features and seamless workflow. In this article, we’ll discuss the best three features that, in my opinion, make Judo stand out as a competitor in the design tool scene.
When you think of a design tool you think about a tool that you can easily design and share the screen with your developers, however, you would never think about the features that I’ll show you here.
In my opinion what Judo.app brings to the table is unique, it narrows the relationship between designers, developers, and any other stakeholder for your product. Being able to do that is not only unique but really powerful as you will see in the next sections.
The three main features are:
- Design with API Data
- Real-time on Device Previews
- SwiftUI Code Generation
And one extra translation feature that really got my attention.
I never thought about how essential it is for design tools to offer the ability to use real API data in the design process. This capability bridges the gap between design and development, ensuring that designers can create accurate, realistic, and effective user interfaces.
Design with API Data
![]()
By incorporating real API data, designers can better understand how their designs will function in real-world scenarios, allowing them to make informed decisions and optimize the user experience. Ultimately, this level of integration streamlines the design and development process, resulting in more efficient teamwork, faster product iterations, and higher-quality applications.
How to Use Real-time Data in Your Designs?
Let’s start this tutorial with a feature that really helps to bring Designers and Developers together. The irony of this is that we will talk about API which is something that connects the backend with the frontend!
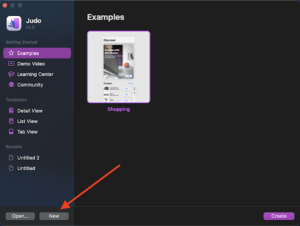
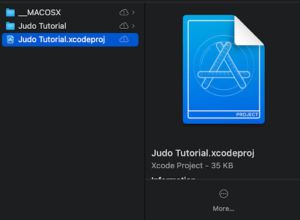
To demonstrate this we will design a list that is filled with names that come from a remote API. First, create a blank project in Judo.app:
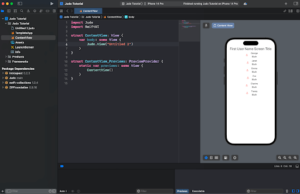
Now let’s start to do our screen. The very basic block in Judo is the Component, and that is what we will create now.
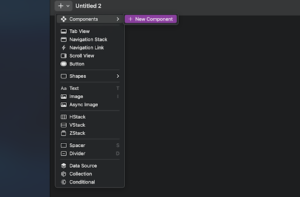
You should now have a full screen to work on. Just like we do in SwiftUI, we need to start to build the screen interface.
The first thing is to add a VStack because we want our list to have a title.
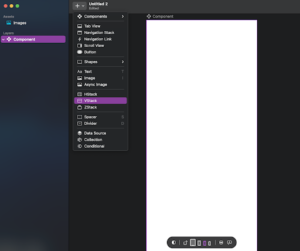
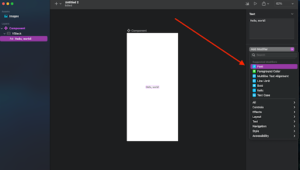
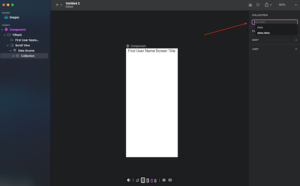
Add a Text layer to your Component that will be the title of our screen. You can do it by pressing the shortcut “T” on your keyboard or using the following menu:
But that doesn’t look like a title, right? We can customize it directly from Judo. In the right column, you will find a drop box with the “Add Modifier” title.
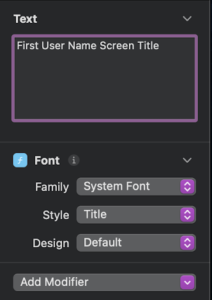
Click on it and select Font, change the Style to Title, and change the text to “First User Name Screen Title”:
With this configuration:
Before we continue, I want to show you something really cool. If we want to view the underlying SwiftUI code used to build this screen, we can press the Swift button in the right top corner and it will show how us what the SwiftUI code looks like.
Check below:

I want you to realize how close to SwiftUI code this design tool is. It’s amazing how expressive you can be without writing any code. Let’s continue. Now it is time to use our API capabilities.
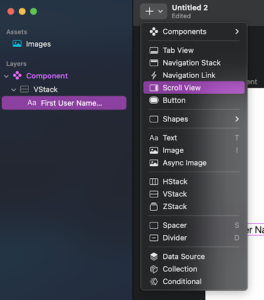
We will need to add a Scroll View:
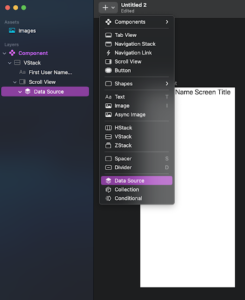
And inside the Scroll View, we will add a component called Data Source. The Data Source as the name says is something that will get data to populate our designs. But why does this matter? Have you ever been asked by your designers what kind of data we have from an API? Or what is the size of the Strings?
Those situations are pretty common in iOS development and if the designers have access to all the data, they can better reason about what is possible or not and work freely without relying on the development team too much.
This is really next-step thinking for designers and developers.
Now, add a new Data Source component and we will configure it right away:
When you click in the Data Source component we have some options already set. The API, the HTTP Method, URL Parameters, and so on:
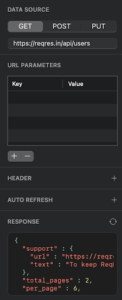
Now inside the Data Source component we have to put another component that will extract the exact data that we want from it, it is called Collection:
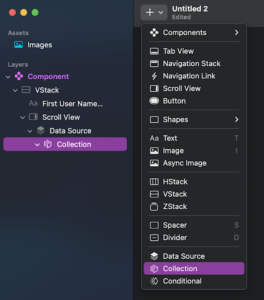
We need to configure the collection to get the data in the right column:
The Collection layer needs to map to an array property in the JSON response.
Add “data.data” in the key path text field as shown above. Observe that it already suggested “data” as a good candidate to use for the key path, but nothing stops you from using a different value.
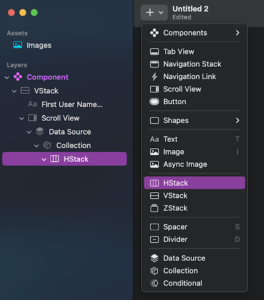
Finally, let’s create the rows of our list. We will do a simple design with HStack and VStacks.
Add first an HStack:
And an image:
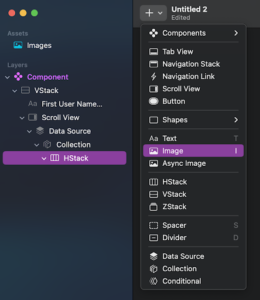
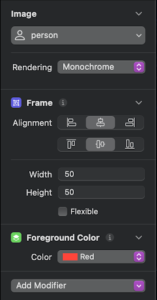
Let’s configure the Image View with a default SF Symbol Person image, 50×50 frame, and red foreground color. To find the person Symbol you just need to click in the Placeholder drop box and search for person in the search text field.
Check below the final configuration:
Now add the last VStack of this tutorial inside the HStack:
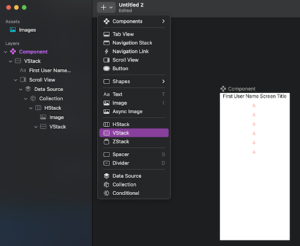
And add two Texts Layers inside the new VStack:

Now the magical API connection part. We want the first name and surname populated automatically from the data fetched from the API.
To do that we need to select the label in the left panel and then go to the right text panel and click on the plus button, it will give us an option to select the field from the parsed json to put in each row:
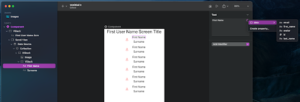
And doing the same for the surname:

Now you can understand why I think this tool is a game-changer. The design team can already know what is the API response and design based on the real data.
This interaction is a real bridge between the development and design teams!
Real-time Previews
The importance of a design tool being able to display real-time previews on iOS devices cannot be overstated.
This feature lets designers and developers instantly visualize how their designs will look and feel on actual devices, ensuring an accurate representation of the end product.
With real-time previews, teams can quickly identify and address any issues related to layout, responsiveness, and user experience before investing time and resources in the development phase.
Faster Iteration and Device Compatibility Direct From Design Tool
This immediate feedback loop improves efficiency and helps create a seamless and polished user experience, ultimately resulting in higher-quality applications and satisfied end-users. Let’s check how that works using Judoand Xcode! You can quickly check in several devices by generating a full Xcode project with your design directly from the Judo.app. Go to the top right corner and select the “Export to Xcode…” option:

Now select the place to generate the project, give it a name and now go to the select saved location and open it:
When you open it, you can see that you have everything that you need to check your designs in real devices, simulators, or even SwiftUI Previews! Check the image below to see what your project should look like:
Now you can install the prototype in your devices or simulators and see how things should look like! Really cool, isn’t it?
SwiftUI Instant Code Generation From Design
![]()
As iOS developers that have to work with designers, we usually do tedious back-and-forth work checking each one of the attributes of the view. For example: Imagine that I have a full custom label inside a row, and you need to check its font, font size, frame, max number of lines, foreground color, background color, shadow, shadow attributes, and so on. If you think reading this was tedious, imagine doing the actual work. But there is a light at the end of the tunnel with Judo.
If you are developing and using SwiftUI, Judo generates that code for you!
How to create SwiftUI Code with a Design Tool?
Now imagine that your designer came up with this row design for your lists in the app, a very customized orange background row with custom properties and fonts.
Like the image below:
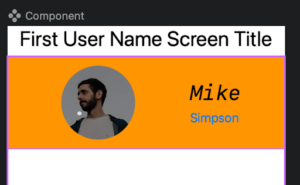
You can imagine that creating something like this in SwiftUI is very fast… And it is, however with Judo’s SwiftUI code generation, it’s not only fast, it’s already done for you.
In Judo you can transform the tiring experience of checking each one of the label font size, name, italics, masks, colors, and padding of everything in the row into a one-click experience.
Check below how can you have the full SwiftUI code in one click with Judo, go to the top right corner and click on the Swift-shaped button:
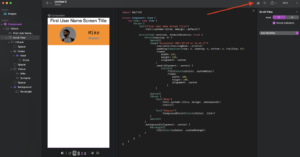
As you can see, the full SwiftUI code for that custom row is already done for you.
That is what I call a time saver for developers.
One More Thing… Solving Translations Problems

I was about to finish this article but one more feature caught my attention, this feature is really useful for designers. You can add your translations directly into your design files and check how the UI will behave with them. Imagine that our app should be fully translated into German.
If you already worked with any app translation, you know that some languages are harder to fit into the label spaces than others. German is one of the hardest in my experience. But with Judo, the designer can check directly from the tool what the translation would look like.
To do that, select the title label, in our case the “First User Name Screen Title” and press the little “A” icon at the bottom:

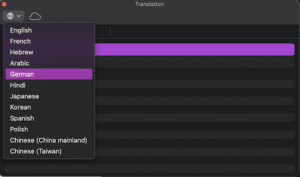
Then click the “Manage Translations…” option. Now you will see all the Texts that we have in our Component. Click the Globe icon and select German.
Now a German tab will appear like the image below:
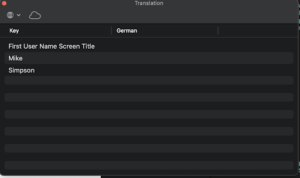
We now have two options. If you already have your translations and localizations you can just double tap in the German column and add your translations.
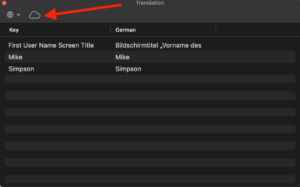
Or you can let Judo do the translation work for you by clicking the cloud symbol next to the globe:
Now to see how our label will look on a German user’s device we just need to go back to the main screen.
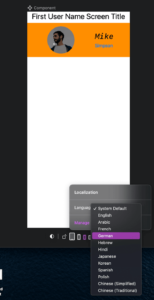
However, this time we will click on the small “A” button at the bottom and then click on Language: “System Default”.
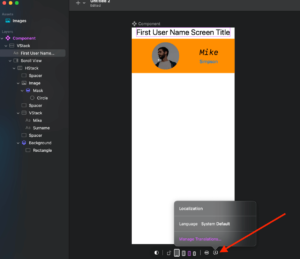
A context menu will appear showing all the available languages and we can select German from there:
And now we can check how it would appear in German:
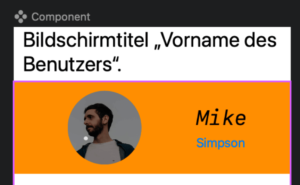
The impressive part is that now the designer can easily change the app’s translations and adjust the font size and other things to make the design process with the highest fidelity possible.
And that’s it for today!
Summary – Designers and Developers United With Judo
In conclusion, Judo is a new design tool that is revolutionizing iOS development and design.
With its unique features and seamless integration with SwiftUI, Judo simplifies and streamlines the design process, bridging the gap between designers, developers, and stakeholders.
The ability to design with real API data enhances the accuracy and effectiveness of user interfaces, while real-time on-device previews allow for instant visualization of designs on actual devices, improving efficiency and user experience. Judo’s instant code generation for SwiftUI also eliminates the tedious back-and-forth work between designers and developers, saving time and effort.
Furthermore, Judo’s translation feature enables designers to easily incorporate translations into their designs, ensuring a high level of fidelity and usability. With Judo, iOS developers and designers can collaborate more effectively, iterate faster, and create high-quality applications that meet user needs.
It’s a tool that unites various stakeholders and empowers them to bring their ideas to life with ease and efficiency.
Fellow Apple Developers, that’s all.
I hope you liked reading this article as much as I enjoyed writing it. If you want to support this blog you can Buy Me a Coffee or say hello on Twitter. I’m available on LinkedIn or send me an e-mail through the contact page.
You can likewise sponsor this blog so I can get my blog free of ad networks.
Thanks for the reading and… That’s all folks.
Image credit: Featured Painting


