Hallo allemaal, Leo hier. Today we will explore an interesting Shape in SwiftUI called ContainerRelativeShape.
With SwiftUI, creating custom shapes has never been easier. From simple rectangles and circles to more complex polygons and curves, the possibilities are endless. Plus, you can animate your shapes to add even more flair to your app. With SwiftUI, you have the ability to create custom shapes that can be manipulated in a variety of ways. You can adjust the size, color, opacity, and more to create exactly what you’re looking for.
Shapes in SwiftUI can be animated in a variety of ways, from simple transitions to more complex animations. This allows you to add dynamic elements to your app and make it more engaging for your users. SwiftUI shapes are designed to be accessible to all users, regardless of their conditions. You can add accessibility labels and hints to your shapes to ensure that everyone can interact with them in a meaningful way.
Wether you are using native SwiftUI components like the disclosure groups or you are going to create a very unique splash screen animation you it is always good to have one more tool in your belt to make your life easier.
Lately I’ve being playing around with Shapes and it has very powerful API that SwiftUI call Transformed Shapes, and one of the transformed shapes is the subject of today’s article, the Container
No more talking, let’s code! But first…
Painting of The Day
The painting I chose for today is a 1905 painting called Departure of a Cargo Ship by Maxime Maufra.
Maxime Maufra started painting at the age of 18 with encouragement from artists in Nantes. But it was only after discovering the Impressionists and exhibiting his works at the Paris Salon that he decided to pursue painting full-time. He left his business to live in Brittany where he met Gauguin and had his first solo exhibition in Paris.
He later exhibited with Durand-Ruel and traveled extensively to find inspiration for his art. Maufra was the first painter to reside in the Bateau-Lavoir in Montmartre and returned to Brittany annually, finding inspiration in Quiberon. Maufra’s works featured nature and landscapes in a unique style that blended traditional techniques with those of the Impressionists. His paintings were known for their rich colors and the way they captured the fleeting moments of nature.
I chose this painting because cargo boats usually carry containers, and that is exactly our topic today.
The Problem – Nested Rounded Corners Problem in SwiftUI
Imagine that your designer wants you to design a component that has several rounded corner layers.
As a picture is worth a thousand words let’s see what is this problem is about:
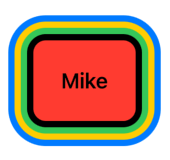
As you can observe in the image above, this component has a lot of rounded layers. The most outer one, the blue layer, has a corner radius way bigger than the most inner layer, the red one. You could easily check in Figma/Sketch or whatever other design tool that you are using what are the exact values to achieve this.
But you and I both know that at the moment the we add one more letter to that, all the hardcoded corner radius will fall and we will have to give maintenance to this component again.
How to avoid hardcoding each one of the outer layers? That’s where the ContainerRelativeShape enters in action.
Code Example – ContainerRelativeShape in SwiftUI
Create a new Xcode project and add the code below as our first draft solution:
struct ContentView: View {
    var body: some View {
        HStack {
            Text("Example 1")
                .bold()
                .padding(22)
                .background(.red, in: RoundedRectangle(cornerRadius: 30))
                .padding(5)
                .background(.black, in: RoundedRectangle(cornerRadius: 30))
                .padding(5)
                .background(.green, in: RoundedRectangle(cornerRadius: 30))
                .padding(5)
                .background(.yellow, in: RoundedRectangle(cornerRadius: 30))
                .padding(5)
                .background(.blue, in: RoundedRectangle(cornerRadius: 30))
        }
        .padding()
    }
}
When you do this, you can easily start to see the problem:
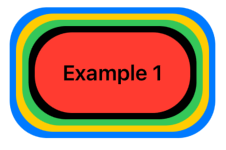
Although all the corners have the same radius, this is not the intended result. What we want is to the inner shapes to fit perfectly inside the other shape.
You can hardcode the radius values and have a good result like this:
struct ContentView: View {
    var body: some View {
        HStack {
            Text("Example 112312")
                .bold()
                .padding(22)
                .background(.red, in: RoundedRectangle(cornerRadius: 14))
                .padding(5)
                .background(.black, in: RoundedRectangle(cornerRadius: 18))
                .padding(5)
                .background(.green, in: RoundedRectangle(cornerRadius: 22))
                .padding(5)
                .background(.yellow, in: RoundedRectangle(cornerRadius: 26))
                .padding(5)
                .background(.blue, in: RoundedRectangle(cornerRadius: 30))
        }
        .padding()
    }
}
However as soon as the component start to grow, it starts to look a little funky:
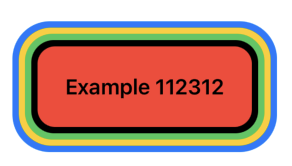
What is the solution then?
Solving the Inner Rounded Corners Problem Using ContainerRelativeShape
If we change each of the inner backgrounds with a ContainerRelativeShape struct it will fill exactly the inner portion of the view.
Copy and paste the code below:
struct ContentView: View {
    var body: some View {
        HStack {
            Text("Example 1")
                .bold()
                .padding(22)
                .background(.red, in: RoundedRectangle(cornerRadius: 14))
                .padding(5)
                .background(.black, in: RoundedRectangle(cornerRadius: 18))
                .padding(5)
                .background(.green, in: RoundedRectangle(cornerRadius: 22))
                .padding(5)
                .background(.yellow, in: RoundedRectangle(cornerRadius: 26))
                .padding(5)
                .background(.blue, in: RoundedRectangle(cornerRadius: 30))

            Text("Example 2")
                .bold()
                .padding(22)
                .background(ContainerRelativeShape().fill(Color.red)) // use containerRelativeShape here!
                .padding(5)
                .background(ContainerRelativeShape().fill(Color.black)) // use containerRelativeShape here!
                .padding(5)
                .background(ContainerRelativeShape().fill(Color.green)) // use containerRelativeShape here!
                .padding(5)
                .background(ContainerRelativeShape().fill(Color.yellow)) // use containerRelativeShape here!
                .padding(5)
                .background(ContainerRelativeShape().fill(Color.blue)) // use containerRelativeShape here!
                .background(.clear, in: RoundedRectangle(cornerRadius: 30))
        }
        .padding()
    }
}
And now we have what we wanted.
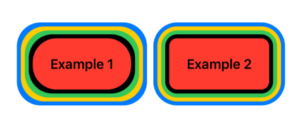
Using ContainerRelativeShape as the transform shape do the trick!
Now we can just set the just the outer radius that all the other radius will adapt nicely. Very cool, isn’t?
Using ContainerRelativeShape with Widgets
Now that we studied how useful it can be for your regular app. There’s a second really good use for the ContainerRelativeShape. Imagine that you want to add an inner border to your widget. How would you do that? Yes, you guessed right with ContainerRelativeShape!
First add a Widget to your project:

Now in your automatically generated Container, search for the EntryView. In my example was WidgetTutorialShapeContainerEntryView in the file WidgetTutorialShapeContainer.swift, but it depends on how you called your widget.
When you find it it should only have a placeholder Text(entry.date, style: .time). Let’s change that to the code below:
struct WidgetTutorialShapeContainerEntryView : View {
    var entry: Provider.Entry

    var body: some View {
        ZStack {
            ContainerRelativeShape()
                .fill(Color.red)
                .padding(2)

            Text(entry.date, style: .time)
        }
    }
}
Now our Widget has a very soft inner rounded corner:
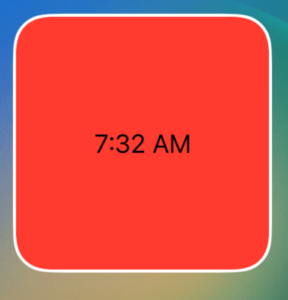
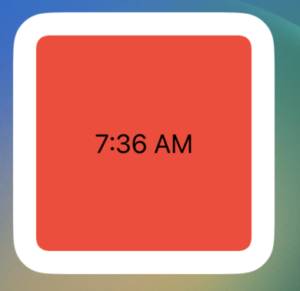
And different padding generate different rounded corners values.
With 10 padding:

With 15 padding:
And not rounded corner at all, with 30 padding:
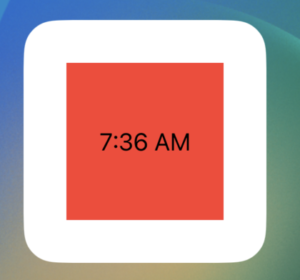
The above effect happens because the distance of the container view to the relative super view.
And it is interview questions time!
SwiftUI Interview Questions – ContainerRelativeShape
As usual I’ll add some questions and answers that could come along related to the topic of the article.
Q: What is ContainerRelativeShape in SwiftUI?
ContainerRelativeShape is a type of transformed shape in SwiftUI that allows the inner shapes to fit perfectly inside the outer shape, even if the outer shape has multiple rounded corners with different radius.
Why is ContainerRelativeShape useful?
It’s useful because it eliminates the need to hardcode the radius values of each outer layer in a component, making it easier to maintain and allowing the inner shapes to adapt to changes in the outer shape.
How do you use ContainerRelativeShape in SwiftUI?
You can use ContainerRelativeShape as a transform shape to create inner shapes that fit perfectly inside the outer shape, or to add an inner border to a widget.
And we are done for today!
Summary – ContainerRelativeShape in SwiftUI
In conclusion, ContainerRelativeShape is a powerful tool in SwiftUI that can help you create complex and visually appealing components in your app. By allowing the inner shapes to fit perfectly inside the outer shape, you can avoid hardcoding radius values and easily maintain your components as they grow and change.
Plus, with the ability to animate your shapes and add accessibility labels and hints, SwiftUI shapes offer endless possibilities for creating dynamic and inclusive user interfaces.
Whether you’re just starting out or you’re a seasoned developer, ContainerRelativeShape is definitely worth exploring in your SwiftUI projects.
So why not give it a try and see what kind of amazing components you can create?
Fellow Apple Developers, that’s all.
I hope you liked reading this article as much as I enjoyed writing it. If you want to support this blog you can Buy Me a Coffee or say hello on Twitter. I’m available on LinkedIn or send me an e-mail through the contact page.
You can likewise sponsor this blog so I can get my blog free of ad networks.
Thanks for the reading and… That’s all folks.
Image credit: Featured Painting


