
Hallo telefoons en televisies, Leo hier. Today we will explore the amazing world of HealthKit creating a really simple Step Counter SwiftUI app.
As the year draws to a close, it brings with it many joys: Christmas parties, indoor barbecues with friends (locally known as ‘gourmetten‘), and New Year celebrations. This is also the time when we reflect on our achievements and reassess our annual goals.
I must admit, however, that I fell short of my goals this year. I had two main objectives: to continue exercising and to start my own business.
In January, I was brimming with enthusiasm about launching a digital business, perhaps a new blog or promoting online courses as an affiliate. But as it often happens, life had other plans. A new job opportunity came my way, demanding my full attention to hit the ground running. While I don’t regret prioritizing my career – a fact evident from the sporadic updates to my blog in recent months – it did mean putting other ambitions on the back burner.
Balancing article writing with my new job responsibilities proved challenging, and admittedly, my blog had to take a back seat since it doesn’t pay the bills. As for physical exercise, that too fell by the wayside. Living in a city without convenient gym access hasn’t helped.
Yet, this year wasn’t all disappointing. There were some incredible highlights: extensive travel, an amazing job opportunity, and most importantly, a happy wife (which, let’s be honest, is the real win here). My goals for the coming year remain unchanged: embark on a personal business venture and commit to regular physical activity.
Shifting gears to iOS, I recently delved back into a topic I haven’t covered in a while: an algorithmic challenge. For those who enjoy dynamic programming and algorithms, this one’s for you!
I’ve always been a staunch advocate for unit testing, but as I grow older, I find my approach to coding and best practices becoming more flexible. I used to insist on impeccable test suites, but I’ve come to realize that various factors can lead to less-than-perfect codebases. One particularly time-consuming issue is dealing with flaky tests for numerous reasons. If you’re strapped for time to address these, Swift offers a solution for managing this technical debt. In my latest article, I explore how to anticipate failures in your tests using XCTExpectFailure.
Enough said – let’s dive into coding! But first…
Painting of The Day
Today is a painting from 1841 called “Wanderer An Einem Wildbach” by Andreas Achenbach.
Andreas Achenbach, born on 29 September 1815 in Kassel and passing away on 1 April 1910 in Düsseldorf, was a renowned German painter specializing in landscapes and seascapes, inspired by the Romantic movement. He is recognized as a founding figure of the Düsseldorf School. His sibling, Oswald Achenbach, achieved similar fame in the landscape painting realm. Collectively, due to their initials, they were famously dubbed as the “Alpha and Omega” of landscape artists.
I chose this painting because we will talk about step counter, no one better than a wanderer to represent that, right?
The Problem – How to Create A Step Counter in SwiftUI?
You need to show the count of the steps your user did today.
So I promised that we would do an app to do that in less than five minutes, so keep your seatbelt thight because this will be fast.
To accomplish that you need only three things:
- Configure your app capabilities to have HealthKit permission.
- Ask for the user’s authorization to read it steps data.
- Query the Step Data.
Let’s start with the first one.
Step 1 – Adding HealthKit Step Reading Permission To Your App
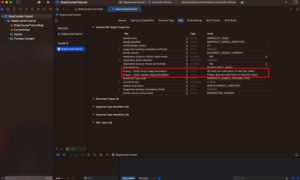
First of all, start a new SwiftUI project. ( Nowadays is the only one that you can start in Xcode 15 anyway). And we need to add new values to your project ‘info.plist’ file.
To do that you will need to go to your project ‘info.plist’ and add the following two new keys:
Privacy – Health Share Usage Description
Privacy – Health Update Usage Description
Like the image below:
Then you just have to add the HealthKit capability in your project Signin & Capabilities tab:
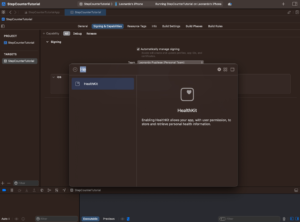
And that’s it! The first step is done.
I told you that will be fast.
Step 2 – How to Ask for Authorization To Read User HealthKit Step Data in SwiftUI
Here is where we will start some coding.
Create an ObservableObject called StepCounterViewModel that will be responsible for asking authorization for reading the Step Data and also querying the data.
enum StepCounterError: Error { // just a random error
    case couldNotFetchHealthStore
}

final class StepCounterViewModel: ObservableObject {

    @Published var healthStore: HKHealthStore?
    @Published var error: Error?
    @Published var steps: String = "No Steps Data"

    init() {
        if HKHealthStore.isHealthDataAvailable() {
            healthStore = HKHealthStore()
        } else {
            error = StepCounterError.couldNotFetchHealthStore
        }
    }

    func requestAuth() async { // second step
        guard let stepCountType = HKQuantityType.quantityType(forIdentifier: .stepCount),
              let healthStore else { return }

        do {
            try await healthStore.requestAuthorization(toShare: [], read: [stepCountType])
        } catch {
            self.error = error
        }
    }
}
This is the minimum code to ask permission for your user steps data. You can check that is very straightforward we just need the type of data, in this case “.stepCount”, and then ask to read them.
Now import your HealthKit and use your new ViewModel in your view:
struct ContentView: View {
    @StateObject private var viewModel = StepCounterViewModel()

    var body: some View {
        VStack {
            if let error = viewModel.error {
                ContentUnavailableView("No Steps Data", systemImage: "figure.walk")
            } else {
                Image(systemName: "figure.walk")
                    .resizable()
                    .aspectRatio(contentMode: .fit)
                    .frame(height: 100)
                    .foregroundStyle(.red)

                Text(viewModel.steps)
                    .font(.largeTitle)
            }
        }
        .padding()
        .task {
            await viewModel.requestAuth()
        }
    }
}
What this is doing? Every time you open your app, we will check for the authorization, if the user doesn’t give it to you we will prompt the first time. Also we are using the new ContentUnavailableView to show when content is not available. If you want to know more about ContentUnavailableView you can check the docs.
If you run your app now you will see this screen:
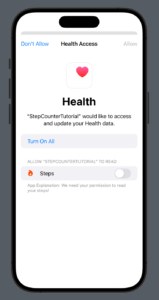
And that’s the end of the second step!
Step 3 – How to Query All The Steps a User Walked Today Using HealthKit and SwiftUI?
For the challenge today we will just query the steps the user walked today. Let’s go back the StepCounterViewModel and you should add the following function to it:
func fetchTodaySteps() async throws {
    guard let healthStore else { return }

    let startDate = Calendar.current.date(bySettingHour: 1, minute: 0, second: 0, of: Date())! // step 1
    let healthStepType = HKQuantityType(.stepCount) // step 2

    let sampleDateRange = HKQuery.predicateForSamples(withStart: startDate, end: Date()) // step 3

    let sample = HKSamplePredicate.quantitySample(type: healthStepType, predicate: sampleDateRange) // step 4

    let stepsQuery = HKStatisticsCollectionQueryDescriptor(predicate: sample, options: .mostRecent, anchorDate: Date(), intervalComponents: DateComponents(day:1)) // step 5

    let stepsData = try await stepsQuery.result(for: healthStore) // step 6

    stepsData.enumerateStatistics(from: startDate, to: Date()) { statistics, pointer in // step 7
        let stepCount = statistics.sumQuantity()?.doubleValue(for: .count())
        DispatchQueue.main.async {
            if let stepCount, stepCount > 0 {
                self.steps = "\(stepCount) steps"
            }
        }
    }
}
Although this looks like a lot, what we are doing is really simple.
- Create the start date at midnight today ( I had to add 1 because of timezone issues).
- Create a constant that represents the type of data that you want to query from HealthKit, in this case, step count.
- Now you create the data range that you want to search for the sample, in our case will be the startDate as today and the current time ( represented by Date())
- Create a quantity sample object that takes the type of data that you want and the data range.
- Create the query using the predicate as your sample. In our case we just need the option “mostRecent” but you can also get a full month of data just using “cumulativeSum” for example, anchor date should be the final date and the interval component is what defines the time interval for each statistics object in the collection.
- Fetch the Query created in step 5.
- Loop over the results and aggregate the data.
With that function in place, we can now add that to our view model and call it in our task modifier in the view.
Final Code Sample – Step Counter Using HealthKit in SwiftUI
Check the final code example:
import SwiftUI
import HealthKit

struct ContentView: View {
    @StateObject private var viewModel = StepCounterViewModel()

    var body: some View {
        VStack {
            if let error = viewModel.error {
                ContentUnavailableView("No Steps Data", systemImage: "figure.walk")
            } else {
                Image(systemName: "figure.walk")
                    .resizable()
                    .aspectRatio(contentMode: .fit)
                    .frame(height: 100)
                    .foregroundStyle(.red)

                Text(viewModel.steps)
                    .font(.largeTitle)
            }
        }
        .padding()
        .task {
            await viewModel.requestAuth()
            try? await viewModel.fetchTodaySteps()
        }
    }
}

#Preview {
    ContentView()
}

enum StepCounterError: Error {
    case couldNotFetchHealthStore
}

final class StepCounterViewModel: ObservableObject {

    @Published var healthStore: HKHealthStore?
    @Published var error: Error? = nil
    @Published var steps: String = ""

    init() {
        if HKHealthStore.isHealthDataAvailable() {
            healthStore = HKHealthStore()
        } else {
            error = StepCounterError.couldNotFetchHealthStore
        }
    }

    func requestAuth() async { // second step
        guard let stepCountType = HKQuantityType.quantityType(forIdentifier: .stepCount),
              let healthStore else { return }

        do {
            try await healthStore.requestAuthorization(toShare: [], read: [stepCountType])
        } catch {
            self.error = error
        }
    }

    func fetchTodaySteps() async throws {
        guard let healthStore else { return }

        let startDate = Calendar.current.date(bySettingHour: 1, minute: 0, second: 0, of: Date())!
        let healthStepType = HKQuantityType(.stepCount)

        let sampleDateRange = HKQuery.predicateForSamples(withStart: startDate, end: Date())

        let sample = HKSamplePredicate.quantitySample(type: healthStepType, predicate: sampleDateRange)

        let stepsQuery = HKStatisticsCollectionQueryDescriptor(predicate: sample, options: .mostRecent, anchorDate: Date(), intervalComponents: DateComponents(day:1))

        let stepsData = try await stepsQuery.result(for: healthStore)

        stepsData.enumerateStatistics(from: startDate, to: Date()) { statistics, pointer in
            let stepCount = statistics.sumQuantity()?.doubleValue(for: .count())
            DispatchQueue.main.async {
                if let stepCount, stepCount > 0 {
                    self.steps = "\(stepCount) Steps Today"
                }
            }
        }
    }
}
Copy and paste the code above and you will have the basics to show the steps the user did today.
The final view should be something like this:

If you are curious about how the ContentUnavailableView will layout, this is the result:

And we are done for today!
Summary – Creating Your First Pedometer in SwiftUI
To wrap up, we’ve seen how easy and effective it is to combine HealthKit with SwiftUI to make a step counter app. This guide showed that even beginners can quickly create something practical and useful. The skills you’ve learned here are just the beginning – there’s so much more you can do with SwiftUI and HealthKit.
Think about how this simple app can lead to bigger projects, especially in health and fitness tech. Use what you’ve learned to build more apps and explore new ideas. Remember, the world of app development is full of opportunities. Keep experimenting and learning, and who knows what you might create next!
Fellow iOS Developers, that’s all. I hope you liked reading this article as much as I enjoyed writing it.
If you want to support this blog you can Buy Me a Coffee or say hello on Twitter. I’m available on LinkedIn or send me an e-mail through the contact page. You can likewise sponsor this blog so I can get my blog free of ad networks.
Thanks for the reading and…
That’s all folks.
Image credit: Featured Painting


