Hallo hoofdgerechten en snoepjes, Leo hier. Today we will create Geofences in SwiftUI.
I think we all remember the Pokemon GO fever, right? Here are just some examples of that fever. Hundreds of people running after Pokemons in certain locations. That was the dream of any Pokemon trainer, now they can have the same feeling as Ash Ketchum going into the wild and capturing a random Pokemon.
On the other hand, Pokemon GO has its death tracker. At the moment I’m writing this article 24 people died while playing Pokemon GO. I bet that no one related to that game could predict such a side effect that would be capturing Pokemon in the wild. I need to emphasize that no form of entertainment is worth your life, so please be careful while playing anything with Augmented Reality.
How does Pokemon GO relate to iOS development? Well, as you saw in that video, some Pokemon were available only in certain locations for a certain time. But how did your app know that you were entering the available Pokemon area? It is all about Geofencing.
Geofencing is when you create a region monitoring to determine when the user enters or leaves a geographic region. For example: if you want to create an app that triggers an event when you get into a specific area, you can use Geofencig techniques to do that.
Something that is also related to catching Pokemon is walking around your area and discovering new places. In that process, maybe you want to know how many steps you walked today, for that we have this super simple tutorial about creating a step counter in SwiftUI in less than 5 minutes!
I’m really bad at dynamic programming, and that’s a given. I think that’s why I’m so happy whenever I can solve a dynamic programming challenge. If you want to tackle an easy challenge in that area check out my article about it.
No More talking, let’s code! But first…
Painting of The Day
The painting today is a 1919 art piece and it’s called Landscape with Fence by Konstantin Korovin.
He was a leading Russian Impressionist painter born in 1861, and hailed from a Moscow merchant family. Influenced by his art-loving father and brother Sergei, a realist painter, Korovin studied at the Moscow School of Painting with notable artists and friends like Valentin Serov. Disappointed by the Imperial Academy in St. Petersburg, he returned to Moscow, embracing Impressionism after a transformative visit to Paris.
His work, influenced by travels in Russia and abroad, spanned Impressionist to Art Nouveau styles. Korovin’s northern landscapes, painted following trips to Norway and the Arctic, were notable for their delicate grey shades. His works contributed significantly to Russian art, including designs for the Far North pavilion at the 1896 All Russia Exhibition.
I chose this painting because today we will talk about digital fences, and it is a painting of a real geofence.
The Problem – New Region Monitoring In SwiftUI
You need to change the UI based on a given location.
Let’s imagine that you are creating an iOS app for the Seiko Store in Amsterdam. Now, you need to create a feature that every time a user enters the radius of the Seiko store, the UI changes to show some advertising.
How would you do that?
This is a classic example of geofences.
Geofences in iOS development are pretty neat! Think of a geofence as an invisible boundary you set up in the real world using your app. It’s like drawing a virtual circle around a specific location on a map. When someone with your app enters or leaves this circle, their iPhone can detect this change and your app can respond accordingly.
Let’s check how you could do that in SwiftUI. But first, let’s check how things were done in the past.
Adding Geofences in the Old Deprecated Way
In the past, the way to add geofences was using two delegations methods from LocationManager, namely didEnterRegion, and didExitRegion.
The examples below take into consideration that you already configured your info.plist to have the key Privacy – Location When In Use Usage Description. Otherwise, please add it.
Check below how you can configure Seiko Store region monitoring in the old way:
import SwiftUI
import CoreLocation

struct ContentView: View {
    @State var viewModel = OldLocationManagerViewModel()

    var body: some View {
        VStack(spacing: 8) {
            if viewModel.isInSeikoStore {
                Text("Check Amazing Watches - The Latests Trends")
                    .font(.largeTitle)
            }

            Image(systemName: viewModel.isInSeikoStore ? "watch.analog" : "globe")
                .resizable()
                .scaledToFit()
                .frame(width: 150)
                .padding()

            Text("Location manager: \(viewModel.location?.description ?? "No Location Provided!")")

        }
        .sheet(isPresented: $viewModel.shouldShowGoodByeSheet, content: {
            Text("See you soon!")
                .font(.largeTitle)
            Image(systemName: "watch.analog")
                .resizable()
                .scaledToFit()
                .frame(width: 150)
                .padding()
        })
        .padding()
        .task {
            try? await viewModel.requestUserAuthorization()
            viewModel.monitorSeikoStoreRegion()
            try? await viewModel.startCurrentLocationUpdates()
        }
    }
}

@Observable
class OldLocationManagerViewModel: NSObject, CLLocationManagerDelegate {
    var location: CLLocation? = nil
    var isInSeikoStore = false
    var shouldShowGoodByeSheet = false
    private let regionIdentifier = "myCustomRegion"

    private let locationManager = CLLocationManager()

    override init() {
        super.init()
        locationManager.delegate = self
    }

    func requestUserAuthorization() async throws {
        locationManager.requestWhenInUseAuthorization()
    }

    func startCurrentLocationUpdates() async throws {
        for try await locationUpdate in CLLocationUpdate.liveUpdates() {
            guard let location = locationUpdate.location else { return }

            self.location = location
        }
    }

    func monitorSeikoStoreRegion() {
        let center = CLLocationCoordinate2D(latitude: 52.367880, longitude: 4.891160) // SEIKO STORE LOCATION

        if CLLocationManager.isMonitoringAvailable(for: CLCircularRegion.self),
           let maxDistance = CLLocationDistance(exactly: 20) {
            let region = CLCircularRegion(center: center,
                 radius: maxDistance, identifier: regionIdentifier)
            region.notifyOnEntry = true
            region.notifyOnExit = true

            locationManager.startMonitoring(for: region)
            print(center, maxDistance)
        }
    }

    func locationManager(_ manager: CLLocationManager, didEnterRegion region: CLRegion) {
        guard region.identifier == regionIdentifier else { return }
        isInSeikoStore = true
        print("didEnterRegion run")
    }

    func locationManager(_ manager: CLLocationManager, didExitRegion region: CLRegion) {
        guard region.identifier == regionIdentifier else { return }
        shouldShowGoodByeSheet = true
        isInSeikoStore = false
        print("didExitRegion run")
    }
}
In the OldLocationManagerViewModel we are configuring the delegate to trigger region monitoring in the two last functions. And the region monitoring is configured inside the monitorSeikoStoreRegion function.
This is the old way because it doesn’t use any of the new APIs of Core Location for example CLMonitor. CLMonitor is heavily based on async/await capabilities, this way older codebases cannot take advantage of that.
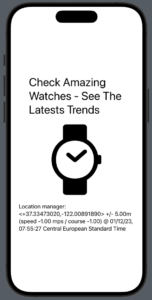
The base screen for our example is this:
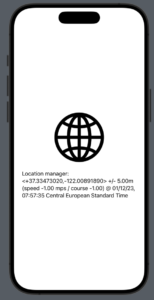
The code above works fine and whenever the user enters or exits the region that you want to monitor the UI will change. For example, when the user enters 20 meters inside the central latitude and longitude point, the UI will add a title and change the image, like the image below:
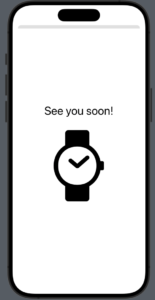
When the user goes out of the bounds of the Seiko Store in Amsterdam, the app will show a sheet saying this:
We could finish the article today here, however, Apple launched new APIs that we can use so let’s do this!
The New Geofences API in SwiftUI
If you had to rewrite the code above in a newer API you would use the CLMonitor class.
Check the code example below that makes use of all the new async/await APIs, you can copy and paste directly to your study project:
import SwiftUI
import CoreLocation

struct ContentView: View {
    @State var viewModel = NewLocationManagerViewModel()

    var body: some View {
        VStack(spacing: 8) {
            if viewModel.isInSeikoStore {
                Text("Check Amazing Watches - The Latests Trends")
                    .font(.largeTitle)
            }

            Image(systemName: viewModel.isInSeikoStore ? "watch.analog" : "globe")
                .resizable()
                .scaledToFit()
                .frame(width: 150)
                .padding()

            Text("Location manager: \(viewModel.location?.description ?? "No Location Provided!")")

        }
        .sheet(isPresented: $viewModel.shouldShowGoodByeSheet, content: {
            Text("See you soon!")
                .font(.largeTitle)
            Image(systemName: "watch.analog")
                .resizable()
                .scaledToFit()
                .frame(width: 150)
                .padding()
        })
        .padding()
        .task {
            try? await viewModel.requestUserAuthorization()
            await viewModel.monitorSeikoStoreRegion()
            try? await viewModel.startCurrentLocationUpdates()
        }
    }
}

#Preview {
    ContentView()
}

@Observable
class NewLocationManagerViewModel: NSObject, CLLocationManagerDelegate {
    var location: CLLocation? = nil
    var isInSeikoStore = false
    var shouldShowGoodByeSheet = false
    private let regionIdentifier = "SeikoRegion"

    private let locationManager = CLLocationManager()
    private var monitor: CLMonitor? // we need a new object here

    override init() {
        super.init()
        locationManager.delegate = self
        locationManager.desiredAccuracy = kCLLocationAccuracyBest
    }

    func requestUserAuthorization() async throws {
        locationManager.requestWhenInUseAuthorization()
    }

    func startCurrentLocationUpdates() async throws {
        for try await locationUpdate in CLLocationUpdate.liveUpdates() {
            guard let location = locationUpdate.location else { return }

            self.location = location
        }
    }

    func monitorSeikoStoreRegion() async {
        if monitor == nil {
            monitor = await CLMonitor("MonitorID")
        }

        await monitor?.add(CLMonitor.CircularGeographicCondition(center: CLLocationCoordinate2D(latitude: 52.367880, longitude: 4.891160), radius: 20), identifier: regionIdentifier, assuming: .unsatisfied)

        Task {
            guard let monitor else { return }
            for try await event in await monitor.events {
                    switch event.state {
                    case .satisfied: // you will receive the callback here when user ENTER any of the registered regions.
                        enterSeikoStoreRegion()
                    case .unknown, .unsatisfied: // you will receive the callback here when user EXIT any of the registered regions.
                        exitSeikoStoreRegion()
                    default:
                        print("No Location Registered")
                    }
            }
        }
    }

    func enterSeikoStoreRegion() {
        isInSeikoStore = true
        print("didEnterRegion run")
    }

    func exitSeikoStoreRegion() {
        shouldShowGoodByeSheet = true
        isInSeikoStore = false
        print("didExitRegion run")
    }
}
You can check the clear difference between the old version and the new one. The most important one is that now you receive the events in an async sequence. The sequence will provide you with events that you can use the identifier to filter and react accordingly. Also, we need a new object called CLMonitor.
In our example above we don’t need to filter anything since we are only monitoring one place, but if we monitor another place we could filter the events like this:
for try await event in await monitor.events {
        switch event.state {
        case .satisfied:
            if event.identifier == regionIdentifier {
                enterSeikoStoreRegion()
            } else if event.identifier == "another region identifier" {
                // do other stuff
            }

        case .unknown, .unsatisfied: // here you will receive the callback when user leaves in the region
            if event.identifier == regionIdentifier {
                enterSeikoStoreRegion()
            } else if event.identifier == "another region identifier" {
                // do other stuff
            }
        default:
            print("No Location Registered")
        }
}
Also, I think we can all agree that this syntax:
for try await event in await monitor.events { ... }Is reeeeeally weird. But why do we need two awaits here? The first one is needed because of the way that Swift chose to read from async sequences. The second await is needed because “monitor.events” is also an async expression.
And we are done for today!
Summary – How to Create Location Monitoring in SwiftUI With the New CLMonitor
In conclusion, geofencing in SwiftUI offers a dynamic way to enhance user experience, much like the immersive world of Pokemon GO. However, it’s crucial to balance the excitement of augmented reality with safety and awareness. Always remember, no game is worth risking your safety for.
We’ve navigated the shift from traditional geofencing methods to the modernized approach in SwiftUI using CLMonitor. This new API not only streamlines location monitoring but also opens doors to innovative app development, all while maintaining user privacy and app efficiency.
Fellow iOS Developers, that’s all. I hope you liked reading this article as much as I enjoyed writing it.
If you want to support this blog you can Buy Me a Coffee or say hello on Twitter. I’m available on LinkedIn or send me an e-mail through the contact page.
You can likewise sponsor this blog so I can get my blog free of ad networks.
Thanks for the reading and…
That’s all folks.
Image credit: Featured Painting


