
Hallo jassen en jurken, Leo hier. Today we will explore how to create expected failures in unit tests using pure Swift.
I posted two questions on my LinkedIn about soft and hard skills. I’m opinionated about this matter and I wanted to hear from the community what your thoughts are.
I know that some people don’t even call soft and hard skills. Because they are all very important and there’s no soft part if you have to develop one skill. But let’s use those definitions. Hard skills create the title of your job, for example, iOS Developer should know how to do iOS apps. Soft skills are everything that is not exactly related to iOS development but are part of the job, for example, negotiation skills, communication skills, requirement gathering, etc.
The questions were: When searching for a job are soft or hard skills more valuable? And when you are already in a job are soft or hard skills more valuable?
In my head, the answer is pretty clear. When you are interviewing for iOS developer roles people tend to judge your hard skills because they are what you will do daily. In this phase I would say that hard skills are more important, let’s say 80% hard skills and 20% soft skills. So, in my opinion, to succeed in the iOS interviews you should focus on hard skills like SwiftUI, UIKit, architectures, data patterns, etc.
However, the thing that a lot of iOS devs forget is when you get a job in a company, that proportion drastically changes. Soft skills play the biggest role when you are in a team that has to communicate with other iOS teams and areas. The biggest part of your job would be communication, negotiation, and alignment with other areas to achieve bigger goals. Of course, you will also use your coding skills but they become one more tool to accomplish what needs to be done. In my opinion, to succeed in the company roles, I would advise investing 80% in soft skills and 20% in hard skills.
Well, let’s go to the subject for today, unit tests. I know that failable tests are not exactly the best practice because they should be reliable, but sometimes times are simply not possible.
I don’t know if you checked the location manager API’s lately, but they had a great update. Learn how to modernize your user location with that article!
I’ve also added an article showing what every type of keyboard looks like in SwiftUI. That article delves into the myriad of SwiftUI TextField keyboard types, showcasing their utility across Apple’s UI framework with hands-on code snippets.
No more talking, let’s code! But first…
Special Thanks – Coffees Donation!
A big shoutout to Jim Hillhouse for the generous donation of five coffees, also thanks to Flier and an anonymous donator that donates one coffee each!
Your support fuels our passion and helps keep the momentum going. Every cup of coffee counts, and we’re incredibly grateful for your contribution. Thank you, Jim, Flyer, and the anonymous person!
Painting of The Day
The painting I chose for today is a 1620 mythological painting named “Perseus and Andromeda” by Peter Paul Rubens.
The 1622 work by Flemish master Peter Paul Rubens, “Perseus and Andromeda,” captures the Greek tale post-Perseus’ triumph over the Gorgon.
In the artwork, Perseus’ shield reflects the Gorgon, and the scene is enriched with the winged horse Pegasus in its Tobiano pattern. Above Perseus, the glory goddess presides, surrounded by cherubs, while the slain sea monster Cetus is depicted at the painting’s lower edge.
I chose this painting because it depicts the state of a lot of test suites out there. Some tests fail, some tests pass, some tests are commented on, everything is happening at the same time and sometimes is a really big mess. I hope with this article we can start organizing things better with the tools that the testing framework provides to us.
The Problem – Intermittent Unit Test in Swift
You need are develop a feature that is making a test become flaky, and somehow you can’t fix the test right away.
Testing is an integral part of the software development lifecycle. It helps developers ensure the correctness of their code and detect bugs early. XCTest, a testing framework provided by Apple, is commonly used for this purpose in iOS development. One of its powerful features is the ability to handle expected failures, which can be a game-changer in managing tests in a more nuanced way.
I know that in the IDEAL scenario, you should always keep your house clean keep your unit tests passing. However life happens, and a lot of stuff can happen that makes it not very feasible at the moment to fix all the unit tests that are broken.
Let’s check some of the possible situations:
- Expected Failures During Code Refactoring: When refactoring code, there might be temporary inconsistencies or bugs introduced that would cause certain tests to fail. For instance, if you were refactoring random hash generation code, a test checking the hash output might fail temporarily. By using
XCTExpectFailure, you can mark these failures as expected, which prevents your Continuous Integration (CI) from reporting a failure, yet still provides feedback about the test failure. - Verifying Current Expectations: This is when the opposite happens. Here you are expecting a fail but the test passes! When an expected failure does not occur, it indicates a change in the code behavior which may be significant.
XCTExpectFailurewill report the test as failed in such scenarios, acting as a guard to ensure your tests match the current code expectations. - Specific Assertion Failures: There may be cases where only specific assertions are expected to fail while others should pass. This distinction is crucial for verifying different parts of the code during refactoring or development. By utilizing
XCTExpectFailurewith closure, you can mark specific assertions as expected to fail, allowing other assertions to be validated normally. - Maintaining Test Quality: Using
XCTExpectFailureover-disabling or skipping tests helps maintain the quality of your test suite. Unlike skipped or disabled tests,XCTExpectFailureit provides a checkpoint that prompts you to re-enable a test once the expected failure no longer occurs. This way, you don’t end up with skipped or disabled tests that could run successfully, thus keeping up the quality of your code and test suite.
And not even mentioning the situations where you have a shared code base and someone else breaks your tests because of some internal behavior change, or you need to deliver something fast and the CI is not stable because of some different runners running your tests.
The list is vast. The only thing that I know is that sometimes, we need a tool to say: “This test is ok to fail”. This should be the daily rule, but life happens.
Let’s explore the XCTExpected failure API now!
How to Use XCTExpected to Control Failable Unit Tests?
Let’s explore everything that this API has to offer.
Let’s write a straightforward unit test first.
final class ExpectedFailuresTutorialTests: XCTestCase {
    func testFailableTestTutorial() {
        // Given
        let a = 2
        let b = 3

        // When
        let result = sum(a,b)

        // Then
        XCTAssertEqual(result, 15)
    }

    func applyFee(_ x: Int, _ y: Int) -> Int { x + y + 10 }
}
Now let’s imagine that we give maintenance to that function and the fee rate calculations change for something that is not predictable. For example to this:
func applyFee(_ x: Int, _ y: Int) -> Int { x + y + 10 + Int.random(in: 0...2)}
( I know I know that in this case we just have a closed set of options and we could check if the answer is within that set, BUT you got the point here)
Now we have a test that will be flaky, sometimes will pass, sometimes not. How to handle that?
Expecting a Temporary Unit Test Problem
If you know that the problem is something that will solve with time you can add an expected failure to the test, like the example below:
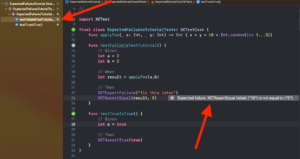
final class ExpectedFailuresTutorialTests: XCTestCase {
    func applyFee(_ x: Int, _ y: Int) -> Int { x + y + 10 + Int.random(in: 1...3)}

    func testFailableTestTutorial() {
        // Given
        let a = 2
        let b = 3

        // When
        let result = applyFee(a,b)

        // Then
        XCTExpectFailure("fix this later")
        XCTAssertEqual(result, 5)
    }

    func testTrueIsTrue() {
        // Given
        let a = true

        // Then
        XCTAssertTrue(true)
    }
}
Now we have two tests. One that fails but we expect that fails, and another one that doesn’t.
Although Xcode will say that the Test Succeeded there’s a nice indication in the IDE that the assert was false anyway:
Which is pretty good! So we don’t forget to look at those back again.
However, if you are expecting a test fail and it doesn’t… You will have a failed test (haha) :
If the test proceeds without any assertion failures, Xcode will flag the test as failed due to the absence of the anticipated failure. To have Xcode recognize the test as successful in subsequent runs, eliminate the expected failure.
Alternatively, you can utilize the options outlined below to adjust your expected failure criteria. You can constraint all your tests expected to one place and in that place you can expect some failures.
For example:
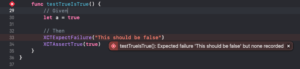
    func testTrueIsTrue() {
        // Given
        let a = true

        XCTExpectFailure("This should be false") { // everything inside this closure MUST fail to the test pass
            XCTAssertTrue(!a)
        }

        XCTAssertTrue(a)
    }
How To Unit Tests Unpredictable Tests
As you saw above, if you have an XCTExpectFailure and sometimes the tests pass you will have your whole suite failing to pass. To fix that we can set the isStrict property from XCTExpectedFailure.Options to false.
Like the example below:
func testFailableTestTutorial() {
    // Given
    let a = 2
    let b = 3
    let options = XCTExpectedFailure.Options()

    options.isStrict = false // add this!
    // When
    let result = applyFee(a,b)

    // Then
    XCTExpectFailure("Review this in the next version", options: options)
    XCTAssertEqual(result, 16)
}
With this set, you have the most flexible option possible: if the test pass is ok, and if the test fails the test suit will pass and IDE will warn you that the assert is not passing.
Using Issue Matcher To Exclusively Match Failing
If you need more grain control over what failure is acceptable or not, you can also use the Issue Matcher closure to do that. Imagine that you have several assertions and you just want the ones with a specific message should fail.
Look how you would make a test that has 3 assertions, 2 that are expected to fail and one that always passes:
func testFailableTestTutorial() {
    // Given
    let a = 2
    let b = 3
    let options = XCTExpectedFailure.Options()

    options.issueMatcher = { issue in
        issue.type == .assertionFailure && issue.compactDescription.contains("This result should be predictable")
    }

    // When
    let result = applyFee(a,b)

    // Then
    XCTExpectFailure("Review this in the next version", options: options)
    XCTAssertTrue(true) // always pass
    XCTAssertEqual(result, 18, "This result should be predictable") // but this specifically not
    XCTAssertEqual(result, 19, "This result should be predictable") // but this also not

}
What happens when calling XCTExpectFailure Multiple Times?
When utilizing XCTExpectFailure multiple times in a single test, adhere to these guidelines.
- If XCTExpectFailure is invoked with a closure, failure detection is confined exclusively to the commands within that closure.
- If XCTExpectFailure is called without a closure, the testing framework will assess each failure against the matchers from all XCTExpectFailure invocations within the test, starting with the most recent. A failure is then attributed to the first XCTExpectFailure that aligns with it.
- Each XCTExpectFailure that does not correlate with an actual test failure will be recorded as a separate failure. To prevent this, remove any XCTExpectFailure instances that do not find a corresponding failure. For tests that fail sporadically and you wish to prevent the system from logging an unpaired XCTExpectFailure as a failure, you can set the isStrict parameter to false in the options of your XCTExpectFailure call.
And we are done!
Explore XCTExpectFailure in Swift
In wrapping up today’s journey through the intricacies of unit testing in Swift, we’ve traversed the landscape of expected failures and their management within the XCTest framework.
We’ve delved into the XCTExpectFailure API, a tool that, when wielded wisely, can serve as a temporary bridge over the troubled waters of flaky tests. It’s a reminder that while perfection in testing is the goal, pragmatism must sometimes lead the way in the face of deadlines and dynamic codebases.
Remember, while XCTExpectFailure allows us to mark tests as ‘okay to fail,’ our ultimate aim should always be to circle back, resolve these issues, and maintain a robust and reliable test suite. Until next time, keep coding, keep testing, and never stop learning.
Fellow iOS Developers, that’s all. I hope you liked reading this article as much as I enjoyed writing it.
If you want to support this blog you can Buy Me a Coffee or say hello on Twitter. I’m available on LinkedIn or send me an e-mail through the contact page. You can likewise sponsor this blog so I can get my blog free of ad networks.
Thanks for the reading and…
That’s all folks.
Image credit: Featured Painting


