
Hello friends, Leo here. The topic today is how to use aspect ratio with Auto Layout in iOS development.
Today we’ll quickly explore a problem with images and layouts. Aspect ratio is an important feature to master because nowadays we have a bunch of screen sizes, this implies layout changing regarding the width and the height of the screen. If you want your views to have always the same aspect ratio without having to be concerned about the screen size, this post is for you!
It’s said that the old artists used the golden ratio to paint their pieces. Can you spot on the image of this post where Rembrandt used this?
Let’s code!
Problem – Aspect ratio with Auto Layout
Your backend will send you images with 344 widths and 200 in height. You want to your UITableViewCell fit this proportion.
First, we have to do is to think about what dimension we will anchor on. To this problem, we will anchor the width of the screen. So we can use some math to calculate the aspect ratio of the image, and with that, we can set the height anchor of the cell.
Math
To calculate the aspect ratio you just make a division based on X/Y where X is the dimension we want to make adaptable and the Y is the anchor dimension. On the problem set above, we will use the width as the anchor because the design team said that the width of the view will have constant padding on each side. If width can change, the height of the image must proportionally change too.
The math will seem 200/344 and gave us 0.5813 as the answer. So now we know that no matter what auto-calculated size of the width, the height will be 0.58 times that. And with this info, we can code the auto layout for the view.
Auto Layout
Open your playgrounds and you can paste this code there.
//: A UIKit based Playground for presenting a user interface

import UIKit
import PlaygroundSupport

class MyViewController : UIViewController, UITableViewDataSource, UITableViewDelegate {

    let dataArray = [("Title","Subtitle 2131 "),("Title","Subtitle 2131"),("Title","Subtitle 2131")]
    let tableview = UITableView()

    override func loadView() {
        let view = UIView()
        self.view = view
    }

    override func viewDidLoad() {
        view.addSubview(tableview)

        tableview.translatesAutoresizingMaskIntoConstraints = false
        tableview.dataSource = self
        tableview.delegate = self
        tableview.register(VariantsTableViewCell.self, forCellReuseIdentifier: VariantsTableViewCell.cellID)
        tableview.separatorStyle = .none
        NSLayoutConstraint.activate([
            tableview.topAnchor.constraint(equalTo: view.topAnchor),
            tableview.bottomAnchor.constraint(equalTo: view.bottomAnchor),
            tableview.leadingAnchor.constraint(equalTo: view.leadingAnchor),
            tableview.trailingAnchor.constraint(equalTo: view.trailingAnchor)
        ])
    }

    func tableView(_ tableView: UITableView, numberOfRowsInSection section: Int) -> Int {
        return dataArray.count
    }

    func tableView(_ tableView: UITableView, cellForRowAt indexPath: IndexPath) -> UITableViewCell {
        let cell = tableview.dequeueReusableCell(withIdentifier: VariantsTableViewCell.cellID) as! VariantsTableViewCell
        return cell
    }
}

PlaygroundPage.current.liveView = MyViewController()
And this will basically configure a table view. Now we will implement the aspect ratio on the cell view:
class VariantsTableViewCell: UITableViewCell {
static let cellID = "cell"
private var backgroundImage: UIImageView!
override init(style: UITableViewCell.CellStyle, reuseIdentifier: String?) {
super.init(style: style, reuseIdentifier: reuseIdentifier)
configureCellView()
}
required init?(coder: NSCoder) {
fatalError("init(coder:) has not been implemented")
}
private func configureCellView() {
configureBackgroundImageView()
}
private func configureBackgroundImageView() {
backgroundImage = UIImageView()
backgroundImage.backgroundColor = .red
backgroundImage.translatesAutoresizingMaskIntoConstraints = false
contentView.addSubview(backgroundImage)
NSLayoutConstraint.activate([
backgroundImage.leadingAnchor.constraint(equalTo:
contentView.leadingAnchor, constant: 10),
backgroundImage.trailingAnchor.constraint(equalTo:
contentView.trailingAnchor, constant: -10),
backgroundImage.topAnchor.constraint(equalTo:
contentView.topAnchor, constant: 5),
backgroundImage.bottomAnchor.constraint(equalTo:
contentView.bottomAnchor, constant: -10),
backgroundImage.heightAnchor.constraint(equalTo:
backgroundImage.widthAnchor, multiplier: 0.58) // this line do the aspect ratio
])
}
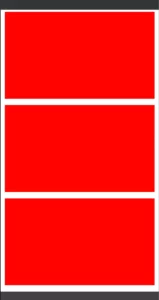
}As you can see the last line on NSLayoutConstraint.activate function is setting the height of the UITableViewCell to be 0.58 times the width. This way you can always assure that images with this aspect ratio will fit perfectly on your layout in iOS. The result should be the image below:
And we are done!
Summary – Using aspect ratio with Auto Layout in iOS
This was a brief explanation of how important is to understand the aspect ratio using auto layout and I hope you enjoy the reading. Any feedback or comments are welcome.
That’s all my people, I hope you liked reading this article as much as I enjoyed writing it. If you want to support this blog you can Buy Me a Coffee or leave a comment saying hello. You can also sponsor posts and I’m open to freelance writing! You can reach me on LinkedIn or Twitter and send me an e-mail through the contact page.
Thanks for reading and… That’s all folks.
credits: image


