
Hallo afwijkenden en wanbetalers, Leo hier. Today we will explore the new API to get User Location in SwiftUI.
You know, when we first start out in our careers, it’s all about getting the technical things right. We’re laser-focused on mastering the skills of our trade. But as time goes on and we move up the ranks, there’s a shift. It’s not just about how well you code or design; it’s also about how you connect with people and communication skills are the key. Think about it: as a staff or principal engineer in the iOS world, you’re not just coding away in a corner. You’re the go-to person, the mentor, the guide.
Remember when we were fresh out of school or new to the job? We needed a lot of hand-holding, right?
But as we grow, it’s our turn to offer that guiding hand. For those in the iOS community, especially the big shots, it’s all about lifting others up, sharing what you know, and making sure everyone’s on the same page.
It’s like being the big sibling in a family. While the younger ones might need a bit more help tying their shoes, the older ones are there to teach and support. So, as we climb that career ladder, it’s not just about getting better at our job, but also about being there for others.
Cool, right?
Soft skills are a great topic for another article, and I’m excited to share some recent findings in this area.
Also, today is my wife’s birthday! She is the love of my life and she is my inspiration to do everything.
Going back to iOS development I think the past two weeks we had interesting articles exploring two different aspects of using SwiftUI. The first one was explaining how SwiftUI lifecycle can be different from UIKit one and we created a view extension that can control the trigger of an action that happens only the first time the view appears on the screen.
Another thing that we explored was all the kinds of keyboard types in SwiftUI. Is always important to show how flexible our options are when using SwiftUI and how specialized can be your keyboard input in your apps.
Now you can choose what best fits the purpose of your app!
No more talking, let’s code! But first…
Painting of the Day
The painting I chose for today is a 1511 artwork called “Prophet Isaiah in Sistine Chapel Ceiling” by the legend, Michelangelo.
The Sistine Chapel, located in the Vatican Palace within Vatican City, has frescoes that have influenced many artists, including Caravaggio and Norman Rockwell with his renowned Rosie the Riveter piece. One notable figure in the fresco, positioned fourth from the right near the High Altar, is a dynamic portrayal by Michelangelo.
The depiction of Isaiah is full of movement, with his cloak appearing to flow around him. The colors, especially post-restoration, are both cool and radiant. Isaiah is shown holding a blue book, likely representing the biblical Book of Isaiah.
I chose this painting because looks like the angel is bringing the good news to Isaiah and is interested in hearing that, like us when the WWDC brings new amazing APIs to use!
The Problem – How to Use The New CLLocationUpdate Class?
You are developing a brand-new app and want to use the most recent Location APIs.
User location is one of the most important pieces of information that an iOS app can access. It allows apps to provide a more personalized and relevant experience to the user.
For example, a weather app can use the user’s location to provide accurate weather forecasts, a maps app can use the user’s location to provide turn-by-turn navigation, and a food delivery app can use the user’s location to show nearby restaurants.
First let’s understand where it is generally used and some security/privacy implications.
Examples of User Location for Apps
Imagine you’re on a road trip and you’re trying to find a good place to eat. You could pull over to the side of the road and search for restaurants on your phone, but then you’d have to type in your location, which can be a pain. Or, you could use a food delivery app that uses your location to show you restaurants that are nearby. With just a few taps, you can browse menus and order food that will be delivered right to your car.
This is just one example of how user location can make your life easier and more convenient. Here are a few other examples:
- Navigation apps: User location allows navigation apps to provide turn-by-turn directions and real-time traffic updates. This can be a lifesaver when you’re driving in an unfamiliar city or trying to avoid traffic jams.
- Weather apps: User location allows weather apps to provide accurate forecasts for your current location. This is important for planning your day and staying safe in bad weather.
- Social media apps: User location allows social media apps to show you posts from your friends who are nearby and to suggest new friends who are in your area. This can help you stay connected with the people in your life and make new friends.
- E-commerce apps: User location allows e-commerce apps to show you products that are available in stores near you and to estimate shipping times. This can be helpful if you need to buy something quickly or if you want to avoid paying for shipping.
And that’s not all, those were just a few examples of how user location is important for the iOS app environment.
User Location Privacy Implications
Of course, user location also has some privacy implications. That’s why Apple gives users complete control over which apps can access their location data. You can choose to allow an app to access your location while you’re using it, only once, or never. You can also change your location permissions for any app at any time.
If you’re concerned about your privacy, you can choose to only allow apps that you trust to access your location data. You can also check your location history to see which apps have been accessing your location and when.
User Location Update API – The Old Way
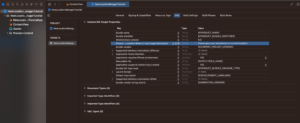
Before starting this exercise, one crucial thing to remember. To use location API’s you need to add the permission in the info.plist file. In new projects it is located in the project screen configuration, like in the screenshot below:
So let’s check this simple example of how we used to use the user location in SwiftUI. Check the code below:
@Observable
class OldLocationManager: NSObject, CLLocationManagerDelegate {
    var location: CLLocation? = nil

    private let locationManager = CLLocationManager()

    override init() {
        super.init()
        locationManager.delegate = self
    }

    func requestUserAuthorization() async throws {
        locationManager.requestWhenInUseAuthorization()
    }

    func startCurrentLocationUpdates() {
        locationManager.startUpdatingLocation()
    }

    func locationManager(_ manager: CLLocationManager, didUpdateLocations locations: [CLLocation]) {
        guard let location = locations.first else { return }

        self.location = location
    }
}
The class has three main properties:
location: This property stores the user’s current location if it is known.locationManager: This property is a reference to the Core Location manager.requestUserAuthorization(): This method requests permission from the user to access their location.startCurrentLocationUpdates(): This method starts receiving updates from the Core Location framework when the user’s location changes.
The class also has one delegate method:
locationManager(_ manager: CLLocationManager, didUpdateLocations locations: [CLLocation]): This method is called by the Core Location framework when the user’s location changes. The method takes an array of locations as input, but the class only stores the first location in the array.
The class’s implementation is straightforward but the rationale behind is not that easy to follow at first glance. The init() method initializes the locationManager property and sets the class as the delegate for the location manager. The requestUserAuthorization() method calls the requestWhenInUseAuthorization() method on the location manager to request permission from the user to access their location. The startCurrentLocationUpdates() method calls the startUpdatingLocation() method on the location manager to start receiving updates from the Core Location framework when the user’s location changes.
The locationManager(_ manager: CLLocationManager, didUpdateLocations locations: [CLLocation]) method stores the first location in the locations array in the location property.
As you can see there is a lot happening in the class. That implementation is very old and if you check the CLLocationManagerDelegate definition file you will see the copyright from 2008! The good news is that now is that Apple now launched new APIs that will make our lives easier.
How to Use the New User Location Update API?
Apple “recently” launched the async/await and a lot of old APIs are migrating to this new way of receiving asynchronous updates. Apple then released the AsyncSequence which is a way to continuously listen to an async stream of data. In the Xcode 15 and iOS 17 you can now use the async APIs to get your user’s current location.
Check the code below on how to implement the new way of listening to user location updates:
@Observable
final class NewLocationManager {
    var location: CLLocation? = nil

    private let locationManager = CLLocationManager()

    func requestUserAuthorization() async throws {
        locationManager.requestWhenInUseAuthorization()
    }

    func startCurrentLocationUpdates() async throws {
        for try await locationUpdate in CLLocationUpdate.liveUpdates() {
            guard let location = locationUpdate.location else { return }

            self.location = location
        }
    }
}
See how simple is this code now? Really cool isn’t it?
We created a class named NewLocationManager that provides a simple way to request user authorization for location services and start receiving location updates. The class is annotated with the @Observable attribute, which means that any changes to the class’s properties will be published to subscribers.
The class has two methods:
requestUserAuthorization(): This method requests user authorization for location services. The method is asynchronous and will throw an error if the user denies authorization.startCurrentLocationUpdates(): This method starts receiving location updates from theCLLocationManagerobject. The method is asynchronous and will throw an error if there is a problem starting location updates.
The startCurrentLocationUpdates() method uses the CLLocationUpdate.liveUpdates() function to receive location updates in real-time. The liveUpdates() function returns an asynchronous sequence of CLLocationUpdate objects. The startCurrentLocationUpdates() method iterates over the sequence and updates the location property with the latest location update.
Now let’s see how to use both old and new ways in SwiftUI.
New Location Manager SwiftUI Example
You can copy and paste the code above and start using it in your SwiftUI classes like the example below:
import SwiftUI
import CoreLocation

struct ContentView: View {
    @State var newlocationManager = NewLocationManager()
    @State var oldLocationManager = OldLocationManager()

    var body: some View {
        VStack {
            Image(systemName: "globe")
                .resizable()
                .scaledToFit()
                .frame(width: 150)
                .padding()
            Text("Old location manager: \(oldLocationManager?.description ?? "No Location Provided!")")
            Text("New location manager: \(newlocationManager.location?.description ?? "No Location Provided!")")
        }
        .padding()
        .task {
            oldLocationManager.requestUserAuthorization()
            oldLocationManager.startCurrentLocationUpdates()
        }
        .task {
            try? await newlocationManager.requestUserAuthorization()
            try? await newlocationManager.startCurrentLocationUpdates()
            // remember that nothing will run here until the for try await loop finishes
        }
    }
}

@Observable
class OldLocationManager: NSObject, CLLocationManagerDelegate {
    var location: CLLocation? = nil

    private let locationManager = CLLocationManager()

    override init() {
        super.init()
        locationManager.delegate = self
    }

    func requestUserAuthorization() {
        locationManager.requestWhenInUseAuthorization()
    }

    func startCurrentLocationUpdates() {
        locationManager.startUpdatingLocation()
    }

    func locationManager(_ manager: CLLocationManager, didUpdateLocations locations: [CLLocation]) {
        guard let location = locations.first else { return }

        self.location = location
    }
}

@Observable
class NewLocationManager {
    var location: CLLocation? = nil

    private let locationManager = CLLocationManager()

    func requestUserAuthorization() async throws {
        locationManager.requestWhenInUseAuthorization()
    }

    func startCurrentLocationUpdates() async throws {
        for try await locationUpdate in CLLocationUpdate.liveUpdates() {
            guard let location = locationUpdate.location else { return }

            self.location = location
        }
    }
}
The result of the code above in the Xcode 15 should be this screen: 
And we are done for today!
Summary – Getting User Location Using New Async/Await Location Updates API
The evolution of iOS development has been remarkable, especially with the introduction of SwiftUI and the new async/await APIs. The ability to seamlessly integrate user location into our apps has never been easier, and the new CLLocationUpdate class is a testament to that.
As developers, it’s essential to stay updated with these advancements, not just for the sake of technical prowess but also to enhance user experience.
Remember, it’s not just about writing code; it’s about creating solutions that resonate with users. So, whether you’re a newbie or a seasoned developer, always be curious, keep learning, and most importantly, keep coding.
Fellow Apple Developers, that’s all. I hope you liked reading this article as much as I enjoyed writing it. If you want to support this blog you can Buy Me a Coffee or say hello on Twitter. I’m available on LinkedIn or send me an e-mail through the contact page. You can likewise sponsor this blog so I can get my blog free of ad networks.
Thanks for the reading and… That’s all folks. Image credit: Featured Painting


