
Hallo honden and katten, Leo hier. Today’s topic is how to Unit Test Notification Center in Swift and how to make your life easier in terms of maintainability of your code that use Notification Center.
We will continue to talk about unit testing. Since iOS 2, we iOS developers have access to this dispatch center. The NotificationCenter is a notification dispatch mechanism that enables the broadcast of information to registered observers.
Each running app has a default Notification Center, and you can create new notification centers to organize communications in particular contexts.
An important disclosure of the article is this: If your app uses notifications extensively, you may want to create and post to your notification centers rather than posting only to the default notification center. When a notification is posted to a notification center, the notification center scans through the list of registered observers, which may slow down your app. By organizing notifications functionally around one or more notification centers, less work is done each time a notification is posted, which can improve performance throughout your app.
That said, let’s code! But first…
Painting of The Day
The painting of the day is a 1495 piece called Calumny of Apelles from Sandro Botticelli. Alessandro di Mariano Filipepi, known as Botticelli, was one of the most representative artists of Florentine culture; he was unique in his ability to translate into ideas and images the will of Lorenzo de Medici (ruler of the Florentine Republic and the most enthusiastic patron of arts), and the spirit of nascent Renaissance.
The figures in the painting are either personifications of vices or virtues or in the case of the king and victim, of the roles of the powerful and the powerless. It is really worth studying a little more about this brilliant painting.
I chose this painting because one of the virtues is whispering things in the ears of the king, much like what our notification center does for all the observers.
The Problem – Unit Test Notification Center in Swift
You have a CartViewModel and when you add a new item it uses the notification center to propagate changes throughout your app.
First of all, create a new project and be sure that the unit tests check box is checked. Now create a file called CartViewModel that will be our system under test. Copy/paste the lines below in the file:
extension Notification.Name {
    static var addSingleItemNotification = Notification.Name("cart.add.single.item")
}

struct CartViewModel {

    private var items = [String]()


    mutating func add(item: String) {

        // Cart adding logic here

        NotificationCenter.default.post(name: .addSingleItemNotification, object: nil, userInfo: ["items":items])
    }
}
This function is just a placeholder to add something to our cart items and after that send the notification center the right message with all the items attached to it.
Now let’s create our CartViewModelTests. In your unit test target create a class called CartViewModelTests and add this function:
func testAddCartItem_NotificationPosted() throws {
    var sut = CartViewModel()

    sut.add(item: "Apple")

    // how to test if the notification was posted?

}
Our main goal today is to get the CartViewModel unit tested and there are many ways to achieve that. Today we will observe two ways: one easier, and another one a little more complex.
Notification Center testing using XCTest API
To test notification if a notification is sent from your system under test, you can use the XCTNSNotificationExpectation API.
Let’s see that in action:
func testAddCartItem_NotificationPosted() throws {
    var sut = CartViewModel()
    let expectedList = ["Apple"]

    let handler: (Notification) -> Bool = { notification in // Mark 1
        guard let cart = notification.userInfo?["items"] as? Array<String> else {
            return false
        }

        XCTAssertEqual(cart, expectedList)

        return true
    }

    expectation(forNotification: .addSingleItemNotification,
                object: nil,
                handler: handler) // Mark 2

    sut.add(item: expectedList[0])

    waitForExpectations(timeout: 4, handler: nil) // Mark 3
}
Explaining the code:
- In Mark 1 we define how will we assert the content of the notification sent. If you don’t send anything you can ignore this part. This is important in our case because is here that we will not only assert that we received the `addSingleItemNotification` but also the notification content.
- Mark 2 is where we add our expectations to the test.
- Mark 3 is how much time we are willing to wait until we consider a failed test.
Run the unit test, command+U, and all good right? Oh…
![]()
Now we need to fix our CartViewModel:
mutating func add(item: String) {

    // Cart adding logic here
    items.append(item)

    NotificationCenter.default.post(name: .addSingleItemNotification, object: nil, userInfo: ["items":items])
}
Perfect! All pass. So this way you can unit test anything with the notification center in your code. But we can do better, let’s check a more controlled approach.
Injecting Notification Behavior in the ViewModel
There’s a famous quote in IT saying:
“Almost all problems in computer science can be solved by adding one more layer of indirection”.
So let’s do that. Instead of using the notification center directly, we will inject that behavior into our ViewModel, in other words, we will handle to the ViewModel anything that can do exactly what it needs from the notification center.
There are various ways to achieve that, let’s inject the behavior into the initializer. But how do I know what to inject?
- First, you can check the function signature of what you are calling:
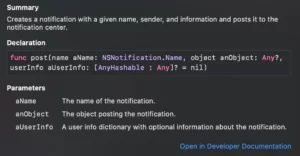
- Create a protocol that does the same thing and make the object that was used conform to the new protocol:
protocol Postable {
    func post(name aName: NSNotification.Name, object anObject: Any?, userInfo aUserInfo: [AnyHashable : Any]?)
}

extension NotificationCenter: Postable {}
- Now we have our
Postabletype we can inject it to theCartViewModelin the initializer:
struct CartViewModel {

    private var items = [String]()
    private let notificationCenter: Postable


    init(notificationCenter: Postable = NotificationCenter.default) { // Mark 1
        self.notificationCenter = notificationCenter
    }

    mutating func add(item: String) {

        // Cart adding logic here
        items.append(item)

        notificationCenter.post(name: .addSingleItemNotification, object: nil, userInfo: ["items":items])
    }
}
Check the Mark 1. It is interesting because the initializer signature of our CartViewModel will not change for any of the consumers of our CartViewModel. This way we will not have to change anywhere else in the code to be able to inject the notification center into our code.
Run the unit tests, and still, everything is fine.
Great! Now we can create our notification center mock in the test suite. Go to your test suite and create the new Notification Center spy below:
extension CartViewModelTests {
    class NotificationCenterCartSpy: Postable {

        var cartItems: [String]? = nil
        var notificationName: String? = nil

        func post(name aName: NSNotification.Name, object anObject: Any?, userInfo aUserInfo: [AnyHashable : Any]?) {
            self.cartItems = aUserInfo?["items"] as? [String]
            self.notificationName = aName.rawValue
        }
    }
}
What we are doing here is just capturing anything that is posted by the CartViewModel. By doing that we can spy on it and make our assertions.
Check how the test is way simpler now:
func testAddCartItem_NotificationPostedInjected() {
    let notificationCenterMock = NotificationCenterCartSpy()
    var sut = CartViewModel(notificationCenter: notificationCenterMock)
    let items = ["Apple"]

    sut.add(item: items[0])

    XCTAssertEqual(notificationCenterMock.cartItems, items)
    XCTAssertEqual(Notification.Name.addSingleItemNotification.rawValue, notificationCenterMock.notificationName)
}
And we are done!
Summary – How to Unit Test Notification Center in Swift
Today we studied two ways of testing Notification Center, one using the XCTest API and another one injecting the behavior and checking with a spy object. Which one you will use? Like almost everything, it depends. If your app doesn’t rely strongly on the notification center maybe using the XCTest API is more straightforward, or if you want to have everything injected to have more control over your code maybe injecting the behavior is the way to go.
In the end, the important thing is to know the benefits and the drawbacks of every approach. There’s no such thing as a perfect decision.
That’s all my people, I hope you liked reading this article as much as I enjoyed writing it. If you want to support this blog you can Buy Me a Coffee or leave a comment saying hello. You can also sponsor posts and I’m open to freelance writing! You can reach me on LinkedIn or Twitter and send me an e-mail through the contact page.
Thanks for reading and… That’s all folks.
Credits:


