
Hallo vrienden, Leo hier. The topic today is something that everyone eventually has to do: Center a View in the Superview.
We will explore interesting facts about UIKit coordinate system. The goal is to center a subview within its superview. It’s been a very busy week for me and the article today will be a very fast one!
Centering a view within its superview is a very common UI that we iOS developers try to achieve. This article will explain four ways you can achieve that and we will try four different approaches and how they differ from each other. The most important thing to focus on is how your UI is already built to adapt the best technique for you.
No more talking, let’s code! But first…
Painting of the Day
Today we featured the 2001 painting called The Golden Jar from Israel Tsvaygenbaum. He was born on February 1, 1961, and is a Russian-American artist of Jewish descent. A number of his works are in the Museum of Imitative Arts, Derbent.
The culture and dynamic of the life of the area where Tsvaygenbaum grew up and his Jewish background are reflected in his paintings.
I chose this painting because looks like the flowers are not centered, maybe he forgot to convert those coordinated systems?
The Problem – Center a View in the Superview
> You have two views. One view is a subview of the other and you want that subview to be centered within the superview.
The first thing to follow this article is to start a new project in Xcode with Storyboard. Now open the generated ViewController class and copy/paste this code:
class ViewController: UIViewController {
    let redSquare: UIView = {
        var view = UIView(frame: CGRect(x: 100, y: 200, width: 200, height: 200))
        view.backgroundColor = .red
        return view
    }()

    let yellowSquare: UIView = {
        var view = UIView(frame: CGRect(x: 0, y: 0, width: 100, height: 100))
        view.backgroundColor = .yellow
        return view
    }()

    override func viewDidLoad() {
        super.viewDidLoad()
        view.addSubview(redSquare)
        redSquare.addSubview(yellowSquare)
    }
}
We created two view objects. One is a red square( the redSquare property) and the other one is a yellow square ( the yellowSquare property). Should look like the image below:
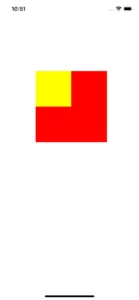
But we want the yellow square to be centered on the red square. How can we do that?
Disclaimer: The first three solutions implies that you already have the frame of both views.
Solution 1 – Converting Frames
You could think: “Well to center both views I just need to set the center property of the yellow view to be equal to the center property of the red view”.
Let’s do that:
override func viewDidLoad() {
    super.viewDidLoad()
    view.addSubview(redSquare)
    redSquare.addSubview(yellowSquare)
    yellowSquare.center = redSquare.center
}
The result is:

But why?
Now begin the lesson about coordinate systems. Each view has its coordinate system, that begins from the top left corner. Each time you add a subview to another view, the subview now is within the coordinate system of the superview. This means that the frame X and Y positions values are relative to the superview, also the center property.
In other words, think that the world for the view is its superview. The view needs to be localized in the world, so it uses the superview “world” to do that.
Now that you know that, we can easily explain why our code doesn’t work. Let’s print it out to make it more clear:

As you can check in the image above, the red square center is in x = 200 and y = 300 IN RELATION to its superview, which means in relation to the UIViewController standard view. And the center position of the yellow view is x = 50 and y = 50 IN RELATION to the red square view.
After we set the new center of the yellow subview to x = 200 and y = 300 that means we will move our view 200 points to the right and 300 points down, and that is outside the size of the red square view, because the Y value is bigger than the height of the red square view.
To solve that we need to convert the center position of the red square in relation to its super view. Like this:
yellowSquare.center = redSquare.convert(redSquare.center, from: view)
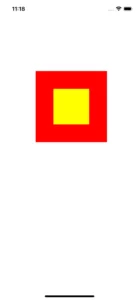
And you got it centered!
Solution 2 – Using Mathematics and Bounds
Now you know how the center property works within the super view coordinates system, you can use some math on your side. Instead of converting things, which can be a little tricky, let’s just use the middle of the height and the width of the red view to set our new center:
yellowSquare.center = CGPoint(x: redSquare.frame.size.width/2, y: redSquare.frame.size.height/2)
Build and run to check if works… And it does! But it is not the best alternative to use the redSquare frame for this, it is better to use bounds. But why? Imagine that we apply a transformation and check the code below:
print("redSquare.frame -> \(redSquare.frame)")
redSquare.transform = CGAffineTransform(scaleX: 2, y: 0.4)
print("redSquare.frame \(redSquare.frame)")

yellowSquare.center = CGPoint(x: redSquare.frame.size.width/2, y: redSquare.frame.size.height/2)
The result is:
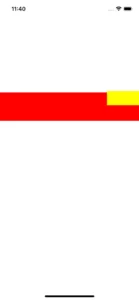
Well… the view is not centered anymore.
To solve that we should use bounds. And to explain let’s print what is happening:
![]()
As you can see, before the transforming function the redSquare frame was (x=100.0, y=200.0, width=200.0, height=200.0) and now after the transform is (x=0.0, y=260.0, width=400.0, height=80.0). Look that transforming functions necessarily change the frame because now it has new coordinates within the super view “world” coordinate system.
But as you can see, the bounds don’t change. This means you can reliability trust in the bounds to get the width and height to set the new center.
yellowSquare.center = CGPoint(x: redSquare.bounds.size.width/2, y: redSquare.bounds.size.height/2)
Resulting in:
Nice, isn’t it?
Solution 3 – Using CGRect API to Center a View in the Superview
One good thing is that Apple does a good job with API. The CGRect has two properties that we can use here, they are midX and midY. They do exactly what you are thinking: Return the x or y- coordinate that establishes the center of a rectangle.
yellowSquare.center = CGPoint(x: redSquare.bounds.midX, y: redSquare.bounds.midY)
As we are using the red square bounds property, it will also work with any transformation process.
Solution 4 – Auto Layout
You can use auto layout in the subview.
Let’s see:
yellowSquare.translatesAutoresizingMaskIntoConstraints = false
NSLayoutConstraint.activate([
yellowSquare.centerXAnchor.constraint(equalTo: redSquare.centerXAnchor),
yellowSquare.centerYAnchor.constraint(equalTo: redSquare.centerYAnchor)
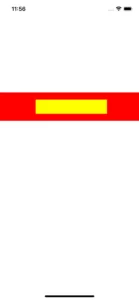
])But now the yellow square is missing. Why?
Well, now the yellowSquare.translatesAutoresizingMaskIntoConstraints property is set to false. We are not relying on the frame we previously set in the anonymous closure anymore, now the auto layout constraints will take care of everything. It’s way more complicated than just taking over the frame, but for the sake of simplicity let’s assume that.
If you print the yellow frame from viewDidLoad and after from didAppear :
![]()
You can see that our view, is in the right position but with 0 height and 0 widths. Now we just change the layout to the new constraints to set the correct height and width:
NSLayoutConstraint.activate([
    yellowSquare.centerXAnchor.constraint(equalTo: redSquare.centerXAnchor),
    yellowSquare.centerYAnchor.constraint(equalTo: redSquare.centerYAnchor),
    yellowSquare.heightAnchor.constraint(equalToConstant: 100),
    yellowSquare.widthAnchor.constraint(equalToConstant: 100)
])
Now everything should be ok!
Full Code Sample
If you want to test or see everything we wrote.
import UIKit

class ViewController: UIViewController {

    let redSquare: UIView = {
        var view = UIView(frame: CGRect(x: 100, y: 200, width: 200, height: 200))
        view.backgroundColor = .red
        return view
    }()

    let yellowSquare: UIView = {
        var view = UIView(frame: CGRect(x: 0, y: 0, width: 100, height: 100))
        view.backgroundColor = .yellow
        return view
    }()

    override func viewDidLoad() {
        super.viewDidLoad()
        view.addSubview(redSquare)
        // 1 - first child.center
        redSquare.addSubview(yellowSquare)
        // print("Before set")
        // print("yellowSquare.center -> \(yellowSquare.center) redSquare.center -> \(redSquare.center)")
        // print("yellowSquare.frame -> \(yellowSquare.frame) redSquare.frame -> \(redSquare.frame) \n")

        //yellowSquare.center = redSquare.center

        // print("After set [yellowSquare.center = redSquare.center]")
        // print("yellowSquare.center -> \(yellowSquare.center) redSquare.center -> \(redSquare.center)")
        // print("yellowSquare.frame -> \(yellowSquare.frame) redSquare.frame -> \(redSquare.frame) \n")

        //yellowSquare.center = redSquare.convert(redSquare.center, from: view)

        // 2 - Using Math with frame sizes explain why to use bounds instead of frame here
        // print("redSquare.frame -> \(redSquare.frame) redSquare.bounds -> \(redSquare.bounds)")
        // redSquare.transform = CGAffineTransform(scaleX: 2, y: 0.4)
        // print("redSquare.frame -> \(redSquare.frame) redSquare.bounds -> \(redSquare.bounds)")
        //
        // yellowSquare.center = CGPoint(x: redSquare.bounds.size.width/2,
        // y: redSquare.bounds.size.height/2)
        // 3 - Using bounds Mid Points - As the bounds refers to the views within itself the middle of that coordinate is the point we want.

        // yellowSquare.center = CGPoint(x: redSquare.bounds.midX, y: redSquare.bounds.midY)

        // 4 - Using Auto Layout
        //print("yellowSquare.frame -> \(yellowSquare.frame) yellowSquare.bounds -> \(yellowSquare.bounds)")

        // yellowSquare.translatesAutoresizingMaskIntoConstraints = false
        // print("[viewDidLoad] yellowSquare.frame -> \(yellowSquare.frame) yellowSquare.bounds -> \(yellowSquare.bounds)")
        //
        // NSLayoutConstraint.activate([
        // yellowSquare.centerXAnchor.constraint(equalTo: redSquare.centerXAnchor),
        // yellowSquare.centerYAnchor.constraint(equalTo: redSquare.centerYAnchor),
        // yellowSquare.heightAnchor.constraint(equalToConstant: 100),
        // yellowSquare.widthAnchor.constraint(equalToConstant: 100)
        // ])
    }
}
And we are done!
Summary – Center a View in the Superview
Today we checked four ways to center a view within others. We explained how center property works and how different coordinate systems can work together. There are many ways to solve this problem: using pure math, or using auto layout, or using CGFloat API etc. You should pickup what best suits you.
That’s all my people, I hope you liked reading this article as much as I enjoyed writing it. If you want to support this blog you can Buy Me a Coffee or leave a comment saying hello. You can also sponsor posts and I’m open to freelance writing! You can reach me on LinkedIn or Twitter and send me an e-mail through the contact page.
Thanks for reading and… That’s all folks.
Credits:


