
Hallo allemaal, Leo hier. Today we will try to start our SwiftUI modularisation with SPM in 5 minutes.
Since the first article about modularisation I feel that something was missing. Now I know what it is. In that article, I started with a fully engineered example with a coordinator pattern and two view controllers. This time we will do something way simpler, we will leverage the launch screen that we build last week and try to modularise that little app with SPM.
As you will observe, even a small app can lead to very curious architecture options that we will dive into some of them throughout this tutorial. Keep in mind that I’ll try to not change too much how the architecture is now. The intervention we will do today, as in the first article I’ve written, is just to add modularisation capabilities to the app.
The Modularisation technique is a great tool for developers who want the freedom to develop features isolated and independently, this way enabling a much more scalable and faster compile code.
One day I may write about the advantages of modularisation, but I feel that if you are reading this, you already know all, right?
Painting of the Day
The painting I chose for today is an 1870 art piece called The Boyhood of Raleigh by John Everett Millais.
Sir John Everett Millais, lived from 8 June 1829 to 13 August 1896. He was an English painter and illustrator who was one of the founders of the Pre-Raphaelite Brotherhood. A child prodigy, at the age of eleven Millais became the youngest student to enter the Royal Academy Schools.
The painting depicts the young, wide-eyed Sir Walter Raleigh and his brother sitting on the beach by the Devonshire coast. He is listening to a story of life on the seas, told by an experienced sailor who points out to the sea. The art piece was influenced by an essay written by James Anthony Froude on England’s Forgotten Worthies, that describes the lives of Elizabethan seafarers. It was also probably influenced by a contemporaneous biography of Raleigh.
I chose this painting because it looks like the senior sailor is saying: “Hey code, do you see that SPM package? Yes, you should be there.”
The Problem – SwiftUI Modularisation with SPM
You want to break your SwiftUI App into smaller SPM modules.
As for all architecture and modules articles, we will start writing down what is the current state of the architecture. Why is that important? We do that because we can see how things can be grouped and what are the easiest things to modularise.
Usually, you want to start modularisation with:
- Structs and classes that don’t depend on anything
- Features with well-defined boundaries, for example, that communicate with others through a protocol or message system.
You can start with whatever you want, those guidelines above are just tips to make your life easier. We will start with last week’s article project. No worries in the end you will find the full project to play yourself.
Last week’s project is about creating an animated launch screen with SwiftUI. This way the project has three parts, one is the root of the app, one is the ContentView the app’s main view and we have all the objects used by the launch screen including a manager and an enum.
Drawing the architecture we have something similar to this:

Now we start to think about how can we split this into modules. It is a lot easier when you visualize things like this because we can literally draw the boundaries that we want.
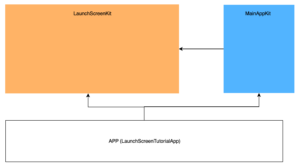
For example we could split into features:
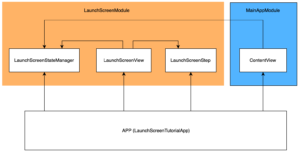
With this in mind, we could create two modules, the LaunchScreenModule in orange and the MainAppModule in blue.
And that is exactly what we are going to do. Remember that I said that is easier to start with modules that don’t have dependencies, if you observe the image above the LaunchScreenModule doesn’t depend on anything. Things use and that’s it.
I know that we could split this, even more, putting views in separate modules but you as a developer should make decisions about when is worth splitting or not. I like splitting per feature, and if there are a lot of custom components maybe put the views in separate places. But you should do whatever works better for scaling your app.
Creating your first SPM module
We will start creating the LaunchScreenModule, it is easier because doesn’t have dependencies.
For me, the easiest way to create SPM packages is by following the steps below:
- Create the new SPM Root Package in Project -> General -> Frameworks, Libraries, and Embedded Content.
- Create the initial setup of the package. Customizing the Package.swift file and renaming things that need to be renamed.
- Change all the access modifiers where applicable.
- Import the newly created module where applicable.
If you really want to deep dive into SPM modules I would recommend you go to my friend Marco Eidinger blog he is a specialist. Now let’s start with the first step and you will see that is something you can do in almost no time.
First Step to Modularise Apps with SPM and SwiftUI
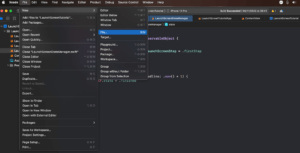
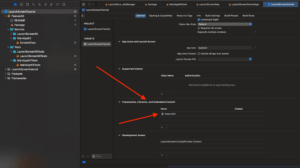
The first thing to do is go to Project -> General -> Frameworks, Libraries, and Embedded Content and create your new SPM Package.
Then, make sure to mark your project as a target as in the image below. I called my SPM package as FeatureKit, but you should use a good naming for your project.
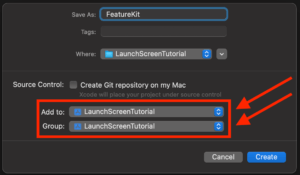
And now you should see this:
Now copy and paste the new Package.swift configuration for your project:
// swift-tools-version: 5.7
// The swift-tools-version declares the minimum version of Swift required to build this package.

import PackageDescription

let package = Package(
    name: "FeatureKit",
    platforms: [.iOS(.v16)],
    products: [
        .library(
            name: "FeatureKit",
            targets: ["LaunchScreenKit"]),
    ],
    dependencies: [],
    targets: [
        .target(
            name: "LaunchScreenKit",
            dependencies: []),
        .testTarget(
            name: "LaunchScreenKitTests",
            dependencies: ["LaunchScreenKit"]),
    ]
)
This is saying:
- Line 1: The minimum Swift version is 5.7 and you should be aware of NOT DELETING THIS LINE.
- Line 8: The platform will be only iOS 16 and above.
- Lines 10,11,12: You are using your SPM package named FeatureKit with the target LaunchScreenKit.
- Line 16 to 21: Finally you are declaring those targets that will be our module separation.
The biggest advantage of this strategy is that when you change the main app your targets are not compiled again. They will only compile when you change them and their dependencies. One last setup thing to do is to go to the target and add your newly created spm package to your project target:
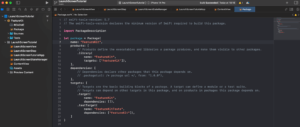
Now inside Packages -> Sources rename the FeatureKit and FeatureKitTests groups(folders) to LaunchScreenKit and LaunchScreenKitTests respectively. And copy the desired files into your LaunchScreenKit.
The final result should be this:
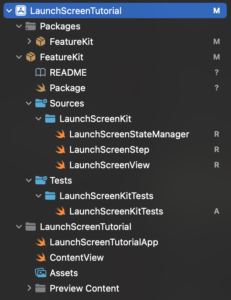
Observe the new names of the folders and that now you have all the launch screen-related files in one place. Cool, isn’t it?
I also leave blank the LaunchScreenKitTests like this, because we are not focusing on testing now:
import XCTest

@testable import LaunchScreenKit

final class LaunchScreenKitTests: XCTestCase {}
Another advantage is that you can test your SwiftUI views normally, you don’t lose preview capabilities because of the modularisation process.
It is time to change all the access modifiers to make them public.
In LaunchScreenStateManager you need to change this:
import Foundation

public final class LaunchScreenStateManager: ObservableObject { // public

    @MainActor
    @Published public var state: LaunchScreenStep = .firstStep // public

    public init() {} // create a public initializer

    @MainActor
    public func dismiss() { // make this public
        state = .secondStep

        DispatchQueue.main.asyncAfter(deadline: .now() + 1) {
            self.state = .finished
        }
    }
}
Make the LaunchScreenStep a public enum.
And in LaunchScreenView, change the struct itself and the “var body” to the public access modifier, and create a “public init() {}“.
import SwiftUI

public struct LaunchScreenView: View { // change this to public
    @EnvironmentObject private var launchScreenState: LaunchScreenStateManager

    @State private var firstAnimation = false
    @State private var secondAnimation = false
    @State private var startFadeoutAnimation = false

    public init() {} // add this initializer

    // rest of the code

    public var body: some View { // change this to public
     // rest of the code
    }
     // rest of the code
}
Now your module is ready to be used externally.
The final step is to import the new module into the app, adding “import LaunchScreenKit” to your classes. Add it at the top of ContentView.swift and LaunchScreenTutorialApp.swift, for example:
import SwiftUI
import LaunchScreenKit // add this to your classes that will use the module

struct ContentView: View { ... }
And that’s it!
This is how to create a local SPM package inside a project. You had to change some private vars to the public access modifier due to the @Published property wrapper and we have some workarounds on that, but is not for today, the focus here is modularisation.
Extracting our second SwiftUI module to SPM
Now you learned how to do we’ll speed up a little bit. The second module that we will create is the MainAppKit, which would be only our ContentView now, but it could be a lot more stuff.
Do you remember that the ContentView depends on the LaunchScreenKit? This way, when we extract that to a new module we need to represent that dependency in the Package.swift file too. Let’s start.
In your Package.swift file, add the new target module:
// swift-tools-version: 5.7
// The swift-tools-version declares the minimum version of Swift required to build this package.

import PackageDescription

let package = Package(
    name: "FeatureKit",
    platforms: [.iOS(.v16)],
    products: [
        .library(
            name: "FeatureKit",
            targets: ["LaunchScreenKit", "MainAppKit"]), // add a new target here
    ],
    dependencies: [],
    targets: [
        .target(
            name: "LaunchScreenKit",
            dependencies: []),
        .testTarget(
            name: "LaunchScreenKitTests",
            dependencies: ["LaunchScreenKit"]),

        .target( // add a new target here
            name: "MainAppKit",
            dependencies: ["LaunchScreenKit"]), // this modules depends on LaunchScreenKit to work
        .testTarget( // add a new target test here
            name: "MainAppKitTests",
            dependencies: ["MainAppKit"])
    ]
)
Now try to build and you will have this error:
Source files for target MainAppKit should be located under ‘Sources/MainAppKit’, or a custom sources path can be set with the ‘path’ property in Package.swift
This is because we didn’t create the group(folder) structure yet. Let’s create everything we need:
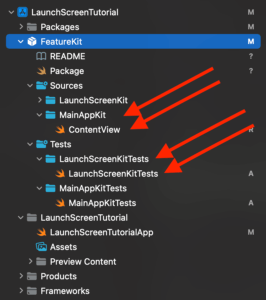
We create 3 things here: Two folders, one in Sources called “MainAppKit” and one in Tests called “MainAppKitTests“. Also, we created one new Swift file with a blank MainAppKitTests containing this:
import Foundation

import XCTest
@testable import LaunchScreenKit

final class MainAppKitTests: XCTestCase {}
And we transferred the ContentView to the MainAppKit folder.
We need to change the access modifiers and create a new public init for the ContentView.
import SwiftUI
import LaunchScreenKit

public struct ContentView: View { // add public modifier here

    @EnvironmentObject private var launchScreenState: LaunchScreenStateManager

    public init() {} // create public init here

    public var body: some View { // add public modifier here
    }
}
Now the last thing of this article is changing the root of the app adding the “import MainAppKit” to it, so it can use the ContentView class and that’s it!
We are done!
Final Architecture Check
Let’s check what our app’s architecture looks like now:
That was our main goal. We could extract the LaunchScreen feature for another module so the developers can continue improving that flow and that will not depend on anything else in the app. At the same time, other devs can continue the development of the main app inside the MainAppKit module which will not conflict with the LaunchScreenKit module.
This is something that you could do in minutes that can save hours and hours of unnecessary recompilations. Be mindful when splitting or not your code.
Problems Ahead!
One thing to notice is, as the LaunchScreenKit module is a dependency of the MainAppKit module, every time it changes you will have to recompile the MainAppKit too. This is a problem that we can solve in another article, the goal here was to introduce everyone to the magic world of modularisation.
And we are done!
Summary – SwiftUI Modularisation with SPM
Today we did a brief introduction to local SPM packages and how to prepare your app for modularisation. A checklist was used to guide us in the whole process which make things easier for anyone who wants to start this endeavor.
We also showed the architectural designs at the start of the project and at the end of the project, and how different is the final product.
Fellow developers, that’s all. I hope you liked reading this article as much as I enjoyed writing it. If you want to support this blog you can Buy Me a Coffee or just say hello on Twitter. You can reach me on LinkedIn, or send me an e-mail through the contact page.
You can also sponsor this blog so I can get my blog free of random advertisers.
Thanks for the reading and… That’s all folks.
Image Credit: Wikiart


