
Hallo allemaal, Leo hier. The topic today is how to Programmatically Testing your Code.
This is the fifth part of my series “How to start iOS Development Career”. If you didn’t read the introduction, Part 2, Part 3 and Part 4 I would strongly suggest doing so.
If you came here, you probably have everything to get your first job. You already know enough Swift to build interfaces and also have a basic knowledge of important features for iOS development.
From here to the end of the articles we will continue with the essential skills that I thought were important to start an iOS career, but probably you are good to go for an entry-level job. That was what I did, after being confident that I could make interfaces and being comfortable coding in Swift I started to apply for jobs.
Many iOS developers skip this phase, and you will be surprised at how many developers overlook this important skill. Testing is important for a lot of reasons. The most obvious one is instead of *thinking* that your code/algorithm work you *know* your code works.
Furthermore, testing gives you the freedom to refactor and change pieces of your code without having to worry if it breaks something or not. If the tests are green, nothing is broken. As the famous quote from Jon Reid: “The reason we want tests is to give us confidence so that we can make bold changes”.
Those two reasons to test for me were already the selling point to make me learn how to do it in any language. When I work as a backend developer where we don’t have UI screens to check if our work actually works, we depend a lot on testing to assure that the code does what we expect it does.
However, to me, the most important point of testing is that testing your code OBLIGATES you to reason about your code structure and this is priceless. When we are coding we most of the time are trying just to solve the problem and move on. Testing forces us to step back, see our code in a third person and start to think about how my code structure was created, and rapidly check if that was intended.
Today we will explore this amazing topic of iOS testing.
No more talking, let’s go! But first…
Painting of The Day
The painting today is a 1671 art piece called **Allegory on Faith** by the master [Johannes Vermeer](https://www.wikiart.org/en/johannes-vermeer). Jan (Johan) Vermeer van Delft was born in 1632 in Delft and is one of the greatest Dutch masters, is responsible for some of the most iconic imagery in the history of art, such as The Girl with a Pearl Earring, The Milkmaid, and The Art of Painting. His artworks are a rarity, with only around 36 known paintings attributed to him. Much of Vermeer’s life remains a mystery, which makes him and his paintings all the more captivating and intriguing.
I chose that painting because every time I write tests I can spot a bug early in development and I make that face thinking: “I’m glad I wrote unit tests for this before”.
The Problem – Programmatically Testing your Code
You need to learn how to run automated tests in your app.
A good introduction to testing is answering the “Why?” question. Why do we need automated testing? The first thing you need to keep in mind is, “to go faster”.
This is counterintuitive because writing “production” code and writing tests actually take more time than just writing the production code. So how that help to go fast? Let’s check the example situation below.
You need to add new Facebook login to an app that already has another login method, for example, an in-house login. How do you know that everything you have done doesn’t mess with the code that was already in place? With automated testing, you can just run the test suit and know that everything is still good. Otherwise, you have to rely on manual testing, and you have to manually test the in-house login plus the new Facebook login code.
Now imagine adding a third login method using Google. Again, if you have automated tests you just run the test suit and you are good to go. Otherwise… You have to manually run tests for your in-house login method, for the Facebook login method, and now for the google login method.
I’m not implying that if you add tests your app is automatically perfect or that you will never need to manually test again. It is that by adding automated tests you can be sure that at least everything that you already covered is still working.
This flow doesn’t look promising. A lot of apps out there run without any automated tests, meaning that this reworking flow is run over and over for each new feature, or maintenance that the app needs.
Other reasons to write tests are, but are not limited to:
- More code readability and better architecture. This is inevitable, when you write tests while developing features you will come up with a better code because you are already thinking about it while you write. When you have to test something the way you build it is modified to be easy to use and with the minimum required coupling.
- Fewer bugs and/or show them early in the development lifecycle. When you add tests you are already searching for edge cases in your production code, this way you have a “third person” view of your code and you can reason better on it.
- Enable code reuse is another side effect of automated tests. While testing we will need mocks, spies, and/or stubs objects this way we need to make our code reusable with inheritance or protocols, or very easy to create objects.
And there is more. It is not the scope of this article to make an extensive defense of automated tests but you get the point. For me was an important skill to have, and if you read almost any job description in iOS listings you will see the importance for companies too.
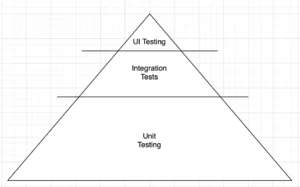
The way I see there are three main areas to automate your tests. Unit tests, integration tests, and UI Tests.
And you can see in the test pyramid below how many the proportion of each one is advised to be:
Before entering each one of those categories let’s remember that Xcode has one main framework to test code which is XCTest. Inside it, you can be focused on testing without the need for screens and also testing screen layout elements and their interactions.
Unit Tests
Unit tests are by far the most reliable and fast tests you can have. It is important to notice that having a great unit test coverage gives you the confidence to implement new features and modify existing ones with a meager chance of introducing new bugs.
Unit testing is what I studied most and it is what I recommend you focus on in the beginning. The advantages for your code quality will be already rewarded if you just introduce a few tests for every code you write.
If you don’t want to create a new project and test your code, you can do it in Playgrounds:
import XCTest

func addToString(_ x: Int,_ y: Int) -> String {
    "\(x + y)"
}

class MyTestCase: XCTestCase {

    func testMyCaseTestsNow() {
        XCTAssertEqual(addToString(1,2), "3")
    }

    func testMyCaseTestsNow2() {
        XCTAssertEqual(addToString(2,2), "3")
    }
}

MyTestCase.defaultTestSuite.run()
That would result in:

In this brief code, you can see that we are testing our addToString function, and we have two tests, one is failing and the other is passing. The Playground is not the best place to make tests, but if you are aiming for quick demos maybe is a good idea.
My recommendation is to study as much as you can about unit testing. From here, you will start to question yourself: How much code coverage my code should have? What are the most important parts to cover? Should I add unit tests and UI tests? Or only unit tests?
There’s no right answer to that. It all depends and you will have to judge by yourself what is the most beneficial for your codebase.
Integration Tests
The integration tests can be by XCTest and XCUITests. The important concept here is to test how components interact with each other. For example, you can test the login component and how it interacts with the user storage component.
The integration tests are very important when you have an app with a lot of different components that need to integrate. Testing all the orchestration, synchronization and reliability is very important for that kind of app.
In the future, I can talk more extensively about integration tests but I don’t think this is a topic you should focus on at the beginning.
UI Test
UI testing is great but is where things get very slow and not so reliable.
First, because you have to literally test with a real device emulation of your screens, in our case the Simulator. This sets a lot of other environment variables that you don’t have with unit tests, like internet connection and device settings.
For each of the UI test cases, you have to launch your app, so you can imagine how slow this could get. There are techniques for UI tests that speed up this process and we will comment later in this article.
There are two main techniques for UI testing: App flow testing with XCUIElements and snapshot testing ( generally with third-party libraries).
App Flow Testing
App flow testing is the native way to test your UI. In XCUITest you have all the tools needed to make all steps a user would make in your app. You can make it tap on buttons, filling text fields, or even scrolling through table views and collection views.
A typical test would look something like this:
func checkTutorialApp() {
    let appObj = XCUIApplication() // Mark 1

    appObj.buttons["Show More"].tap() // Mark 2
    appObj.otherElements.containing(.image, identifier:"MyTutorial").element.tap() // Mark 3

    XCTAssert(appObj.staticTexts["Tutorial Explanation"].exists) // Mark 4
}
But, what is happening in the test above?
- In the test above you are launching the application.
- Tap a button with the “Show More” text.
- Find an image with the identifier “MyTutorial” and tap it.
- Check if the label: “Tutorial Explanation” exist on the screen.
Did you notice that test is blatantly different from the unit test? Here we are literally navigating through the app, tapping things, checking if a label appears on the screen or not.
This is the gold of XCUITest, we are testing the app flow itself and how everything integrates. This is not free and not even fast, it comes with a lot of flakiness because you are constrained by a lot of things. For example: if the internet connection is bad your tests could fail because you can’t communicate to a login service.
This is the ultimate integration test for iOS. Is literally putting everything together and testing it all.
I wouldn’t spend too much time learning this at the beginning of your journey but it is good to know that this exists natively.
Snapshot Testing
On the other hand, if you are paying attention to the XCUITest we are not testing the layout itself, but the behavior and interactions of the screens. For example, you can have a label in the view hierarchy that is not showing because is behind another view or image. And that will be a successful test.
But how can we be sure that the UI is always exactly how we wanted it? Well, that is when the snapshot tests come to save the day!
There are a bunch of snapshot testing frameworks out there. I would recommend two: the uber and the point-free frameworks.
The way they work is the same: first, you run your test to take a snapshot/record of the screen and all tests will fail. Now you have a base snapshot to compare and run again without recording and all tests should pass.
From now on, every time you change something on the screen the snapshots will fail if change something that wasn’t intended. For every new intended change in the screen, you need a new screen recording to update the base snapshot.
With this technique, you can ensure the reliability of your layout throughout the development of new features.
One disadvantage is that this also relies on the simulator and if any configuration change on that you can fail the test. This way you will always have to accept some error margin of comparison, which can lead to small bugs. But in the long term, I think it is a very reliable way to test layout in iOS.
I wouldn’t study too much of this technique at the beginning of your journey, but it is very important to know that this exists.
Resources To Study
I studied using the Testing Swift from Paul Hudson. It is a very comprehensive book about iOS testing and has a really good theoretical explanation of testing. I use this book as a reference until today, it is a great resource.
Another great resource for testing is this youtube playlist where Caio and Mike from Essential Developer make an app with 100% unit test coverage from scratch. Really good stuff. Also, I recommend their channel for learning architecture stuff.
How to Practice Programmatically Testing
To practice testing, I did try to apply the unit tests to classes/structs I was already using. For example, if you have a controller that controls login, how would you test that? Or a class that has a view model that provides FAQ information for you, how can you mock that information for your view?
Testing practice is really a new world to discover. When you start is hard to stop, the fast success feedback loop you have while writing applications with unit tests is amazing and rewarding. The main tip here is always to think: “Where I can Programmatically Testing your Code?”.
Try yourself in your already controllers, view models, stores, etc. Let me know what you think and what are your struggles!
Summary – Programmatically Testing your Code
Today we went through the basics of iOS testing and how to programmatically testing your code. We checked unit tests, integration tests, snapshot tests, app flow tests, and also all the resources I used to improve my testing skills in iOS.
This is part of the series of articles about starting your iOS career!
That’s all my people, I hope you liked reading this article as much as I enjoyed writing it. If you want to support this blog you can Buy Me a Coffee or leave a comment saying hello. You can also sponsor posts and I’m open to freelance writing! You can reach me on LinkedIn or Twitter and send me an e-mail through the contact page.
Thanks for reading and… That’s all folks.
Credits:


