
Hallo vrienden, Leo hier. Today we will talk about how to dynamically change app icons with SwiftUI.
I had the idea for this article using Duolingo. I don’t like how Duo uses the constrained heart quantity to force you into buying the subscription but they have to earn somehow, right? I think that maybe could be more hearts, I think 10 would be enough to not be so frustrating and not too easy.
Stop rumbling and move on with the story. Duolingo gave me 3 days of the premium Duolingo and something interesting happened. The app’s icon when you are premium is different than your regular icon.
Today we will be discussing a valuable and exciting feature that can be used in SwiftUI: the ability to change your app’s icon dynamically. With just a few simple steps, you can customize and update your app’s icon to better reflect your brand and enhance the user experience.
Additionally, dynamic app icons can be used to advertise special events or promotions, providing customers with a fun and interactive way to engage with your brand.
Whether you want to create a unique visual identity or simply add some extra flair to your app, SwiftUI makes it easy to dynamically change your app icon.
Dynamically changing your app’s icon can be a powerful tool for improving the user experience and increasing customer attention. By allowing customers to customize and personalize their app’s icon, you can create a remarkable and memorable visual identity that sets your app separated from others.
Overall, changing your app’s icon with SwiftUI can be a valuable tool for creating a strong and distinctive brand presence in the iOS market.
SwiftUI has great tools to improve your app’s user experience. For example, you can use native background tasks to download images or any other resource while the user is not using the app with background tasks. That is especially useful for apps that need to perform complex or time-consuming tasks, such as downloading large files or syncing data with a remote server. By using background tasks, you can ensure that your app remains responsive and efficient, providing users with a seamless and enjoyable experience.
And the last thing is that you can also use fresh new Mapkit configurations with SwiftUI. Just need to do some bridging code and voi lá!
No more talking, let’s code! But first…
Special Thanks
Someone that didn’t want to reveal donated through the Buy me a Coffee link. Thank you so much for your donation through the Buy me a Coffee platform.
Your support means the world to us and helps us to continue creating valuable content and resources for our community. I’m truly grateful for your contribution and appreciate your willingness to support our work.
Painting of the Day – St.Sergius and Bacchus
The painting I chose for today is a very old painting, dating from 650, called St.Sergius and Bacchus, doesn’t have a specific author and the theme is Holy Martyrs.
Byzantine genre icons are a type of religious painting that originated in the Byzantine Empire. They typically depict religious figures or scenes from the bible and are characterized by their use of gold leaf, intricate details, and stylized figures. Byzantine icons were often used in religious ceremonies and were considered to be sacred objects. They were created using a specific set of techniques and were highly revered by the Byzantine people. The use of genre icons in Byzantine art was influenced by the Eastern Orthodox Church and its teachings.
I chose this painting because its genre is Icon and today we will talk about a lot about icons.
The Problem
You are creating a SwiftUI app and want to change the app home icon after the installation. For example: if a user is a premium you can change the icon to the premium version.
Now let’s imagine a situation. You are assigned to change the app icon programmatically and your app is made in SwiftUI, so a premium user would have a premium feeling and increase the exclusive group belonging.
How would you do that? Let’s check what we want to achieve first.
As you can check in the gif above, what is important is that you can have inside your app the control to change the app icon.
Steps to Change App Icon Dynamically
Below you can check step-by-step how to dynamically change the app icon.
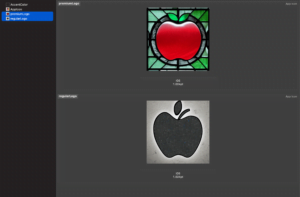
- Import your new app icons in the assets.
- Add new configurations to your App’s Target.
- Add and call the functions to change app icons.
Let’s dive into each one of the steps.
Step 1 – Add New Alternative App Icons for Your SwiftUI App
Go the assets and add a new Icon.
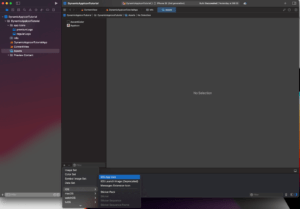
Then just drag and drop your icons and rename them as you wish to use in the code.
Step 2 – Configure the Target Build Settings to Have Your New App Icons
Go to your project, and go to your Target.
In your target go to Build Settings. And you must click the All button like the image below otherwise you won’t see those options.
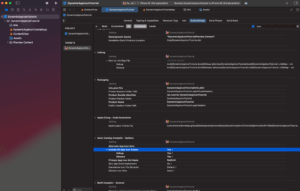
After that you have two alternatives. One is importing all the icon assets and another one is import just a few app icon.
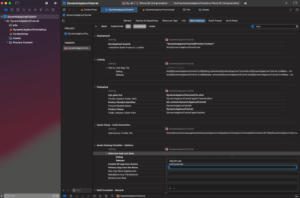
To import all app icons from the assets to use in your app you just need to set the Include All App Icon Assets key to Yes, like the image below.
To import just a few icons you just need to add them in the Alternate App Icon Sets key.
Now let’s code!
Step 3- Programmatically Change App Icon in SwiftUI
We are almost in the end. Hold with me.
In your SwiftUI view, we will have to add one little function and call it.
Check it below:
struct ContentView: View {

    @State private var isRegularIcon: Bool = true

    var body: some View {
        VStack {
            Button {
                changeAppIcon(to: "regularLogoIcon") // this is the same value of the image asset catalog
            } label: {
                Text("Regular App Icon")
            }
            .buttonStyle(.borderedProminent)
            .padding()

            Button {
                changeAppIcon(to: "premiumLogoIcon") // this is the same value of the image asset catalog
            } label: {
                Text("Premium App Icon")
            }.buttonStyle(.borderedProminent)

        }
        .padding()
    }

    private func changeAppIcon(to iconName: String) {
        UIApplication.shared.setAlternateIconName(iconName) { error in
            if let error = error {
                print("Error setting alternate icon \(error.localizedDescription)")
            }

        }
    }
}
All the magic is inside the changeAppIcon function.
One little thing to be careful of. While I was testing I couldn’t use the same name for the file and the icon name in the code, be careful with that.
As you can check for yourself the result is every time a user taps the button, we have an alert saying that the app icon has changed. The result you can check again below:
One last thing is annoying me in this solution. When I was using Duolingo, I don’t remember the alert screen popping in my face saying that the app icon has changed. Looks like the app icon changed in the background, silently.
So that’s our next mission, how to change the app icon without the default iOS alert.
How to change App Icons Without Alert in SwiftUI
Unfortunately, Apple doesn’t provide an API to do that, so keep in mind that if you apply the following solution in your production code, Apple can deny your app in the review process. This is because this little workaround uses a private Apple API.
We will use a workaround to make the app run the UIApplication.shared.setAlternateIconName function but doesn’t show the alert.
The function below is not recommended to be used in production, use at your own risk:
private func setApplicationIconWithoutAlert(_ iconName: String?) {
    if UIApplication.shared.responds(to: #selector(getter: UIApplication.supportsAlternateIcons)) && UIApplication.shared.supportsAlternateIcons { // Mark 1

        typealias setAlternateIconNameClosure = @convention(c) (NSObject, Selector, NSString?, @escaping (NSError) -> ()) -> () // Mark 2.

        let selectorString = "_setAlternateIconName:completionHandler:" // Mark 3

        let selector = NSSelectorFromString(selectorString) // Mark 3
        let imp = UIApplication.shared.method(for: selector) // Mark 4
        let method = unsafeBitCast(imp, to: setAlternateIconNameClosure.self) // Mark 5
        method(UIApplication.shared, selector, iconName as NSString?, { _ in }) // Mark 6
    }
}
Let’s explain line-by-line:
- Mark 1 – Here we are using the UIApplication.shared functions to check if the iOS supports the use of dynamically changing app icons.
- Mark 2 – This is a really interesting line. Swift 2 introduced a way to pass a Swift closure to a C function by taking a function pointer parameter, using the @convention(c) annotation. Why that is important? Because now we can run the closure as a C function and that will not trigger anymore the alert.
- Mark 3 – Creating a Selector for a private Apple API.
- Mark 4 – Use the Selector to locate and return the address of the receiver’s implementation of a class method so it can be called as function.
- Mark 5 – Here we are casting the closure type to the implementation address that we are passing.
- Mark 6 – Run the casted function with parameters.
Again, here we are using private Apple APIs, it is not supposed to be used in production and your app could be rejected by using that type of code.
And we are done for today!
Summary – Dynamically Modifying App Icon in SwiftUI
Today we discussed how to use the SwiftUI framework to dynamically change the app icons of an iOS app. This allows developers to create a unique user experience by providing different app icons for different users or for different occasions. The article provides step-by-step instructions on how to implement this feature using SwiftUI.
We also checked a little hack to not show the alert when changing the app icon programmatically. If you ever wondered if changing the app icon without showing the alert was possible, yes, it is but not recommended.
Fellow Apple Lovers, that’s all. I hope you liked reading this article as much as I enjoyed writing it. If you want to support this blog you can Buy Me a Coffee or say hello on Twitter. I’m available on LinkedIn or send me an e-mail through the contact page.
You can likewise sponsor this blog so I can get my blog free of ad networks.
Thanks for the reading and… That’s all folks.
Image credit: Featured Image


