Hallo tafels en lades, Leo hier. Today we will study how to create a card with an image outside its bounds in SwiftUI.
Last week was a roller coaster for my family and me. We moved to another city and I had a 2-day SwiftUI hackathon at my company, where my team first got the place!
The team was composed of 4 developers and 1 designer. And the designer made a really beautiful screen flow out of nothing! It was a really impressive work, everyone liked the designs. The hackathon experience was terrific and all the teams deserved to win. The theme was that we should create or improve one of our apps based on our own company values.
My team made two apps, one for first aid procedures, for example, when there’s a fire in the building what do I have to do? Or when some really severe accident happens, what should be the next steps? We developed a simple app with four screens, each one was a step-by-step guide on what to do in urgent situations.
The other app was a “Truth or Dare” game. The game had a real spin wheel and a 100% done game engine. With a lot of screens and navigations, we could pull out in just 2 days of the game.
This article is about the last component of the last view of the game. When the current player checks if he won or not the points of the game round.
As I’m fairly new to SwiftUI this game was an adventure for my team and me, we learned a lot and also stumbled on some rough edges of SwiftUI, which I can comment on in another article if anyone wants.
No more talking, let’s code! But first…
Painting of the Day
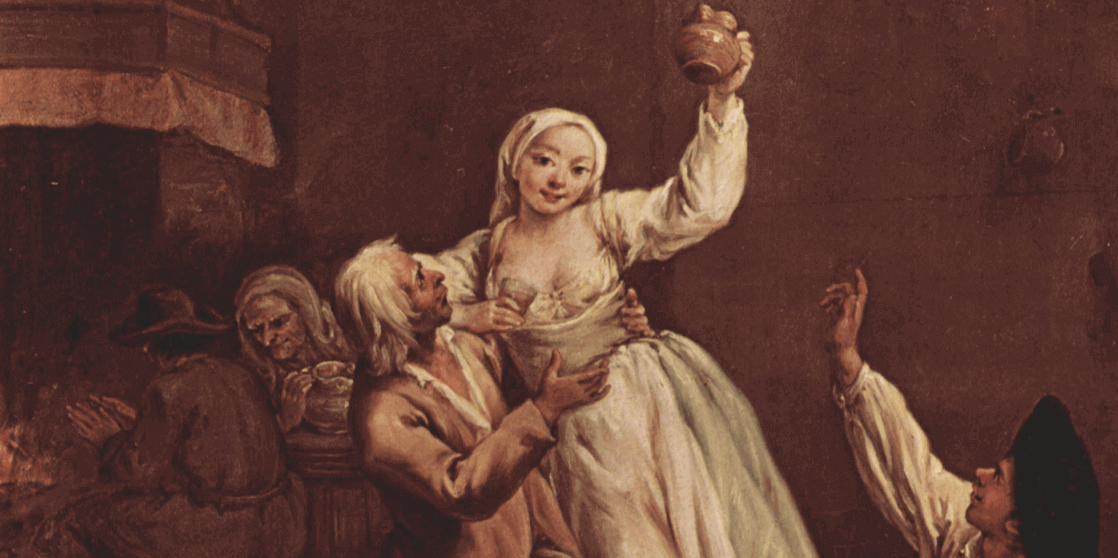
The painting I chose for today is an around 1750 art piece called “The Happy Couple” by Pietro Longhi.
Pietro Longhi was a very famous Venetian painter, who mastered the portrayal of everyday scenes of life in Veneza. Born Pietro Falca, he changed his last name to Longhi when he started painting. When he was a kid, his father encouraged his natural talent for drawing, and he later improved his drawing skills under the acclaimed history painter Antonio Balestra in Verona.
Longhi was extremely popular during his lifetime, painting bright scenes with a light social comedy. Many show Venetians at play and chronicle the daily activities of a typical Venetian citizen, such as going to the barber’s, duck hunting, gambling, or watching an exhibition at the zoo.
I chose this painting because that depicts the celebration that my wife and I when I told her that my team won the Hackathon.
The Problem – Create a Card with an Image Outside its Bounds in SwiftUI
You need to create a view that has an image that goes outside of the background of that view. In other words, you need that an image has an offset from the current view.
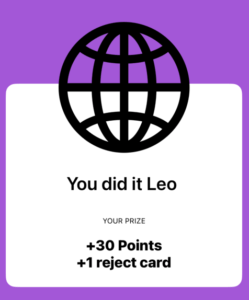
When dealing with the interface is really good to have a visual reference of what we are talking about.
So the view that we will build today is this:
This view should be a no-brainer in SwiftUI. Is a VStack with a bunch o labels and white background and rounded corners.
The only problem is that the first view of the VStack is an image that gets out of the bounds of the card. In UIKit we would do that by constraining the middle-ish of the image with the top constraint of the view and setting it to the X anchor of the whole view, and that’s it.
But how to achieve that in SwiftUI? I think one of my main problems with SwiftUI is how to position views in the interface. I already expressed my opinion that I have a feeling that SwiftUI is a “spacer-based” UI and using the hackathon as an experience I can say that we used A LOT of spacers in two days.
Let’s solve this in two ways, one using ZStack and another one using overlay.
Setting up the basic view
The basic setup of this view is this:
struct ContentView: View {
var body: some View {
ZStack {
Color
.purple
.ignoresSafeArea()
resultView
.padding()
}
}
@ViewBuilder
var resultView: some View {
VStack {
Image(systemName: "globe")
.resizable()
.scaledToFit()
.frame(width: 200, height: 200)
Text("You did it Leo ")
.font(.system(size: 28))
.bold()
.foregroundColor(.black)
.frame(maxWidth: .infinity)
Text("YOUR PRIZE")
.foregroundColor(.black)
.font(.caption2)
.padding(.top, 16)
.padding(.bottom, 8)
Text("+30 Points")
.foregroundColor(.black)
.font(.system(size: 22))
.fontWeight(.heavy)
Text("+1 reject card")
.foregroundColor(.black)
.font(.system(size: 22))
.fontWeight(.heavy)
.padding(.vertical,-15)
.padding(.bottom, 20)
}
.padding()
.background {
RoundedRectangle(cornerRadius: 15, style: .continuous)
.fill(Color.white)
}
.cornerRadius(15)
}
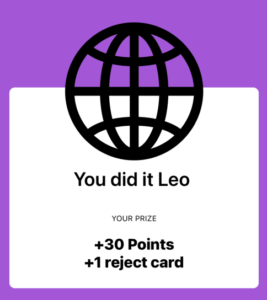
}With the code above you will have this:
Now let’s try to offset the globe outside of the card.
First Attempt – Using Negative Padding with the Image
The first thing that came to my mind was: “This is simple, I just need to add a negative padding in the image and everything is perfect”. *narrator: he was wrong.*.
Let’s test that:
    @ViewBuilder
    var resultView: some View {
        VStack {
            Image(systemName: "globe")
                .resizable()
                .scaledToFit()
                .frame(width: 200, height: 200)
                .padding(.top, -150) // <<<<<< padding added

            Text("You did it Leo ")
                .font(.system(size: 28))
                .bold()
                .foregroundColor(.black)
                .frame(maxWidth: .infinity)

            Text("YOUR PRIZE")
                .foregroundColor(.black)
                .font(.caption2)
                .padding(.top, 16)
                .padding(.bottom, 8)
            Text("+30 Points")
                .foregroundColor(.black)
                .font(.system(size: 22))
                .fontWeight(.heavy)
            Text("+1 reject card")
                .foregroundColor(.black)
                .font(.system(size: 22))
                .fontWeight(.heavy)
                .padding(.vertical,-15)
                .padding(.bottom, 20)
        }
        .padding()
        .background {
            RoundedRectangle(cornerRadius: 15, style: .continuous)
                .fill(Color.white)
        }
        .cornerRadius(15)
    }
Resulting in this disaster:
Well, that doesn’t end how I expected. Let’s try the first solution.
Solution: The ZStack for the image offset outside the view bounds in SwiftUI
As the ZStack is one of the primary ways to go when talking about overlapping views in SwiftUI let’s give it a try:
@ViewBuilder
var resultView: some View {
    ZStack { // Add this
        VStack { // First View - Background
            Text("You did it Leo ")
                .font(.system(size: 28))
                .bold()
                .foregroundColor(.black)
                .frame(maxWidth: .infinity)
                .padding(.top, 120) // add top padding here too

            Text("YOUR PRIZE")
                .foregroundColor(.black)
                .font(.caption2)
                .padding(.top, 16)
                .padding(.bottom, 8)
            Text("+30 Points")
                .foregroundColor(.black)
                .font(.system(size: 22))
                .fontWeight(.heavy)
            Text("+1 reject card")
                .foregroundColor(.black)
                .font(.system(size: 22))
                .fontWeight(.heavy)
                .padding(.vertical,-15)
                .padding(.bottom, 20)
        }
        .padding()
        .background {
            RoundedRectangle(cornerRadius: 15, style: .continuous)
                .fill(Color.white)
        }
        .cornerRadius(15)

        Image(systemName: "globe") // Second View - Overlapping the VStack background
            .resizable()
            .scaledToFit()
            .frame(width: 200, height: 200)
            .padding(.top, -250)
    }
}
The solution with ZStack is pretty simple. The first view that appears in the ZStack declaration will be put in the last position on the screen. This way you have to build your layout from the background to the foreground.
The first view that we want is the white card with the result info. And that is what we did when we declare the VStack first in the ZStack. The last fix was that the card should have space at the top to accommodate the overlapping image, so we needed to add top padding to the first view so we could stretch the card.
And then, we just need to add the Image as the second view of the ZStack and add negative padding to it. And that’s it!
Using the overlay modifier function to offset the Image outside the container in SwiftUI
To achieve a similar result you could use the overlay view modifier in your VStack.
Check the code below:
@ViewBuilder
var resultView2: some View {
VStack {
Text("You did it Leo ")
.font(.system(size: 28))
.bold()
.foregroundColor(.black)
.frame(maxWidth: .infinity)
.padding(.top, 100)
Text("YOUR PRIZE")
.foregroundColor(.black)
.font(.caption2)
.padding(.top, 16)
.padding(.bottom, 8)
Text("+30 Points")
.foregroundColor(.black)
.font(.system(size: 22))
.fontWeight(.heavy)
Text("+1 reject card")
.foregroundColor(.black)
.font(.system(size: 22))
.fontWeight(.heavy)
.padding(.vertical,-15)
.padding(.bottom, 20)
}
.padding()
.background {
Color.white
}
.cornerRadius(8)
.overlay {
Image(systemName: "globe")
.resizable()
.scaledToFit()
.frame(width: 200, height: 200)
.padding(.top, -240)
}
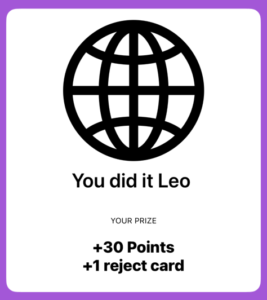
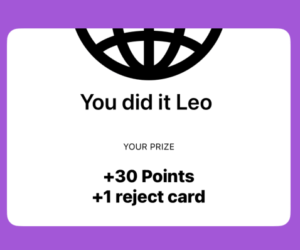
}Getting a pretty similar result. Check it below:
Cool, right? But we have problems with that implementation.
And the best one Using alignmentGuide view modifier
This solution was provided by Timothy Costa in a slack community. Thanks bro 👍! This is the goal of this blog, always learn more and more with everyone. This solution avoid to use magic number which enable this component to be generic.
Check his solution below.
ZStack(alignment: .top) {
    Image(systemName: "globe")
        .resizable()
        .scaledToFit()
        .frame(width: 200, height: 200)
        .alignmentGuide(VerticalAlignment.top) { $0[VerticalAlignment.center] }
        .zIndex(1)

    VStack {
        Text("You did it Leo ")
            .font(.system(size: 28))
            .bold()
            .foregroundColor(.black)
            .frame(maxWidth: .infinity)
            .padding(.top, 100)

        Text("YOUR PRIZE")
            .foregroundColor(.black)
            .font(.caption2)
            .padding(.top, 16)
            .padding(.bottom, 8)
        Text("+30 Points")
            .foregroundColor(.black)
            .font(.system(size: 22))
            .fontWeight(.heavy)
        Text("+1 reject card")
            .foregroundColor(.black)
            .font(.system(size: 22))
            .fontWeight(.heavy)
            .padding(.vertical,-15)
            .padding(.bottom, 20)
    }
    .padding()
    .background {
        Color.white
    }
    .cornerRadius(8)
}
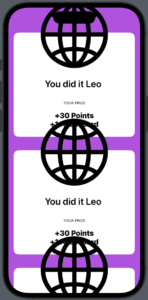
Solving Scrollview and VStack problems
When you try to add this new view to a Scrollview or another VStack, for example doing this:
var body: some View {
    ZStack {
        Color
            .purple
            .ignoresSafeArea()

        ScrollView {
            VStack {
                resultView
                    .padding()

                resultView
                    .padding()


                resultView
                    .padding()
            }
        }
    }
}
The result is:
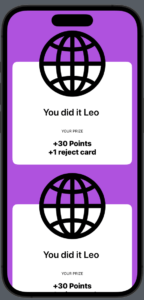
You have a lot of alternatives to fix this issue. I think, and I may be wrong, the safest one is to add padding where it is needed, so the view will always behave the say way.
For example:
ScrollView {
    VStack {
        resultView
            .padding()
            .padding(.top, 80)

        resultView
            .padding()
            .padding(.top, 80)


        resultView
            .padding()
            .padding(.top, 80)
    }
}
Resulting in:
And we are done!
More on SwiftUI
At the beginning of my SwiftUI journey, I had a lot of challenges with basic stuff like setting the background color of the whole view. I compiled some of those challenges inside an article about creating a very simple login view. It is amazing to see the evolution of skill, from the point where you know nothing to actually building something interesting.
Refactoring is a big part of the development effort during your daily life, nonetheless is also something that I like to write about. Breaking up SwiftUI views in a coherent way is a strong technique that you can learn in this article. Avoid having massive SwiftUI views with those three techniques that I wrote about!
Summary – Create a Card with an Image Outside its Bounds in SwiftUI
Today we checked two solutions for creating a component that has an image that is outside its background container. This was inspired by my own mistakes in my company hackathon and I wish that everyone learns from it.
Under pressure plus not knowing how to use a framework is a bombastic mix, it is good to reflect on what was done good and bad throughout the Hackathon experience so I can improve as an iOS developer. The
Fellow developers, that’s all. I hope you liked reading this article as much as I enjoyed writing it. If you want to support this blog you can Buy Me a Coffee or just say hello on Twitter. You can reach me on LinkedIn, or send me an e-mail through the contact page.
Thanks for the reading and… That’s all folks. Image Credit: Wikiart


