
Hallo vorken en messen, Leo hier.
Accessibility is a crucial aspect in the development and design of iOS apps, and its importance extends beyond just a compliance requirement; it’s about creating inclusive and universally usable digital products. Accessibility ensures that all users, regardless of their abilities or disabilities, can access and benefit from apps. This includes people with visual, hearing, motor, and cognitive disabilities, as well as those who may experience temporary impairments.
One of the key reasons for prioritizing accessibility in iOS app development is its user-centric approach. By designing apps with accessibility in mind from the outset, developers not only cater to a wider audience but also enhance the overall user experience. Accessible design often involves simplifying the app’s interface and making it easier to navigate, benefiting not just those with disabilities, but all users, including older adults or those less familiar with technology. This inclusivity in design can lead to increased user satisfaction and retention, and potentially a broader user base.
Moreover, by adhering to established accessibility standards, such as the Web Content Accessibility Guidelines (WCAG), developers can create apps that are more usable in various environments and by people with different types of disabilities. These guidelines offer a framework for making digital content accessible, covering aspects like contrast ratios, font sizes, and flexible navigation options, ensuring that apps are usable by people with a wide range of abilities.
Incorporating accessibility features such as VoiceOver, a screen reader for visually impaired users, and Dynamic Type, which allows users to adjust text size, can significantly improve an app’s usability. These features, along with others like Siri and Dictation, are integral parts of iOS development, enhancing the user experience and potentially increasing an app’s ranking in the App Store.
Past two weeks we spent talking about Swift Errors. First we introduced you to the theme about how to handle errors in Swift and showed how flexible the error handling can be. The second one was about a really nice compilation syntax sugar keyword that enable us to write delightful APIs to be used, the rethrows keyword.
On a side note and unrelated to iOS I just found a REALLY good interpretation of Mozart’s Requiem. Just close your eyes and listen, you will thank me later.
Nowadays, it is very important to think about all users of our apps, and Apple just gave a tool to leverage that will. This is the theme for today’s article!
No more talking, let’s code! But first…
Painting of The Day
The painting I chose today is called The Blind Guitar Player, made in 1778 by Francisco Goya.
Francisco Goya, a prominent Spanish painter and printmaker, is seen as bridging the Old Masters and modern art. He began painting at 14 and, after initial rejections, gained recognition in 1771 with a Rome competition and tapestry designs for Madrid’s palaces. By the 1780s, he was a favored royal painter, becoming the first court painter in 1799. A mysterious illness around 1792-1793, causing deafness and mental changes, profoundly influenced his work.
This period marked a shift from joyful themes to darker depictions of war and turmoil, possibly influenced by Spain’s war with France or his illness. Goya’s diverse legacy includes royal portraits, haunting scenes, and inspirations for operas, music, and films.
I don’t even need to explain why I chose this painting, do I?
The Problem – How to check if your app has Accessibility Problems?
You need to audit and report all the potential problems with your app accessibility.
The Xcode 15 brought us a really nice new tool to check if our apps are compliant with accessibility rules or not. There were already other tools to do that, such as A11yUITests. But now you don’t need them anymore since you can use Xcode to do the work for you!
In the end, you just need to call performAccessibilityAudit in your XCUIApplication in an XCUITest target and that’s it. Check the code below:
func testAutomatedAccessibility() {
    let myApp = XCUIApplication()
    myApp.launch()

    do {
        try myApp.performAccessibilityAudit()
    } catch {
        XCTFail("The automated accessibility audit fail because [\(error.localizedDescription)]")
    }
}
Let’s see how to implement that step by step.
Implementing Accessibility Audits From Scratch
So let’s start creating a project. In that newly created project add this ContentView that has several accessibility errors:
struct ContentView: View {
    var body: some View {
        VStack(spacing:10) {
            Text("My Title!")
                .font(.system(size: 35))
                .foregroundStyle(Color(uiColor: .darkGray))
                .bold()

            Label(
                title: { Text("Subtitle") },
                icon: { Image(systemName: "42.circle") }
            )

            Button {
                print("Tappable Image")
            } label: {
                Image(systemName: "globe")
                    .foregroundStyle(.tint)
                    .background {
                        RoundedRectangle(cornerRadius: 10)
                            .foregroundStyle(.gray)
                    }
            }
            .fixedSize()
            .frame(width: 25, height: 25)

        }
        .padding()
    }
}
Now let’s audit that single view and find out all the a11y problems.
Go to your project folder and add a new target:
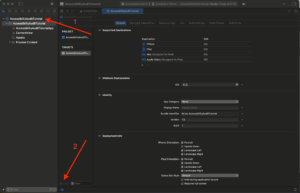
In the modal, choose the UI Testing Bundle and give a name that you think is appropriate to accessibility audit tests:

REMEMBER, YOU NEED A UI TESTING BUNDLE TO MAKE AUTOMATIC ACCESSIBILITY AUDITS WORK.
The next step is to create the UI Test that will run our audits. Go to your UI test target and add this new test to check our View’s accessibility:
func testAutomatedAccessibility() {
    let myApp = XCUIApplication()
    myApp.launch()

    do {
        try myApp.performAccessibilityAudit()
    } catch {
        XCTFail("The automated accessibility audit fail because [\(error.localizedDescription)]")
    }
}
This will result in three accessibility errors:
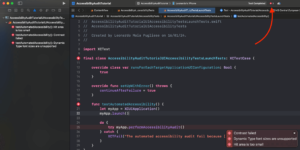
The errors are:
- Hit area is too small
- Contrast Failed
- Dynamic Type font sizes are unsupported
In our view they are simple to check, but what if you had a complex nested SwiftUI structure? How would you know what is causing this test to fail?
Don’t sweat on it becaus Xcode development team also provided a really nice report tool.
Reading Accessibility Errors Reports
Go to your Report navigator, click in the test section and double click in the “Hit area is too small”:
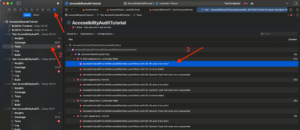
In the next view you will see what exact element is giving you trouble, click in the “Element Screenshot.png” below the error like in the image below:
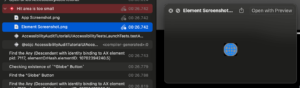
And you can do the same process for the other two problems as well.
Fix the Accessibility Problems in Our Example
To fix the view do something like this:
struct ContentView: View {
    var body: some View {
        VStack(spacing:10) {
            Text("My Title!")
                .font(.largeTitle) // new font
                .foregroundStyle(.primary) // new foreground style
                .bold()

            Label(
                title: { Text("Subtitle") },
                icon: { Image(systemName: "42.circle") }
            )

            Button {
                print("Tappable Image")
            } label: {
                Image(systemName: "globe")
                    .resizable() // add resizable
                    .foregroundStyle(.tint)
                    .frame(width: 25, height: 25) // new size for this view
                    .padding()
                    .background {
                        RoundedRectangle(cornerRadius: 10)
                            .foregroundStyle(.gray)
                    }
            }
        }
        .padding()
    }
}

#Preview {
    ContentView()
}
The changes are:
- The font that we using now for the title is .largeTitle which has a dynamic size. That means that when your user changes the font size in the iPhone configurations your title will follow the new size given by the system.
- The second change is that the title foregroundStyle is now .primary which is a dynamic color. This color has a nice contrast with the default background in light mode and dark mode.
- And finally, we also needed to increase the size of the button so the user has a bigger hit area to touch.
With that in place, we fixed all the accessibility problems on our screen. Let’s explore a little further the performAccessibilityAudit function API.
Specific Accessibility Audits in SwiftUI
In your app, you might need to filter some elements that you already know that are not compliant with accessibility. For example, imagine that you have a legacy button that will not change until the UX/UI craft creates a new one and the current design is tied to a design system. You don’t have the power to change that specific button, so what you can do in that case is whatever a11y problem that happens with that button, you just skip it.
Check the code below where we ignore all the errors that are encountered with the button:
func testAutomatedAccessibilityIgnoreLoginButton() {
    let myApp = XCUIApplication()
    myApp.launch()

    let handler: ((XCUIAccessibilityAuditIssue) -> Bool) = { issue in
        if issue.element == myApp.buttons["login button"] {
            false // ignore problems with login button
        } else {
            true // check any other error
        }
    }

    do {
        try myApp.performAccessibilityAudit(for: .all, handler) // changed here!
    } catch {
        XCTFail("The automated accessibility audit fail because [\(error.localizedDescription)]")
    }
}
With the code above we are saying:
- Get all accessibility errors.
- When an error occurs check if the error is in the “login button”, if yes just ignore it otherwise fail the test.
With the same API we can check for specific errors in the screen. For example, to check just for color contrast problems you could use the code below:
func testAutomatedAccessibilityForColorContrast() {
    let myApp = XCUIApplication()
    myApp.launch()

    do {
        try myApp.performAccessibilityAudit(for: .contrast) // checking just for the color contrast here
    } catch {
        XCTFail("The automated accessibility audit fail because [\(error.localizedDescription)]")
    }
}
Or even checking for several types of errors:
func testAutomatedAccessibilityForColorContrastHitRegionAndTrait() {
    let myApp = XCUIApplication()
    myApp.launch()

    do {
        try myApp.performAccessibilityAudit(for: [.contrast, .hitRegion , .trait]) // three error types checked here
    } catch {
        XCTFail("The automated accessibility audit fail because [\(error.localizedDescription)]")
    }
}
Really cool, isn’t it?
Types of Specific Accessibility Errors in iOS
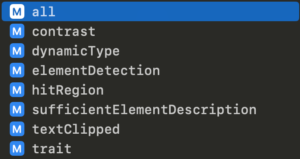
Maybe you are asking yourself: what types of specific errors can I audit? I will list them below for you:
- all: This type will get all the errors from your code, this is the most generic one. This is the default value for the audits.
- contrast: This is the minimum color contrast that your elements should have to be able to be visualized for most of the audience.
- dynamicType: This relates to the ability of your font to use dynamic sizing or not.
- elementDetection: This is when you add views that don’t show on the screen and that views take the focus of the voice-over and the user doesn’t know what is happening because an invisible view is with the current voice-over focus.
- hitRegion: This happens when you have buttons that are too small. Smaller height and width than 44 points.
- sufficientElementDescription: When you have a custom element that doesn’t have an accessibility description for the voice-over.
- textClipped: When you have a clipped text and the voice-over has a problem reading it to the user.
- trait: Every UI component has its own accessibility traits, this error happens when you explicitly don’t have those.
You can mix and match to specify whatever you are looking for to audit in your app using the above elements.
And we are done!
How to Make Your SwiftUI App More Accessible?
In conclusion, enhancing the accessibility of your SwiftUI app is not just about adhering to standards or avoiding potential pitfalls. It’s about embracing a philosophy of inclusivity and user-centric design.
By conducting thorough accessibility audits using tools like Xcode’s performAccessibilityAudit, developers can identify and solve issues that might hinder the user experience for people with varying abilities.
Remember, accessibility is a journey, not a destination. It requires continuous learning, testing, and adapting. As developers, it’s our responsibility to stay informed about the latest accessibility standards and practices. Implementing these principles doesn’t just make our apps more accessible; it makes them better for everyone.
By fostering an environment of inclusivity and awareness in our app development process, we contribute to a world where technology is truly accessible to all. Let’s keep coding but with an eye toward making our digital world more welcoming and accessible for everyone.
Fellow iOS Developers, that’s all. I hope you liked reading this article as much as I enjoyed writing it.
If you want to support this blog you can Buy Me a Coffee or say hello on Twitter. I’m available on LinkedIn or send me an e-mail through the contact page.
You can likewise sponsor this blog and help our community to grow.
Thanks for the reading and…
That’s all folks.
Image credit: Featured Painting


