
Hello guys, Leo here. Auto Layout is an amazing topic and we will explain how what is its coordinate system.
Today we’ll discuss something about auto layout that may confuse many iOS developers and that’s the Auto Layout Cartesian Plane. I bet you were thinking it was just a high school subject, right?
Let’s code!
Auto Layout and the Coordinate System
The Auto Layout is defined by apple as:
Auto Layout dynamically calculates the size and position of all the views in your view hierarchy, based on constraints placed on those views. For example, you can constrain a button so that it is horizontally centered with an Image view and so that the button’s top edge always remains 8 points below the image’s bottom. If the image view’s size or position changes, the button’s position automatically adjusts to match. This constraint-based approach to design allows you to build user interfaces that dynamically respond to both internal and external changes.
Very straightforward, right? Not so much. There are two things we need to understand before we can move on: what Apple considers “8 points below” and what is a constraint.
Point System of Auto Layout
The point system created by Apple is a very smart approach to a problem that started to emerge when the new iPhone was released with different screen resolutions. Imagine you have to create ONE measurement system to encapsulate more than 1 screen resolution. The problem was when you defined a view to having 40 pixels in iPhone 3g, let’s say it would be translated to 1 cm in the screen, BUT after the launch of the Retina display, 40 pixels in the screen would be like half of it, because the resolution of the Retina is higher than the previous iPhone.
So Apple invented this system to let developers only care about the relative constraint position of the views on the screen. Very clever, isn’t it?
Anatomy of a Constraint
The layout of your view hierarchy is defined as a series of linear equations. Each constraint represents a single equation. Your goal is to declare a series of equations that has one and only one possible solution. We can understand better with the image below:
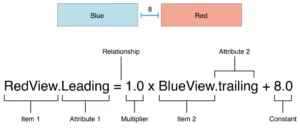
And in the code we write something like this (without using third-party libraries):
redView.leadingAnchor.constraint(equalTo: blueView.traillingAnchor, constant: 8) // the multiplier is default 1
If you pay attention we are setting a relation between two views, the blue and the red, and they are related by the constraint. Check the apple docs about constraints for a WAY better explanation.
Stop talking and let’s code!
Imagine that you have two views, one red square and one yellow square inside the red square, like in the image below:
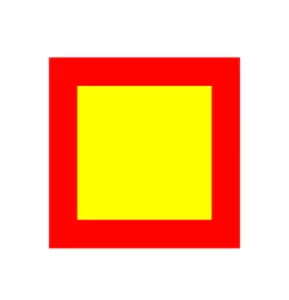
And to achieve that we can write with something like this:
let redSquare = UIView()
redSquare.backgroundColor = .red

redSquare.translatesAutoresizingMaskIntoConstraints = false
view.addSubview(redSquare)

NSLayoutConstraint.activate([
    redSquare.centerXAnchor.constraint(equalTo: view.centerXAnchor),
    redSquare.centerYAnchor.constraint(equalTo: view.centerYAnchor),
    redSquare.widthAnchor.constraint(equalToConstant: 100),
    redSquare.heightAnchor.constraint(equalToConstant: 100)
])

let yellowSquare = UIView()
redSquare.addSubview(yellowSquare)
yellowSquare.backgroundColor = .yellow
yellowSquare.translatesAutoresizingMaskIntoConstraints = false

NSLayoutConstraint.activate([
    yellowSquare.topAnchor.constraint(equalTo: redSquare.topAnchor, constant: 15),
    yellowSquare.leadingAnchor.constraint(equalTo: redSquare.leadingAnchor, constant: 15),
    yellowSquare.trailingAnchor.constraint(equalTo: redSquare.trailingAnchor, constant: -15), // 1
    yellowSquare.bottomAnchor.constraint(equalTo: redSquare.bottomAnchor, constant: -15) // 1
])
And if you are like me and are curious about how things work, you are thinking…
Why the trailing and the bottom Anchor are negative?
Apple’s digital Cartesian Plane is the answer. The image below demonstrates where the coordinate system starts.
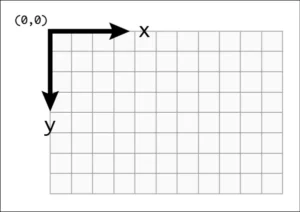
So as you can see the coordinate system starts in the upper-left corner.
Now we have our answer, the trailing anchor is negative because the right side of the yellow square (trailing anchor) must be 15 constant points to the **left** relative to the right side (trailing anchor) of the red square, so while we are walking by the cartesian coordinates when you want to go to the left it will always be **negative**, that’s the reasoning about it.
The same logic applies to the bottom anchor, if you want the bottom side (bottom anchor) of your yellow square to go **UP** relative to the bottom side (bottom anchor) of the red square the constant must be **negative**.
As you can see, every time a view anchor must be to the **left** or **upwards** relative to another view anchor it should be **negative**.
Summary
Today we learned about Auto Layout in iOS using Swift and how its coordinates system works. You will never have doubts anymore about why some constraints should be negative or positive in your life!
That’s all my people, I hope you liked reading this article as much as I enjoyed writing it. If you want to support this blog you can Buy Me a Coffee or leave a comment saying hello. You can also sponsor posts and I’m open to freelance writing! You can reach me on LinkedIn or Twitter and send me an e-mail through the contact page.
Thanks for the reading and… That’s all folks.
Credits: image


