
Hallo knap en mooi, Leo hier. Today we will explore how you can use an animated SwiftUI Toast in UIKit.
This is a scorching topic since we are walking slowly but surely toward all apps having SwiftUI as the primary UI framework. Don’t blame yourself if you already don’t know how to use SwiftUI properly, no one does. We are all trying our best and experimenting a lot.
For example, there are people out there advocating that by using SwiftUI you don’t need any more MVVM patterns, since it has an embedded data flow system that can handle all the communication required for the views. On the other hand, people are saying that now more than ever it is important to decouple views from its data because you *never know when Apple will create a new UI framework*.
We will try to tackle one of the many problems when migrating from UIKit to SwiftUI when some of your views start becoming SwiftUI and you have to bridge to UIKit.
Let’s code! But first…
Painting of The Day
The paint I chose today is called A Toast, an 1896 art piece made by Julius LeBlanc Stewart. He lived from September 6, 1855, to January 5 of 1919, and was an American artist who spent his career in Paris. A contemporary of fellow expatriate painter John Singer Sargent, Stewart was nicknamed “the Parisian from Philadelphia”.
Stewart’s family wealth enabled him to live a lush expatriate life and paint what he pleased, often large-scaled group portraits. The first of these, After the Wedding (Drexel University Art Collection, 1880), showed the artist’s brother Charles and his bride Mae, daughter of financier Anthony J. Drexel, leaving for their honeymoon. Subsequent group portraits depicted his friends — including actresses, celebrities, and aristocrats — often with a self-portrait somewhere in the crowd. Late in life, he turned to religious subjects, but Stewart is best remembered for his Belle Époque society portraits and sensuous nudes.
Well, I don’t think I need to explain why I chose this painting right? She is literally making a Toast.
The Problem – SwiftUI Toast in UIKit
You need to create a toast view in your UIKit codebase but you want to do it using SwiftUI.
The result of this article is to achieve this:
First, start a new UIKit Project. Let’s first create our SwiftUI toast view, press command+N, select a new SwiftUI view and call it whatever you want.
In the new file copy/paste the code below:
import SwiftUI

struct ErrorToast: View {
    private var noDataText: String = "This is a very serious warning. You were warned."

    var body: some View {
        HStack {
            Image(systemName: "exclamationmark.triangle")
            Text(noDataText)
        }
        .padding(25)
        .background(Color.red)
        .cornerRadius(10)
    }
}

struct NoDataToast_Previews: PreviewProvider {
    static var previews: some View {
        ErrorToast()
    }
}
This is a basic SwiftUI view, a simple HStack with an image and text.
The only interesting thing to consider here is that if the background modifier comes after the cornerRadius one, it will not have rounded corners because ORDER MATTERS in a declarative UI framework.
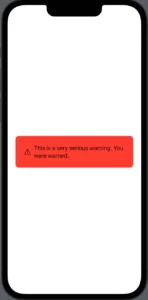
In the preview you should see this:
Now go back to the ViewController.swift file and let’s add that view to the ViewController’s UIView hierarchy.
Adding a SwiftUI view to a UIKit view
To do that we are going to use the new UIHostingController. With that, we can use SwiftUI views in the UIKit environment freely. That’s nice!
First, add these two variables to the default UIViewController:
private let errorToastViewController = UIHostingController(rootView: ErrorToast())
private var topConstant: NSLayoutConstraint?
Now to add a child UIViewController and make it appear, you will need 4 things :
- Call the
addChildfunction in your current UIViewController with the childUIViewControlleras a parameter. - Add the child view to the current UIViewController view hierarchy.
- In your child UIViewController you need to call
didMovewith the parent view controller as a parameter. We do it to tell the child when we’re completely done with any animated transition as it’s added to the view hierarchy. Otherwise, it has no way of knowing that the animated transition (if any) is complete. - Configure child UIViewController view layout.
Now that you know that, let’s see how to do that in action. Copy past the code below in your ViewController class:
override func viewDidLoad() {
    super.viewDidLoad()
    view.backgroundColor = .blue

    configureErrorToast()
}

private func configureErrorToast() {
    addChild(errorToastViewController) // Mark 1
    errorToastViewController.view.translatesAutoresizingMaskIntoConstraints = false
    view.addSubview(errorToastViewController.view) // Mark 2
    errorToastViewController.didMove(toParent: self) // Mark 3

    errorToastViewController.view.backgroundColor = .clear

    // Mark 4
    topConstant = errorToastViewController.view.topAnchor.constraint(equalTo: view.topAnchor, constant: -500)

    NSLayoutConstraint.activate([
        topConstant!,
        errorToastViewController.view.trailingAnchor.constraint(equalTo: view.safeAreaLayoutGuide.trailingAnchor, constant: -15),
        errorToastViewController.view.leadingAnchor.constraint(equalTo: view.safeAreaLayoutGuide.leadingAnchor, constant: 15)
    ])
}
All the marks correspond to each of the steps required to add a child UIViewController.
I don’t have much experience with SwiftUI so I didn’t find a better way to clear the SwiftUI background view. If you know a better way, please reach out.
Let’s create the function to make the toast appear. We will animate it, you could animate but I thought was a nice touch. Copy and paste the code below into your ViewController class.
override func viewDidAppear(_ animated: Bool) {
    super.viewDidAppear(animated)

    showSwiftUIToast()
}

private func showSwiftUIToast() {
    topConstant?.constant = 10

    UIView.animateKeyframes(withDuration: 4, delay: 0, options: .calculationModeLinear, animations: {
        UIView.addKeyframe(withRelativeStartTime: 0, relativeDuration: 0.1) {
            self.view.layoutIfNeeded()
        }

        UIView.addKeyframe(withRelativeStartTime: 0.9, relativeDuration: 0.1) {
            self.topConstant?.constant = -500
            self.view.layoutIfNeeded()
        }
    })
}
But what we are doing in this code? Let’s see.
- In the
viewDidAppearwhen the view appears we call the showSwiftUIToast. - In the showSwiftUIToast function, we are changing the constant of the top anchor of the toast view to 10. That is not enough to animate it.
- Then we are using animateKeyframes so we can have control over the animation.
- In the animation closure we are adding the first keyframe that takes 10% of the duration and starts at the beginning of the duration.
- The second keyframe starts at 90% complete animation with relative duration of 10% of the total duration.
And that’s it!
Full Code Example
The complete code example for the ViewController you can check below:
class ViewController: UIViewController {
    private let errorToastViewController = UIHostingController(rootView: ErrorToast())
    private var topConstant: NSLayoutConstraint?

    override func viewDidLoad() {
        super.viewDidLoad()
        view.backgroundColor = .blue

        configureErrorToast()
    }

    private func configureErrorToast() {
        addChild(errorToastViewController)
        errorToastViewController.view.translatesAutoresizingMaskIntoConstraints = false
        view.addSubview(errorToastViewController.view)
        errorToastViewController.didMove(toParent: self)

        errorToastViewController.view.backgroundColor = .clear

        topConstant = errorToastViewController.view.topAnchor.constraint(equalTo: view.topAnchor, constant: -500)

        NSLayoutConstraint.activate([
            topConstant!,
            errorToastViewController.view.trailingAnchor.constraint(equalTo: view.safeAreaLayoutGuide.trailingAnchor, constant: -15),
            errorToastViewController.view.leadingAnchor.constraint(equalTo: view.safeAreaLayoutGuide.leadingAnchor, constant: 15)
        ])
    }

    override func viewDidAppear(_ animated: Bool) {
        super.viewDidAppear(animated)

        showSwiftUIToast()
    }

    private func showSwiftUIToast() {
        topConstant?.constant = 10

        UIView.animateKeyframes(withDuration: 4, delay: 0, options: .calculationModeLinear, animations: {
            UIView.addKeyframe(withRelativeStartTime: 0.1, relativeDuration: 0.1) {
                self.view.layoutIfNeeded()
            }

            UIView.addKeyframe(withRelativeStartTime: 0.9, relativeDuration: 0.1) {
                self.topConstant?.constant = -500
                self.view.layoutIfNeeded()
            }
        })
    }
}
Summary – SwiftUI Toast in UIKit
Today we study how you can bridge SwiftUI to UIKit. We deal with a lot of different scenarios like animations in UIKit, Auto Layout a SwiftUI view in UIKit. The most important part is to understand that even using UIKit you can still empower your development with the new SwiftUI framework.
This is a very simple view and animation but demonstrates a lot of power that UIKit + SwiftUI integration has.
That’s all my people, today we finished the Architecture and iOS Tooling article closing the series about the beginning of iOS development. I hope you liked reading this article as much as I enjoyed writing it. If you want to support this blog you can Buy Me a Coffee or leave a comment saying hello. You can also sponsor posts and I’m open to freelance writing! You can reach me on LinkedIn or Twitter and send me an e-mail through the contact page.
Thanks for reading and… That’s all folks.
Credits:


