
Hello ladies and gentlemen, Leo here. The topic today is MapKit Annotations Animations.
We’ll do some explorations in MapKit. If you are into MapKit, a huge fan of maps, a cartographer (never knows), or just want to know how to auto resize a map base in two annotations, this post is for you. MapKit is a very versatile framework embedded in iOS that provide us with a lot of API that helps the development using maps. Apple documentation defines it as “Display map or satellite imagery within your app, call out points of interest, and determine placemark information for map coordinates.”
The painting from this post is The Geographer (Dutch: De geograaf) a painting created by Dutch artist Johannes Vermeer in 1668–1669. As we talk about maps, it’s the best painting to represent exactly that, a geographer.
No more talking, let’s code!
Problem – MapKit Annotations Animations
Imagine that you work for a food company and now you have to track where the delivery person in real-time for the user knows how long will take to the hamburger/salad/whatever get to his house.
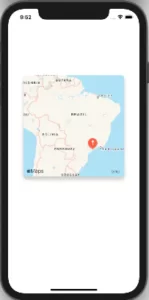
The objective is to do something like this:
The left pin is the delivery person and the right one is the delivery address. The address now is fixed but you can put any coordinates on the left pin to act as your delivery person.
1. First create a plain simple app
Make sure that you choose language Swift as language and Storyboard as interface. We won’t use storyboards and it’s just an example project so I’ll not show how to clean up all the storyboard’s extra configs because it will not do any harm now.
2. Create a new file (shortcut command+n) called DeliveryMapView
Inside that new file, copy these lines:
private var mapView: MKMapView!
private var deliveryPersonAnnotation = MKPointAnnotation()
private var deliveryAddressAnnotation = MKPointAnnotation()
This will create a [implicit unwrapped optional](https://docs.swift.org/swift-book/LanguageGuide/TheBasics.html) mapView and two instances of MKPointAnnotation, the deliveryPersonAnnotation, and the deliveryAddressAnnotation. The deliveryAddressAnnotation will be the pin at your home and the deliveryPersonAnnotation will be the moving pin on the map ( the delivery person coming closer and closer).
Continue in the DeliveryMapView file and copy/paste this:
init() {
    super.init(frame: .zero)
    configureView()
}

required init?(coder: NSCoder) {
    fatalError("init(coder:) has not been implemented")
}

private func configureView() {
    configureMKMapView() // 1
    configureDeliveryAddressAnnotation() // 2
}
Mark 1 and mark 2 are broken but don’t worry we’ll fix that in a moment. It’s just standard configurations for the view. Let’s create the **configureMKMapView** function:
private func configureMKMapView() {

    // mark 1
    mapView = MKMapView()
    addSubview(mapView)
    mapView.translatesAutoresizingMaskIntoConstraints = false

    // mark 2
    layer.shadowColor = UIColor.black.cgColor
    layer.shadowOpacity = 1
    layer.shadowOffset = CGSize(width: 0, height: 10)
    layer.shadowRadius = 5
    layer.shadowColor = UIColor(red: 0, green: 0, blue: 0, alpha: 0.2).cgColor
    isUserInteractionEnabled = false
    mapView.layer.cornerRadius = 10

    // mark 3
    NSLayoutConstraint.activate([
        mapView.topAnchor.constraint(equalTo: topAnchor),
        mapView.leadingAnchor.constraint(equalTo: leadingAnchor),
        mapView.trailingAnchor.constraint(equalTo: trailingAnchor),
        mapView.bottomAnchor.constraint(equalTo: bottomAnchor),
        mapView.heightAnchor.constraint(equalToConstant: 300),
        mapView.widthAnchor.constraint(equalToConstant: 300)
    ])
}
On mark 1 we are just creating an instance of MKMapView, adding that as a subview to the view, and putting TAMIC ( translatesAutoresizingMaskIntoConstraints) to false so we can use auto layout. At mark 2 just a plain shadow configuration, nothing fancy ( it will be better to draw shadows with a shadow path but it’s just a fast example). And lastly, in mark 3 we set the size and the constraints of the view with auto layout.
Now creating the function configureDeliveryAddressAnnotation:
private func configureDeliveryAddressAnnotation() {
    deliveryAddressAnnotation.coordinate = CLLocationCoordinate2D(latitude: -23.6944, longitude: -46.5654) // mark 1
    mapView.addAnnotation(deliveryAddressAnnotation) // mark 2
}
Now the magic begins, when you set the coordinate attribute from deliveryAddressAnnotation you are telling that pin the exact location of it in the world. This means that you can add any amount of pins to the map by just adding (mark 2) annotation in the MKMapView.
3. Show me the map!
Back to the ViewController.swift file, add this:
class ViewController: UIViewController {

    private var deliveryMapView: DeliveryMapView!
    private var latitude = -23.6944
    private var longitude = -47.1154
    private var timer: Timer!

    override func viewDidLoad() {
        super.viewDidLoad()
        configureView()
        view.backgroundColor = .white
    }

    private func configureView() {
        deliveryMapView = DeliveryMapView()
        view.addSubview(deliveryMapView)
        deliveryMapView.translatesAutoresizingMaskIntoConstraints = false

        NSLayoutConstraint.activate([
            deliveryMapView.centerXAnchor.constraint(equalTo: view.centerXAnchor),
            deliveryMapView.topAnchor.constraint(equalTo: view.safeAreaLayoutGuide.topAnchor, constant: 150)
        ])
    }
Build, run and you should see this:
4. Add the second pin
Let’s head back to the DeliveryMapView.swift and add this function:
func updateDeliveryPersonPosition(deliveryPersonLatitude: Double, deliveryPersonLongitude: Double) {

    deliveryPersonAnnotation.coordinate = CLLocationCoordinate2D(latitude: deliveryPersonLatitude, longitude: deliveryPersonLongitude)
    mapView.showAnnotations([deliveryAddressAnnotation,deliveryPersonAnnotation], animated: true)
}
The showAnnotations api from MapKit does the trick here. You can automatically zoom any number of pins on the map. This is very handy when you need to show two points at the same time and one of them will be moving around so the map zoom should follow accordingly.
And call it from ViewController.swift :
private func configureView() {

    [...]

    deliveryMapView.updateDeliveryPersonPosition(deliveryPersonLatitude: latitude, deliveryPersonLongitude: longitude) // this

}
You should see this:

Great, you already have two pins inside your map. We just need to test, let’s fake a deliveryPersonMoviment in the map using Timer in the ViewController.swift:
private func configureView() {

    [...]

    Timer.scheduledTimer(withTimeInterval: 0.1, repeats: true) { [self] timer in
        deliveryMapView.updateDeliveryPersonPosition(deliveryPersonLatitude: latitude, deliveryPersonLongitude: longitude)
        latitude += 0.00
        longitude += 0.005
    }
If this was a real application the data would come from a web-socket-like or rest architecture. Again, this is only an example of MapKit Annotations Animations
5. Animate MapKit Annotations
And we need to animate the updateDeliveryPersonPosition:
func updateDeliveryPersonPosition(deliveryPersonLatitude: Double, deliveryPersonLongitude: Double) {

    UIView.animate(withDuration: 0.1) { [self] in
        deliveryPersonAnnotation.coordinate = CLLocationCoordinate2D(latitude: deliveryPersonLatitude, longitude: deliveryPersonLongitude)
        mapView.showAnnotations([deliveryAddressAnnotation,deliveryPersonAnnotation], animated: true)
    }
}
And it’s done!
Summary – MapKit Annotations Animations
If you want to automatically zoom any number of map annotations, you should use the showAnnoattions(_,animated:) function. And to animate the changes, just animate the new coordinates and the zoom of it.
And today we learned how to animate two annotations to make the same animations that delivery apps have. If you like these tips or have any constructive criticism just send me a hello on Twitter or LinkedIn.
That’s all my people, I hope you liked reading this article as much as I enjoyed writing it. If you want to support this blog you can Buy Me a Coffee or leave a comment saying hello. You can also sponsor posts and I’m open to freelance writing! You can reach me on LinkedIn or Twitter and send me an e-mail through the contact page.
Thanks for reading and… That’s all folks.
Credits: image


