
Hallo meisjes en jongens, Leo hier. The topic today is how to create documentation that is pleasant to read in Swift and help others to interact better with your code.
Today we will explore a little further into how can you be more descriptive in your Swift code. A very important part of every developer’s day-to-day life is to write code that anyone will understand, especially because maybe you will be reading your code in the future and you sure want that you can reason about it.
There are some disclaimers that we should do before starting this journey on documentation.
The first one is that no matter how good your documentation is your actual API and language feature implementations should always come first when reasoning about your code. The second disclaimer is to try to express yourself in your code, and use Swift’s documentation API for everything that isn’t possible with a good naming or the naming would be too big/weird. And finally, documentation is your friend and tool so use it in the right situations.
Let’s code but first…
Painting of The Day
This painting is a 17-century masterpiece called St. Ambrose made by Matthias Stom. Matthias Stom or Matthias Stomer (c. 1600 – after 1652) was a Dutch, or possibly Flemish, a painter who is only known for the works he produced during his residence in Italy. He was influenced by the work of non-Italian followers of Caravaggio in Italy, in particular, his Dutch followers often referred to as the Utrecht Caravaggists, as well as by Jusepe de Ribera and Peter Paul Rubens.
I chose this painting because that is the face that I do when I’m reading the documentation that is not complete/updated, or there’s nothing to read at all. You all been in that same place, right fellows?
The Problem – Documentation that is pleasant to read in Swift
You are developing a tricky framework and it’s important for the users to know exactly what’s going on under the hood.
First things first. Open your favorite playground file and copy-paste the code below:
struct PrettyDocs {

    func sumValues(x: Int, y: [Int]) throws -> Int? {

        if x < 0 {
            throw MyError.Number
        }

        guard !y.isEmpty else { return nil }

        return y.reduce(0, +) + x
    }
}


let pd = PrettyDocs()
print(try pd.sumValues(x: 9, y: [1,2]))
The function is simple but has a lot to explore here. It can throw errors and will return an Optional enum Integer.
The default documentation provided by Xcode 12.5 is:
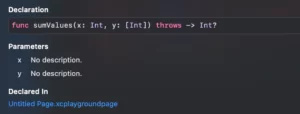
As you can imagine we will improve this to become a really beautiful piece of documentation.
Let’s start adding that to our method. But first let’s explain that we have two ways to document Swift code: the single line and the multi-line.
The single line “`///“` looks like this:
/// This is function sum the X value with all the Y values and return Optional Int.
func sumValues(x: Int, y: [Int]) throws -> Int? {}
In this article we will focus on the multi-line one “`/** */ “`:
/**
 This is function sum the X value with all the Y values
 and return Optional Int.
 */
func sumValues(x: Int, y: [Int]) throws -> Int? {}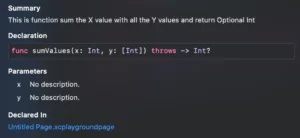
Summary Section
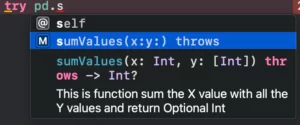
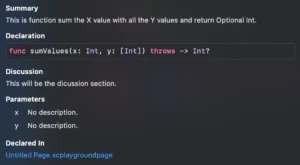
Take a look at the image above again. The Xcode added this Summary title to our documentation without us even needing to explicitly put that. This occurs because in Swift documentation there are two important concepts that divide the documentation into two parts. The Summary section and the Discussion section.
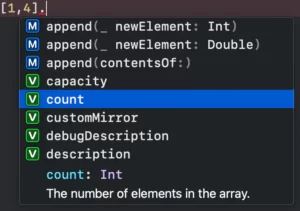
The summary is what you see just when you are writing the code, the example below shows the phrase “The number of the elements in the array” as the summary:
In our example this is shown like this:
Discussion Section
Now to create the Discussion part you need to add an additional paragraph with one blank line. The Swift markup style will consider everything after the first phrase as the discussion part.
/**
 This is function sum the X value with all the Y values
 and return Optional Int.

 This will be the dicussion section.
 */
func sumValues(x: Int, y: [Int]) throws -> Int? {

    if x < 0 {
        throw MyError.Number
    }

    guard !y.isEmpty else { return nil }

    return y.reduce(0, +) + x
}
You should see this now:
Common Markup
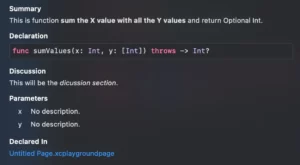
You can add a paragraph just by adding a blank line in your comment section, other ones you can apply are *italic* and even **bold**:
/**
This is function **sum the X value with all the Y values**
and return Optional Int.

This will be the *dicussion section*.

*/
func sumValues(x: Int, y: [Int]) throws -> Int? {}
Resulting:
Also, an important one is the code style, the Optional Int below shows it:
/**
 This is function **sum the X value with all the Y values**
 and return `Optional Int`.

 This will be the *dicussion section*.

 */
func sumValues(x: Int, y: [Int]) throws -> Int? {}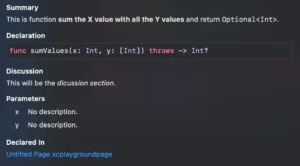
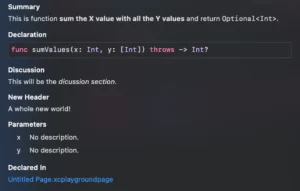
Headers are made using # signs:
/**
 This is function **sum the X value with all the Y values**
 and return `Optional<Int>`.

 This will be the *dicussion section*.

 # New Header

 A whole new world!

 */
func sumValues(x: Int, y: [Int]) throws -> Int? {}
That provides a pretty new header:
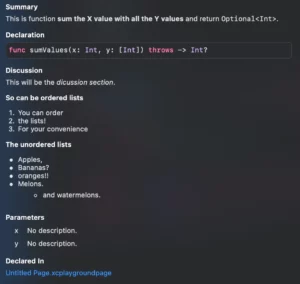
Now talking about enumerating things, you can have Lists inside your docs. The lists can have multiple levels and there are two types of lists: ordered and unordered.
You can use any of those bullet characters : -, +, *, or •, for unordered lists. For ordered lists, you just use: 1. , 2. , 3. and so on… Ordered lists are important if you are doing specific sets of steps that the user should be aware of.
Check the example below:
/**
 This is function **sum the X value with all the Y values**
 and return `Optional<Int>`.

 This will be the *dicussion section*.

 # So can be ordered lists

 1. You can order
 2. the lists!
 3. For your convenience

 # The unordered lists

 - Apples,
 - Bananas?
 - oranges!!
 - Melons.
 - and watermelons.

 */
func sumValues(x: Int, y: [Int]) throws -> Int? {}
Now you have great lists:
Xcode Special cases – Documentation that is pleasant to read in Swift
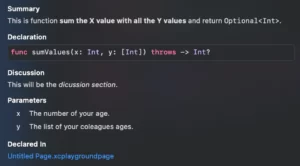
Now you are thinking: Ok but how can I change the parameter description? This and the other cases that we will show from now all share the same pattern. You have a keyword and :, for example: Parameter x:. Check the code below:
/**
 This is function **sum the X value with all the Y values**
 and return `Optional<Int>`.

 This will be the *dicussion section*.

 - Parameter x: The number of your age.
 - Parameter y: The list of your colleagues ages.
 */
func sumValues(x: Int, y: [Int]) throws -> Int? {

    if x < 0 {
        throw MyError.Number
    }

    guard !y.isEmpty else { return nil }

    return y.reduce(0, +) + x
}
Resulting in:
The same behavior is applied to documenting throws and returns. You can see them all in action below:
/**
 This is function **sum the X value with all the Y values**
 and return `Optional<Int>`.

 This will be the *dicussion section*.

 - Parameter x: The number of your age.
 - Parameter y: The list of your colleagues ages.

 - Throws: MyError.Number the *x parameter* should not be less than `zero`

 - Returns: A `Optional Integer` with nil or the sum of your age with your colleagues ages.

 */
func sumValues(x: Int, y: [Int]) throws -> Int? {}
Documentation for Algorithms
We Swift Developers are very lucky to have a handful of keywords to document algorithms. Imagine that you want to document our simple method as a complex algorithm, it could be like this:
/**
 This is function **sum the X value with all the Y values**
 and return `Optional<Int>`.

 This will be the *discussion section* for the algorithm.
 - Important: You need to catch the throwing error and the user must know about it.
 - Precondition: X is not less than zero and Y can't be empty
 - Postcondition: y is guaranteed not copied and the return value is thread-safe
 - Requires: you must run this function in `Runloop.main`
 - Warning: Don't try to rerun the experiment within 5 minutes, it can crash your app.
 - Invariant: There's no such case here.
 - Complexity: *O(n)*
 */
func sumValues(x: Int, y: [Int]) throws -> Int? {}
And now you have an extensive explanation of your algorithm:

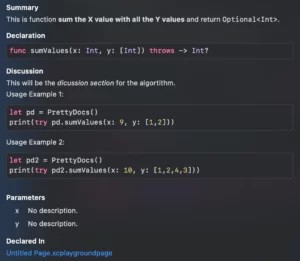
You can also give examples of how your code can be called, and there are two ways to do that. One is adding one tab and two spaces from the beginning of a new line and another is putting your code inside two ~~~:
/**
This is function **sum the X value with all the Y values**
and return `Optional<Int>`.

This will be the *dicussion section* for the algortithm.

Usage Example 1:
~~~
let pd = PrettyDocs()
print(try pd.sumValues(x: 9, y: [1,2]))
~~~

Usage Example 2:

let pd2 = PrettyDocs()
print(try pd2.sumValues(x: 10, y: [1,2,4,3]))

*/
func sumValues(x: Int, y: [Int]) throws -> Int? {

if x < 0 {
throw MyError.Number
}

guard !y.isEmpty else { return nil }
return y.reduce(0, +) + x
}
Resulting in those two blocks of code:
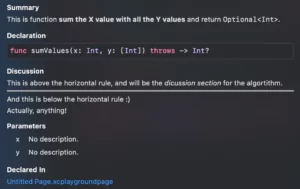
Horizontal Rules
Insert a horizontal rule by using three or more hyphens (-), asterisks (*), or underscores (_) on a line that is surrounded by empty lines. Each of the characters is the same for a horizontal rule. Whitespace between the characters is ignored.
The code below shows it:
/**
This is function **sum the X value with all the Y values**
and return `Optional<Int>`.

This is above the horizontal rule, and will be the *dicussion section* for the algortithm.
* * * *
And this is below the horizontal rule :)

Actually, anything!
*/
func sumValues(x: Int, y: [Int]) throws -> Int? {}
Resulting in the white horizontal rule line here:
Fun Docs With Images!
It seems broken in my Xcode build 12.5 and the new beta also seems to not work but Apple says that is possible to insert images in playgrounds documentations.
It’s curious and would be very good to be able to do that but I couldn’t get it to work properly. If anyone can make it work, just leave a comment below!
Summary – Documentation that is pleasant to read in Swift
In this article, we studied a lot of possibilities around doing documentation. When working in public API or you just want your code base to be more expressive and documentation is a great tool to achieve those goals. Great documentation can save or destroy a project, so be careful using it!
That’s all my people, I hope you liked reading this article as much as I enjoyed writing it. If you want to support this blog you can Buy Me a Coffee or leave a comment saying hello. You can also sponsor posts and I’m open to freelance writing! You can reach me on LinkedIn or Twitter and send me an e-mail through the contact page.
Thanks for reading and… That’s all folks.
Credits:


