
Hallo vrienden, Leo Hier. The topic today is an introduction to Xcode Frame debug and how you can improve your debugging skills with this hidden Xcode feature.
We will check some tips about Xcode view debugging, more specifically when you are using frames. I’ll not dive into what frames are or what bounds are, this is for a future article. The article will a quick one but I found it very interesting.
I want to show how I usually debug my views and recently I discovered a (not so) **hidden feature Xcode feature to do that. For that hidden feature, I want to thank my colleague that showed me, he’s a great developer, and every time I talk with him I learn something, thanks Maarten.
Frame debugging is a good skill to have and we will dive into some tips today. You will learn ways to investigate your views and improve your View Debugging detective skills!
Let’s code but first…
Painting of The Day
I chose an 1876 painting called The Secret created by the master William-Adolphe Bouguereau. He lived from 30 November 1825 to 19 August 1905 and was a French academic painter.
In his realistic genre paintings, he used mythological themes, making modern interpretations of classical subjects, with an emphasis on the female human body. During his life, he enjoyed significant popularity in France and the United States, was given numerous official honors, and received top prices for his work.
I chose this painting because I wanted something with some mystery veil, we will do some serious investigation today. What are the women in the painting talking about? Secrets… Secrets…
The Problem – Xcode Frame Debug
You have a view that is in the view hierarchy but is missing on the screen.
You can follow up on this article. Create a new project and copy/paste the code below to your auto-generated ViewController:
import UIKit

class ViewController: UIViewController {

    let containerView = UIView(frame: CGRect(x: 150, y: 250, width: 80, height: 50))
    let label1 = UILabel()
    let label2 = UILabel()

    override func viewDidLoad() {
        super.viewDidLoad()
        configureView()
        configureLabel1()
        configureLabel2()
    }

    private func configureView() {
        view.addSubview(containerView)
        containerView.backgroundColor = .systemRed
    }

    private func configureLabel1() {
        containerView.addSubview(label1)
        label1.translatesAutoresizingMaskIntoConstraints = false

        label1.text = "Pepijn"

        NSLayoutConstraint.activate([
            label1.leadingAnchor.constraint(equalTo: containerView.leadingAnchor, constant: 5),
            label1.centerYAnchor.constraint(equalTo: containerView.centerYAnchor)
        ])

    }

    private func configureLabel2() {
        containerView.addSubview(label2)
        label2.translatesAutoresizingMaskIntoConstraints = false

        label2.text = "Mike"

        NSLayoutConstraint.activate([
            label2.leadingAnchor.constraint(equalTo: label1.trailingAnchor, constant: 50),
            label2.centerYAnchor.constraint(equalTo: label1.centerYAnchor)
        ])
    }
}
The result should be:

Introducing a bad side effect
Now let’s introduce a very small change in our container view. For some reason you need to clip all content outside of it, one line of code that can bring a lot of headaches:
containerView.clipsToBounds = true
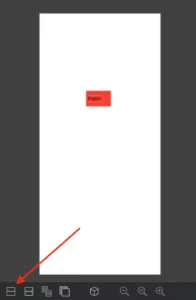
So far so good, but now… the screen looks like this:
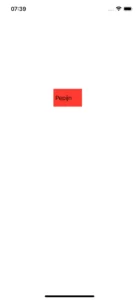
Where did mike go?
Let’s start our tips on debugging to see where he is.
Debugging Tips – Searching for Clues
I’ll show my thought process in this post. How I’ll approach this problem and several ways to solve it. We will try to find all the clues that can lead to the root cause of the problem.
I know this is a very simplistic example, but it can be used for any situation. I was debugging a very VERY layered view couple of weeks ago and I used the same steps.
First Clue
The first clue I would investigate is if the view is in the view hierarchy. To check that you need to run your app through Xcode and press the Debug View Hierarchy button as shown below:
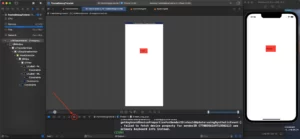
Check in the left menu called Debug Navigator if the view you are searching for is in the hierarchy:
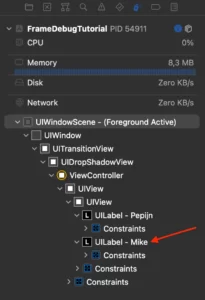
We found our first clue! Now you are sure that your view is somewhere in the view. But where did my UILabel go?
Second Clue
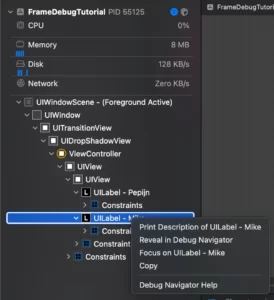
Knowing that our view is in the view hierarchy the second thought would be if the alpha property is zero. You can check that debugging the code, checking to any alpha = 0 or you could just right-click in the Debug Navigator and print the view attributes:
The right-click:
The console result:

As we can check someone accidentally change the alpha property to zero. So let’s revert that… But still, we can’t see the view on the screen. Must be something else.
One last word about the invisibility of views. We won’t search for the hidden property, because if it was the case the UILabel wouldn’t appear in the Debug Navigator. And remember that the view stays in the view hierarchy of the containerView so we could change the hidden to true and the view would appear again.
Third Clue
How about checking where it can be. In the last clue, we learned about the printing view attributes. Let’s breakdown carefully let’s read what that is telling us:

We are looking for the frame attribute. Briefly, the frame of a view is its position in relation to its super view. To decompose that we could print the view frame in the viewDidAppear this way it would be already framed.
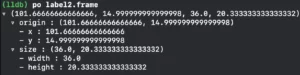
What those numbers are telling us is the X value, in other words, the horizontal position is starting 101 points from the beginning of the containerView. The visualization would be:
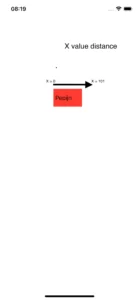
Excellent, let’s now combine another piece of information to this analysis. We know that containerView has 80 of width. So if I’m starting my UILabel 101 points from the beginning of the superview, my label is being drawn outside of the superview boundaries.
This is huge! Another clue was found. Now we know that Mike’s UILabel is beginning to be drawn outside the boundaries of the containerView.
We could stop our analysis here because we already found the solution, but can we be sure that Mike’s View is being drawn outside the boundaries?
Last clue – The, not so, Secret Xcode Feature to Xcode Frame Debug
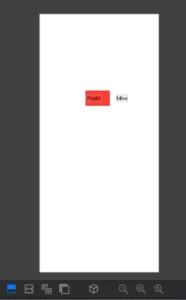
We will use now the lesson that Maarten gave to me a couple of weeks ago. To be 100% sure that the missing UILabel is being drawn outside the superview boundaries you could press one little button in the Debug View Hierarchy called Show Clipped Content:
Voilà! We now can see the view:
Finally, you just need to remove the containerView.clipsToBounds = true code and you know that everything will work normally again.
Disclaimer: all the views should be bounded to their superviews, and the best solution would be or reframe the superview OR make the subviews be constrained by the superview size. This is just an example.
And we are done!
Summary – Xcode Frame Debug
Today we checked how to investigate a view that has disappeared. We learn how to compare the view frame to its superview and how to use an Xcode feature to show the clipped content of the views. In the end Xcode Frame Debug is not hard at all if you follow the steps I describe in this tutorial article.
iOS App Debugging is a skill like any other, and we need to practice to be good at it. The more you practice better you will be in your daily debugging sessions.
That’s all my people, I hope you liked reading this article as much as I enjoyed writing it. If you want to support this blog you can Buy Me a Coffee or leave a comment saying hello. You can also sponsor posts and I’m open to freelance writing! You can reach me on LinkedIn or Twitter and send me an e-mail through the contact page.
Thanks for reading and… That’s all folks.
Credits:


