
Hallo allemaal, Leo hier. The topic today is Dependency Injection with Needle.
When I started as an iOS developer I wanted to know everything I can. I can remember the first days of struggling with delegation and also closures. I remember trying to understand a really interesting article from Sundell about Promises and Futures in Swift.
I little later in that year, a dear friend of mine talked about a dependency injection framework he uses in his job, the Needle framework. It took some time for me to get it to work and I think now it’s time to show a brief introduction to this great framework.
One disclaimer before starting: avoid adding dependencies to your project that aren’t strictly necessary. If you add a framework for everything in your project, that is the fastest way to get a really heavy and non-optimized app.
That said, let’s code! But first…
Painting of The Day
The painting today is a 1902 piece called Two Girls with Needle-work Sitting in a Farm Yard painted by Hans Andersen Brendekilde. Hans Andersen Brendekilde (7 April 1857 – 30 March 1942) was a Danish painter. Brendekilde is the first painter to bring the arts and crafts movement to Denmark when from about 1884 he designed and made integrated frames around his paintings, the frames being part of the paintings and their story. Some frames were symbolistic and others more ornamental.
I chose this painting because the two girls are doing some Needle-work and that is exactly what we are going to do today.
The Problem – Dependency Injection with Needle
You want to add the Needle dependency injection framework to your project.
Let’s start this Needle tutorial with some explanation of why Needle is different from what we have in others dependency injection frameworks.
The first main difference: The Data Structure Behind it
What is the most common implementation for dependency injection? You just use any kind of hashmap and you register each one of your protocol types to it with a concrete implementation of that type. For example Swinject:
let container = Container()
container.register(YourProtocol.self) { _ in YourProtocolImplementation() }
There’s nothing wrong with this approach but it has a difficult choice to make. What happens when I try to get something from the dependency framework?
Let’s explore the two options:
- Always returns an optional. This solves the problem when for some reason you don’t have your object registered in your hashmap. The problem with this approach is you will have to add a nil check EVERY TIME you try to get something from the dependency injection framework, and if you have millions of lines of code could be thousands of nil checks to do throughout the codebase.
- Always return a concrete type. This solves the problem with nil checking throughout the codebase but also brings runtime problems. Imagine that you try to get a type that is not registered in your dependency injection framework, or it crashes your entire application or you should throw an error but again we go back to the “nil check” problem but this time with “throw catch“.
Needle solves this with a hierarchical approach to dependencies. This is the first main difference. Instead of using a hashmap, Needle uses a graph structure as a backbone structure. Needless to say, that has a lightning-fast search because every dependency is built like a path for example RootDependency -> LoginDependency -> UserDependency.
The second main difference: Code Generation
The second main feature of Needle is that it uses Code Generation scripts to create all the code it needs in compile time. What does this mean? It has compile-time safety. As the Needle documentation suggests: If it compiles, it works.
The drawback of that approach is the same with all code generation techniques, you depend on how good is the code generator. And this is a good point for discussion.
All this framework is based on the premise that the code generator script will work for every edge case of your app/environment. You should be careful with this statement because now your app depends not only on the Swift language but also on a third-party script that generates code for you.
Another thing to be careful of is all the errors that can occur in your dependency graph are handled by the script. This means that the error codes or problems that you will encounter along the way are fully attached to that framework. Be careful when you use something tailor-made for something X and you are trying to use for another thing Y.
And the last piece of advice in the concern of code generation tools is: if you are going to use one make sure it has a big community of users using it. Because when you face problems implementing or upgrading your codebase, you won’t be alone waiting for the maintainers to fix that or to even answer simple questions.
This is not specifically a disadvantage with Needle itself (the framework is well tested and it’s great) but with any code generation tool.
Needle Tutorial – Code Example
Like always I’ll try to reduce the example to the bare minimum possible to show it working. Unfortunately, this is not fast but bare with me and you will learn how things work in this great framework.
Create a new project and let’s start diving into it. Delete all storyboard-related things before starting.
Setup Needle Framework
There are some steps to getting up and running the Needle framework.
- To set up the Needle framework I used SPM ( Swift Package Manager ). Go to File -> Add Packages -> At the top of the prompt put the https://github.com/uber/needle.git in the search text box. And add it.
- Then install the Needle script with homebrew:
brew install needle - Go to your target and add a build phase script like the image below:
needle generate YourProjectName/NeedleGenerated.swift YourProjectName/
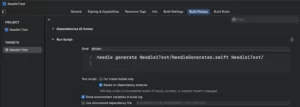
The command above is what will generate the Needle class with all project dependencies. This is responsible to create our tree-like structure of dependencies that you can inject into your project.
Now you can start using Needle in your project.
Visual Concept
Our project today will be very simple. Two screens, one Home screen, and one Detail screen. They will have different dependencies, for example, the home screen will have a dependency on the `DetailComponent`while the Detail screen has a dependency on the
UserData.
Before showing the diagram, it’s important to talk about the Component concept. Each Component is a Scope. The Scope concept is important because you can use it to share objects that make sense for every node below it. For example, you can have a root object that controls if a user is premium or not, and share it with all other components of your app.
In our small tutorial the dependency graph will look like this:
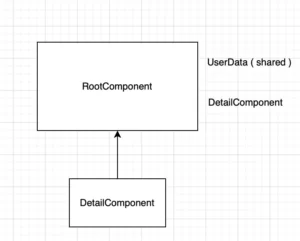
We will have a `RootComponent` that has two properties: One shared userInfo and a DetailComponent property. The userInfo can be used by any other component in the app because it lives in the RootComponent. The DetailComponent` will be a child component for the RootComponent, remember that every child component shares the Scope with all its parents Components this way we can get access to the userData when we are in the DetailComponent.
Implementation
I strongly recommend that you code along so you can learn all the things in this tutorial, be aware that the code will not compile for the majority of this article because you didn’t create all the needed types. Don’t worry, every little thing is gonna be alright.
Code along is one of the best ways to learn and to really fix the concepts in your head you should not only code along but also think about each step throughout the process.
Scene Delegate
Let’s start with the SceneDelegate:
class SceneDelegate: UIResponder, UIWindowSceneDelegate {

    var window: UIWindow?

    func scene(_ scene: UIScene, willConnectTo session: UISceneSession, options connectionOptions: UIScene.ConnectionOptions) {

        guard let windowScene = (scene as? UIWindowScene) else { return }
        window = UIWindow(frame: windowScene.coordinateSpace.bounds)
        window?.windowScene = windowScene

        registerProviderFactories() // generated Needle Function

        let rootComponent = RootComponent() // our starting point
        window?.rootViewController = rootComponent.rootViewController

        window?.makeKeyAndVisible()
    }
}
The registerProviderFactories function is generated by the codegen script. Don’t worry about that now.
And the RootComponent is the starting point for our app. It has the RootViewController that is used to be the rootViewController for the app Window.
Project Structure
To make things fast, create the same files in your environment as shown below:
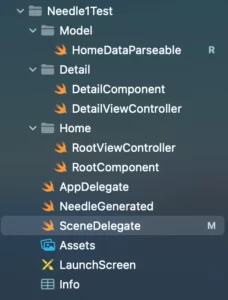
We have the home folder with everything that our home screen needs. The Detail folder with the same things, and one folder for our models. Of course, in a real-world environment, you will have a LOT more layers/files. This is just a simplification to show Needle framework features.
Model Implementation
The model will be a very straightforward code. Copy/paste the below code into your file HomeDataParseable.swift:
protocol UserDataParseable {
    var data: String? { get }
}

final class UserData: UserDataParseable {
    var data: String? = "Ana Maia"
}
Now let’s see the home screen implementation.
Home Screen Implementation
As the framework comment in the documentation, for every ViewController you might want to have a Component subclass to go in pair with it.
Let’s start with the RootComponent:
final class RootComponent: BootstrapComponent {

    var userInfo: UserDataParseable { // Mark 1
        return shared { UserData() }
    }

    var detailComponent: DetailComponent { // Mark 2
        return DetailComponent(parent: self)
    }

    var rootViewController: UIViewController { // Mark 3
        return RootViewController(detailBuilder: detailComponent)
    }
}
Everything in this class is worth explaining:
- The class itself is a child of BootstrapComponent because it will be the root component of our app. This is important because although this class is a component it doesn’t have a parent, this way is a special kind of component.
- Mark 1 shows the
sharedfunction in action. Here we are saying: Everything that is a child of this component will have access to the same instance of this type. - Mark 2 shows how can we add a child component. If we had other tabs in our app, each of those could be a separated child component sharing the same root.
- Mark 3 is our rootViewController for the Home screen. Check that it receives a `DetailComponent` as a parameter, but later you will see that for the `RootViewController` perspective it doesn’t know it is a `DetailComponent` type.
Now the code for the RootViewController:
final class RootViewController: UIViewController {

    private let detailBuilder: DetailBuilder
    private let detailButton = UIButton()

    init(detailBuilder: DetailBuilder) {
        self.detailBuilder = detailBuilder
        super.init(nibName: nil, bundle: nil)
    }

    required init?(coder: NSCoder) {
        fatalError("init(coder:) has not been implemented")
    }

    override func viewDidLoad() {
        super.viewDidLoad()
        view.backgroundColor = .black
        configureButton()
    }

    private func configureButton() {
        view.addSubview(detailButton)

        var buttonConfiguration = UIButton.Configuration.bordered()
        buttonConfiguration.title = "Go to Details"
        buttonConfiguration.baseBackgroundColor = .white

        detailButton.configuration = buttonConfiguration

        detailButton.translatesAutoresizingMaskIntoConstraints = false

        NSLayoutConstraint.activate([
            detailButton.centerXAnchor.constraint(equalTo: view.centerXAnchor),
            detailButton.centerYAnchor.constraint(equalTo: view.centerYAnchor)
        ])

        detailButton.addTarget(self, action: #selector(detailButtonTap), for: .touchUpInside)
    }

    @objc
    private func detailButtonTap() {
        present(detailBuilder.detailViewController, animated: true)
    }
}
This is just a ViewController with a button in the middle that presents another ViewController. The interesting part is when we are presenting the DetailViewController we don’t need to know what needs to be created. The RootViewController can just present the other one without having to worry about how to create the DetailViewController.
Another interesting thing to notice is the initializer parameter, it is receiving a DetailBuilder protocol type, it’s something that has the power to create a Detail Screen for us. It doesn’t and shouldn’t know that in fact, it is the detail component there, this gives us the flexibility to change the implementation of the DetailBuilder without changing who uses that feature.
Detail Screen Implementation
Now let’s implement all the code necessary to make the details screen work. The Details screen needs only the userInfo object to work since we are just going to show the user data there. But first, as we are using the Needle framework let’s create the DetailComponent.swift.
protocol DetailDependency: Dependency { // Mark 1
    var userInfo: UserDataParseable { get }
}

protocol DetailBuilder { // Mark 2
    var detailViewController: UIViewController { get }
}

final class DetailComponent: Component<DetailDependency>, DetailBuilder { // Mark 3

    var detailViewController: UIViewController {
        return DetailViewController(userData: dependency.userInfo)
    }
}
This is where we connect everything.
- Mark 1 is creating all the dependencies that the
DetailComponentwill need. With that in place, we can use the dependency object to search for anything from the root of the dependency tree to this node to automatically set the object for us. Keep in mind that the variable name in the dependency protocol should be the same as used in theRootComponent. - Mark 2 is a protocol created just to decouple the responsibility of dependencies and the view creation.
- Mark 3 wraps everything. Here we are saying that
DetailComponentis aComponent, so it can be used to make the dependency injection tree, this is what enables it to set its parent asRootViewController. It receives a generic parameter with all dependencies that we can search in the dependency graph scope.
And finally the DetailsViewController:
import UIKit

final class DetailViewController: UIViewController {

    var titleLabel = UILabel()

    init(userData: UserDataParseable) {
        super.init(nibName: nil, bundle: nil)
        titleLabel.text = userData.data
    }

    required init?(coder: NSCoder) {
        fatalError("init(coder:) has not been implemented")
    }

    override func viewDidLoad() {
        super.viewDidLoad()
        view.backgroundColor = .white
        configureTitleLabel()
    }

    private func configureTitleLabel() {
        view.addSubview(titleLabel)

        titleLabel.translatesAutoresizingMaskIntoConstraints = false

        NSLayoutConstraint.activate([
            titleLabel.centerXAnchor.constraint(equalTo: view.centerXAnchor),
            titleLabel.centerYAnchor.constraint(equalTo: view.centerYAnchor)
        ])
    }
}
And after all this code, you can build and run your project.
We are done!
Common Issues with Needle – Troubleshooting
The registerProviderFactories function is generated by the codegen script. If you don’t have access to that function you could try running yourself the script we put in the build phase and adding the NeedleGenerated.swift file to your project.
Another common issue is when you override properties by mistake. Imagine that you have this dependency graph: RootComponent -> DetailsComponent -> FAQComponent. And a property declared like this userAnalytics: String { shared { "myAnalytics" }} in the RootComponent.
In this caseFAQComponent can access that property as a String normally… However, if DetailsComponent overrides that variable name with another result, for example in the DetailsComponent you declare userAnalytics: String { shared { "AnotherStringAnalytics" }}, when FAQComponent tries to fetch userAnalytics from the scope it will receive an “Another” instead of the RootComponent version.
Just pay attention to that when you are creating your dependency tree.
Challenge Yourself
Now it’s time to practice what you studied today. The challenge for you is to create another button on the home screen and present a new ViewController called FAQViewController, in that ViewController you should create a new dependency called QuestionNumber (Integer) in the RootComponent. For this, you should also create a new FAQComponent and register it in the RootComponent. Use your new FAQComponent to create the view controller with the dependency you chose and use the dependency from the dependency framework.
Continue Studying
Architectural decisions are meant to make your life as a developer easier, but is not only code flexibility that makes your life easier but also decreasing the cognitive load is important, you can read about that in this article. There I explain how to avoid this anti-pattern and help your future self and colleagues how to have better cohesion in transferring data around the app.
Another post where you can learn more about dependency injection is app modularisation with Swift Package Manager. There we discuss the importance of having a good set of tools to break your app into smaller parts that can be used to help you gain speed.
Summary – Dependency Injection with Needle
Today we make a very basic introduction tutorial to the Needle framework made and used by Uber. This is a very special article for me because I’m for a long time wanted to make it. If you want to see the whole project finished, you can clone it from my GitHub Repo.
That’s all my people, I hope you liked reading this article as much as I enjoyed writing it. If you want to support this blog you can Buy Me a Coffee or leave a comment saying hello. You can also sponsor posts and I’m open to freelance writing! You can reach me on LinkedIn or Twitter and send me an e-mail through the contact page.
Thanks for reading and… That’s all folks.
Credits:


