
Hallo allemaal, Leo hier. The topic is an introduction to App Modularisation with Swift Package Manager and a tutorial on adding package manager to your projects.
Today we will do a little project with modularisation. We will use Swift Package Manager because is how natively we have access to modularisation and it’s the way Apple is pointing. So nothing better than starting to study this great technology.
The technique you will follow up on in this post solve a very specific problem. Imagine that you have a team and as the team grows the swift files and merge problems tend to grow. Also, the build time tends to grow.
With clever modularisation, you can delay the growth of the build time because it will only compile code that is modified. If all of your swift files are in the same project, when you change one of them, you have to build them all. But if you have modules, you will only have to build the module/code that changed. And this is a big difference between medium to large projects.
Disclaimer: This article is heavily inspired by one of the best Brazilian Swift content creators, Cicero Camargo. Its content is in Portuguese but I can’t stress enough how good they are.
Painting of the Day
The painting is a 1634 masterpiece called Dance to the Music of Time by Nicolas Poussin. Nicolas Poussin (June 1594 – 19 November 1665) was the leading painter of the classical French Baroque style, although he spent most of his working life in Rome. Most of his works were on religious and mythological subjects painted for a small group of Italian and French collectors.
I chose this painting because the women are holding hands like our Swift modules will be.
The Problem – App Modularisation with Swift Package Manager
You want to start to break your app into modules with Swift Package Manager.
First of all, we have to plan what we want to achieve with our module separation. Remember that modules can also be hell to compile with the graph dependency is not well made.
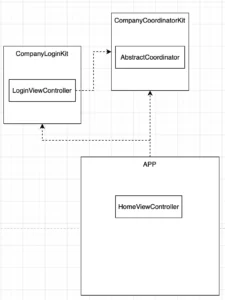
To start imagining that you have a very simple application, just with two screens: the Login Screen and the Home Screen. And to navigate through them we use a coordinator. Very very simple stuff.
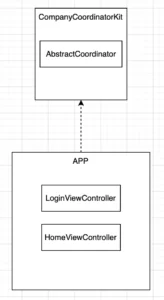
See how everything connects below:
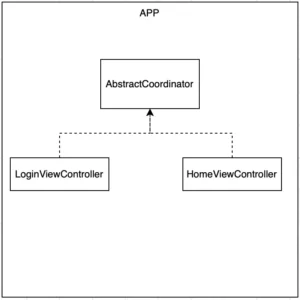
As you can see each viewController has one dependency which is the AbstractCoordinator. Everything working great but think that different teams will start to work on the app, one team taking care of the Authentication process and the other team taking care of the Home of the app. They should be able to work without any interference from each other. How can they do that?
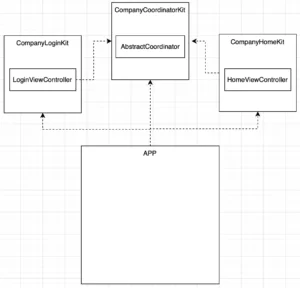
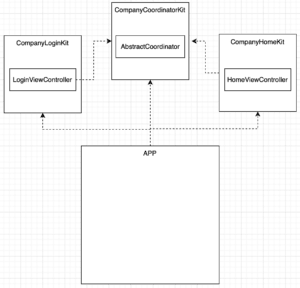
If we separate this into modules we can come up with three modules already: a Login Module, a Home Module, and the Coordinator Module. We will use Apple’s way of naming calling them CompanyLoginKit, CompanyHomeKit, and CompanyCoordinatorKit.
Now that we know what everything should look like, let’s implement it!
Implementation – Swift Package Manager Tutorial
Create a new project. Clean up the Main storyboard, we will use view code. Now copy/paste this to the SceneDelegate file this code, will not work yet but no worry, we will add the required files later:
import UIKit

class SceneDelegate: UIResponder, UIWindowSceneDelegate {

    var window: UIWindow?

    func scene(_ scene: UIScene, willConnectTo session: UISceneSession, options connectionOptions: UIScene.ConnectionOptions) {

        guard let windowScene = (scene as? UIWindowScene) else { return }

        let window = UIWindow(windowScene: windowScene)
        let coordinator = Coordinator()
        window.rootViewController = coordinator.start()
        window.makeKeyAndVisible()
        self.window = window
    }
}
Now create a new Swift file for LoginViewController, copy/paste the code below:
import UIKit

class LoginViewController: UIViewController {

    private let passwordTextField = UITextField()
    private let loginTextField = UITextField()
    private let loginButton = UIButton()
    private let coordinator: AbstractCoordinator

    init(coordinator: AbstractCoordinator) {
        self.coordinator = coordinator
        super.init(nibName: nil, bundle: nil)
    }

    required init?(coder: NSCoder) {
        fatalError("init(coder:) has not been implemented")
    }

    override func viewDidLoad() {
        super.viewDidLoad()

        view.backgroundColor = .white
        title = "Login Screen"

        configureLoginTextField()
        configurePasswordTextField()
        configureLoginButton()
    }

    private func configureLoginTextField() {
        view.addSubview(loginTextField)
        loginTextField.translatesAutoresizingMaskIntoConstraints = false
        loginTextField.textContentType = .username
        loginTextField.layer.borderColor = UIColor.gray.cgColor
        loginTextField.layer.borderWidth = 1
        loginTextField.layer.cornerRadius = 10
        loginTextField.placeholder = "Login"
        loginTextField.layer.sublayerTransform = CATransform3DMakeTranslation(5, 0, 0)

        NSLayoutConstraint.activate([
            loginTextField.centerXAnchor.constraint(equalTo: view.centerXAnchor),
            loginTextField.centerYAnchor.constraint(equalTo: view.centerYAnchor, constant: -100),
            loginTextField.widthAnchor.constraint(equalToConstant: 200),
            loginTextField.heightAnchor.constraint(equalToConstant: 30),

        ])
    }

    private func configurePasswordTextField() {
        view.addSubview(passwordTextField)
        passwordTextField.translatesAutoresizingMaskIntoConstraints = false
        passwordTextField.layer.borderColor = UIColor.gray.cgColor
        passwordTextField.layer.borderWidth = 1
        passwordTextField.layer.cornerRadius = 10
        passwordTextField.placeholder = "Password"
        passwordTextField.textContentType = .password
        passwordTextField.layer.sublayerTransform = CATransform3DMakeTranslation(5, 0, 0)

        NSLayoutConstraint.activate([
            passwordTextField.widthAnchor.constraint(equalToConstant: 200),
            passwordTextField.heightAnchor.constraint(equalToConstant: 30),
            passwordTextField.topAnchor.constraint(equalTo: loginTextField.bottomAnchor, constant: 20),
            passwordTextField.centerXAnchor.constraint(equalTo: loginTextField.centerXAnchor)
        ])
    }

    private func configureLoginButton() {
        view.addSubview(loginButton)
        loginButton.translatesAutoresizingMaskIntoConstraints = false
        loginButton.setTitle("Login", for: .normal)
        loginButton.setTitleColor(.black, for: .normal)
        loginButton.configuration = UIButton.Configuration.filled()
        loginButton.addAction(UIAction(handler: { [weak self] action in
            self?.coordinator.goToHomeScreen()
        }), for: .touchUpInside)

        NSLayoutConstraint.activate([
            loginButton.centerXAnchor.constraint(equalTo: view.centerXAnchor),
            loginButton.topAnchor.constraint(equalTo: passwordTextField.bottomAnchor, constant: 20)
        ])
    }
}
Then, create the HomeViewController.swift file, and copy/paste this code to it:
import UIKit

class HomeViewController: UIViewController {

    private let coordinator: AbstractCoordinator

    init(coordinator: AbstractCoordinator) {
        self.coordinator = coordinator
        super.init(nibName: nil, bundle: nil)
    }

    required init?(coder: NSCoder) {
        fatalError("init(coder:) has not been implemented")
    }

    override func viewDidLoad() {
        super.viewDidLoad()
        view.backgroundColor = .lightGray
        title = "Home View Controller"
    }
}
Create a CoordinatorProtocol.swift file, and copy/paste this code to it:
import Foundation
import UIKit

protocol AbstractCoordinator: AnyObject {
    func goToHomeScreen()
    func start() -> UIViewController
}
And as the last file, create the Coordinator.swift file, and copy/paste the code below to it:
import Foundation
import UIKit

class Coordinator: AbstractCoordinator {

    var navigationController: UINavigationController?

    func goToHomeScreen() {
        navigationController?.pushViewController(HomeViewController(coordinator: self), animated: true)
    }

    func start() -> UIViewController {
        self.navigationController = UINavigationController(rootViewController: LoginViewController(coordinator: self))

        return navigationController!
    }
}
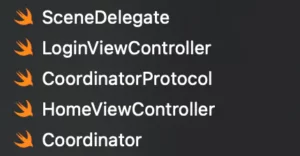
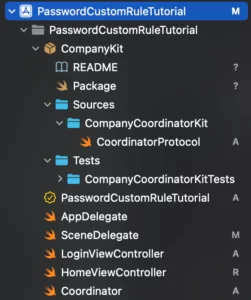
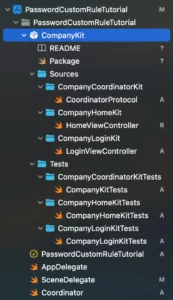
And we are done with file creation. You should have the below files in your project:
You now should be able to build and run the project. Finally, we are ready to go!
Start App Modularisation in Swift
Every time we have to start to break something in modules, it’s easier, to begin with, everything that has fewer dependencies. This seems obvious but it’s not. Always try to plan your modularisations, to begin with, modules that don’t have any dependencies.
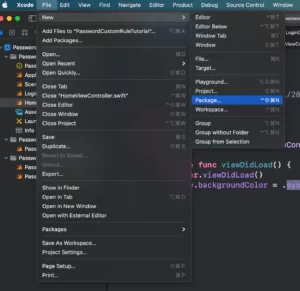
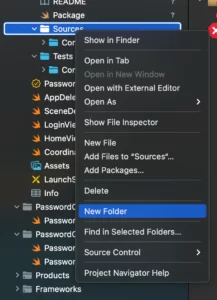
In our example, this is the CompanyCoordinatorKit. Let’s create the first module, go to File -> New -> Package:
Then pay attention to where you are going to create your root module:
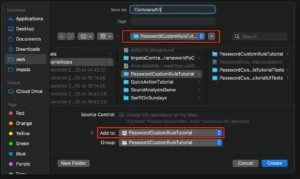
The First red square is the folder location, be sure to be inside your project folder, and the second red box is to ensure that module is added to your project structure.
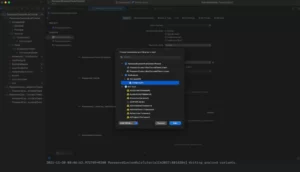
Now we have to say to Xcode that the new module is part of our build, go to your Project -> General -> Frameworks, Libraries, and Embedded Content:
Now go inside your CompanyKit package, and let’s edit the Package.swift file:
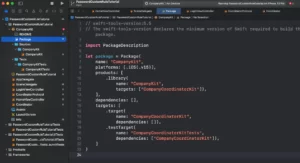
The code is below:
// swift-tools-version:5.5
// The swift-tools-version declares the minimum version of Swift required to build this package.

import PackageDescription

let package = Package(
    name: "CompanyKit",
    platforms: [.iOS(.v15)],
    products: [
        .library(
            name: "CompanyKit",
            targets: ["CompanyCoordinatorKit"]),
    ],
    dependencies: [],
    targets: [
        .target(
            name: "CompanyCoordinatorKit",
            dependencies: []),
        .testTarget(
            name: "CompanyCoordinatorKitTests",
            dependencies: ["CompanyCoordinatorKit"]),
    ]
)
What’s the meaning of those lines?
In the products key, we are saying that we have one library that contains one Target called CompanyCoordinatorKit. This is our first module.
In the targets key, we are specifying how those targets relate to each other. So we have a Target named CompanyCoordinatorKit with no dependencies and it already has a test target called CompanyCoordinatorKitTests. This is one of the advantages of working with SPM, it demands a test target for every module. (This can be controversial, but I think it’s a very good thing because stimulate testing practices).
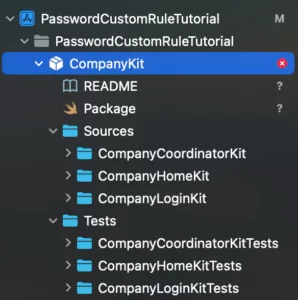
Now rename the Sources -> CompanyKit to CompanyCoordinatorKit and the Tests -> CompanyKitTests to CompanyCoordinatorKitTests as in the image shown below:
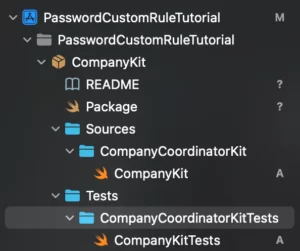
Now your module should build. ( command + b )
Now move the CoordinatorProtocol.swift file to inside the CompanyCoordinatorKit folder group:
And add public access modifier to it, because now he is in another module:
public protocol AbstractCoordinator: AnyObject {
    func goToHomeScreen()
    func start() -> UIViewController
}
Build your module, but now your app doesn’t build anymore… Let’s solve that.
Now you have to add to LoginViewController, HomeViewController, and Coordinator file the import of our newly created module:
import CompanyCoordinatorKit
If you follow up on everything correctly, you should be able to build and run your app now: (command + R)

Extracting Login View Controller
Now the dependency graph should look like this:
We now have to extract the other two view controllers to give freedom for each team (of our imaginary example) to work separately.
Let’s start extracting the LoginViewController.
Go to CompanyKit -> Package and update the file like the following code:
// swift-tools-version:5.5
// The swift-tools-version declares the minimum version of Swift required to build this package.

import PackageDescription

let package = Package(
    name: "CompanyKit",
    platforms: [.iOS(.v15)],
    products: [
        .library(
            name: "CompanyKit",
            targets: ["CompanyCoordinatorKit", "CompanyLoginKit"]),
    ],
    dependencies: [],
    targets: [
        .target(
            name: "CompanyCoordinatorKit",
            dependencies: []),
        .testTarget(
            name: "CompanyCoordinatorKitTests",
            dependencies: ["CompanyCoordinatorKit"]),

            .target(
                name: "CompanyLoginKit",
                dependencies: ["CompanyCoordinatorKit"]),
        .testTarget(
            name: "CompanyLoginKitTests",
            dependencies: ["CompanyLoginKit"]),
    ]
)
Look closely for the changes. We added a new “.target” and a new “.testTarget” entries. Those are the definition of our new module CompanyLoginKit. This module will have only one file but you can have as many as you need. We also updated the “.library” key with the newly created module.
It doesn’t build yet because we didn’t create the group for the new CompanyLoginKit.

Let’s create the desired folders:
And move the LoginViewController to the CompanyLoginKit folder.
Now you have to create the folder under Tests called “CompanyLoginKitTests”, in this test folder you should add a blank swift file. For example, in this test, I just create a new Swift file inside the folder and called it CompanyLoginKitTests.swift. Every module needs at least 1 file to build properly.
In the end, you will have this structure:
Updating Access Modifiers in the project
We have to update the access modifier of our LoginViewController, adding public to it:
import UIKit
import CompanyCoordinatorKit

public class LoginViewController: UIViewController { // New public access modifier here

    private let passwordTextField = UITextField()
    private let loginTextField = UITextField()
    private let loginButton = UIButton()
    private let coordinator: AbstractCoordinator

    public init(coordinator: AbstractCoordinator) { // New public access modifier here
        self.coordinator = coordinator
        super.init(nibName: nil, bundle: nil)
    }

    required init?(coder: NSCoder) {
        fatalError("init(coder:) has not been implemented")
    }

    public override func viewDidLoad() { // New public access modifier here
        super.viewDidLoad()

        view.backgroundColor = .white
        title = "Login Screen"

        configureLoginTextField()
        configurePasswordTextField()
        configureLoginButton()
    }

    private func configureLoginTextField() {
        view.addSubview(loginTextField)
        loginTextField.translatesAutoresizingMaskIntoConstraints = false
        loginTextField.textContentType = .username
        loginTextField.layer.borderColor = UIColor.gray.cgColor
        loginTextField.layer.borderWidth = 1
        loginTextField.layer.cornerRadius = 10
        loginTextField.placeholder = "Login"
        loginTextField.layer.sublayerTransform = CATransform3DMakeTranslation(5, 0, 0)

        NSLayoutConstraint.activate([
            loginTextField.centerXAnchor.constraint(equalTo: view.centerXAnchor),
            loginTextField.centerYAnchor.constraint(equalTo: view.centerYAnchor, constant: -100),
            loginTextField.widthAnchor.constraint(equalToConstant: 200),
            loginTextField.heightAnchor.constraint(equalToConstant: 30),

        ])
    }

    private func configurePasswordTextField() {
        view.addSubview(passwordTextField)
        passwordTextField.translatesAutoresizingMaskIntoConstraints = false
        passwordTextField.layer.borderColor = UIColor.gray.cgColor
        passwordTextField.layer.borderWidth = 1
        passwordTextField.layer.cornerRadius = 10
        passwordTextField.placeholder = "Password"
        passwordTextField.textContentType = .password
        passwordTextField.layer.sublayerTransform = CATransform3DMakeTranslation(5, 0, 0)

        NSLayoutConstraint.activate([
            passwordTextField.widthAnchor.constraint(equalToConstant: 200),
            passwordTextField.heightAnchor.constraint(equalToConstant: 30),
            passwordTextField.topAnchor.constraint(equalTo: loginTextField.bottomAnchor, constant: 20),
            passwordTextField.centerXAnchor.constraint(equalTo: loginTextField.centerXAnchor)
        ])
    }

    private func configureLoginButton() {
        view.addSubview(loginButton)
        loginButton.translatesAutoresizingMaskIntoConstraints = false
        loginButton.setTitle("Login", for: .normal)
        loginButton.setTitleColor(.black, for: .normal)
        loginButton.configuration = UIButton.Configuration.filled()
        loginButton.addAction(UIAction(handler: { [weak self] action in
            self?.coordinator.goToHomeScreen()
        }), for: .touchUpInside)

        NSLayoutConstraint.activate([
            loginButton.centerXAnchor.constraint(equalTo: view.centerXAnchor),
            loginButton.topAnchor.constraint(equalTo: passwordTextField.bottomAnchor, constant: 20)
        ])
    }
}
And finally, add import CompanyLoginKit at the top of the Coordinator.swift file.
We extracted another module!
Extracting HomeViewController
The graph dependency almost looks like we wanted. Check below:
Now we have to do the same process to extract the HomeViewController.
Go to CompanyKit -> Package and update the file like the following code to create the CompanyHomeKit module:
// swift-tools-version:5.5
// The swift-tools-version declares the minimum version of Swift required to build this package.

import PackageDescription

let package = Package(
    name: "CompanyKit",
    platforms: [.iOS(.v15)],
    products: [
        .library(
            name: "CompanyKit",
            targets: ["CompanyCoordinatorKit", "CompanyLoginKit","CompanyHomeKit"]),
    ],
    dependencies: [],
    targets: [
        .target(
            name: "CompanyCoordinatorKit",
            dependencies: []),
        .testTarget(
            name: "CompanyCoordinatorKitTests",
            dependencies: ["CompanyCoordinatorKit"]),

            .target(
                name: "CompanyLoginKit",
                dependencies: ["CompanyCoordinatorKit"]),
        .testTarget(
            name: "CompanyLoginKitTests",
            dependencies: ["CompanyLoginKit"]),

            .target(
                name: "CompanyHomeKit",
                dependencies: ["CompanyCoordinatorKit"]),
        .testTarget(
            name: "CompanyHomeKitTests",
            dependencies: ["CompanyHomeKit"]),
    ]
)
It doesn’t build yet because we didn’t create the group folders for the new CompanyHomeKit.

Create the desired folders:

And move the HomeViewController to the CompanyHomeKit folder.

Now you have to create the folder under Tests called “CompanyHomeKitTests”, in this test folder you should add a blank swift file. For example, in this test, I just create a new Swift file inside the folder and called it CompanyHomeKitTests.swift. Remember! Every module needs at least 1 file to build properly.
Final Project Structure with Modular Architecture in Swift
This is the final structure of our example project:
We have to update the access modifier of our HomeViewController, adding public to it:
import UIKit
import CompanyCoordinatorKit

public class HomeViewController: UIViewController { // New public access modifier here

    private let coordinator: AbstractCoordinator

    public init(coordinator: AbstractCoordinator) { // New public access modifier here
        self.coordinator = coordinator
        super.init(nibName: nil, bundle: nil)
    }

    required init?(coder: NSCoder) {
        fatalError("init(coder:) has not been implemented")
    }

    public override func viewDidLoad() { // New public access modifier here
        super.viewDidLoad()
        view.backgroundColor = .lightGray
        title = "Home View Controller"
    }
}
And finally, add import CompanyHomeKit at the top of the Coordinator.swift file.
And… That’s it!
Now, the final graph dependency result is the same as at the beginning of the post:
Wrap up
To add new modules you have to:
- Add the “.library” key with the newly created module name.
- Inside the “.targets” key you have to add two new entries, the “.target” with the name and dependencies of the new module and “.testTarget” with the structure of the tests of that new module.
- Add a new folder structure to your module matching the names you put in your “.targets”, and add at least one file to each new module folder.
- Transfer the desired swift files to the module and add access modifiers where applicable.
- Import the new dependency to other files/modules in your project.
More Studying Resources
If you want to level up your modularisation game you can read how to use laser-focused access level modifiers for your objects. In that article, I explain what are the access levels and give examples of how to implement each of them right.
A more advanced topic is if you want to embed or not your frameworks in your .ipa file. This makes a lot of difference when you are building and how your app will call your API in runtime, this way you should pay attention to that when using frameworks.
Summary – App Modularisation with Swift Package Manager
This was a brief tutorial on one way to do App Modularisation with Swift Package Manager using the coordinator pattern. If we want t The full project you can check it out on my GitHub repository.
That’s all my people, I hope you liked reading this article as much as I enjoyed writing it. If you want to support this blog you can Buy Me a Coffee or leave a comment saying hello. You can also sponsor posts and I’m open to freelance writing! You can reach me on LinkedIn or Twitter and send me an e-mail through the contact page.
Thanks for reading and… That’s all folks.
Credits:


