
Hallo vrienden, Leo hier. Today we will discuss how to write unit tests for UIButton with XCtest in Swift and why you should learn that to improve your code stability and maintainability.
This is the first article of a series on how to test UI with unit tests.
I know, I know… this is a controversial theme. Some of you will argue that is not necessary to unit test UI, some of you will argue that we are not testing the UI because for that you need either XCUITest or some sort of Snapshot test. My hope with this post is to start to debunk the myth that unit test UI is hard or even useless.
Keep in mind that when we are unit testing the UI this should obey all the other unit test rules, they should be fast and easy to read and write. The unit tests should also serve as documentation of what your system should do and ultimately be live code examples on *how* it should behave.
Today, we will test one of the most used components in UIKit, the UIButton. If you ever be curious about how we could do that, just read through.
Let’s code! But first…
Painting of The Day
The painting I chose was a 1904 art piece called The Mice Stitching Button-Holes by Helen Beatrix Potter. Helen Beatrix Potter (British English /ˈbiːətrɪks/, North American English also /ˈbiːtrɪks/, 28 July 1866 – 22 December 1943) was an English writer, illustrator, natural scientist, and conservationist best known for her children’s books featuring animals, such as those in The Tale of Peter Rabbit.
Born into an upper-class household, Potter was educated by governesses and grew up isolated from other children. She had numerous pets and spent holidays in Scotland and the Lake District, developing a love of landscape, flora, and fauna, all of which she closely observed and painted.
I chose this painting because we will talk about buttons, and… Look! The mice are stitching buttons in the shirt!
The Problem – Unit Tests for UIButton
You added a custom button in a view controller and want to make sure about its configuration and behavior
We will introduce this topic by discussing the strategy of our testing.
Strategy
There is a famous quote in Computer Science that says: “First, solve the problem. Then, write the code” and I can’t agree more. It’s very tempting to start to code everything very fast without actually thinking about the problem.
So what we are trying to do? We want to make sure that our button has the right appearance configuration and the right behavior in our UIViewController. That will be our strategy for tests, we first will write tests for the appearance and then for the behavior.
This closes the scope of our testing. We are not going to test if the button has the right position on the screen or even if it is visible, or the right size. No. We are testing the button itself and its behavior on that screen. It’s worth mentioning that all of our tests will test the integration between the custom button with a UIViewController because the UIButton cannot live detached in the space.
Why this is important? If anyone breaks the appearance we want to know fast right? Imagine that we are using this button on many screens and someone inadvertently changes the color because is the new color on the prototype. This could have side effects that are not seen at the first sight, but we can get it early in unit tests. And the same thing for behavior tests, if someone changes their behavior, we can rapidly know about that.
Let’s begin setup our buttons.
Set up View Controller with two buttons
First, let’s configure the view controller with two buttons. Will be as simple as can be because the focus here is the unit tests.
Create a new project and clean up the storyboard and all its references from your project we will use view code for our example.
Then in the scene delegate changes the scene function to this:
func scene(_ scene: UIScene, willConnectTo session: UISceneSession, options connectionOptions: UIScene.ConnectionOptions) {
    guard let windowScene = (scene as? UIWindowScene) else { return }
    window = UIWindow(windowScene: windowScene)
    window?.rootViewController = ViewController { "Ana" }
    window?.makeKeyAndVisible()
}
This will not build yet but don’t worry.
Now create a new CustomButton that will be our target for unit testing. Paste the code below to the new button file.
final class CustomButton: UIButton {
    init(title: String) {
        super.init(frame: .zero)
        translatesAutoresizingMaskIntoConstraints = false
        configureAppareance(with: title)
    }

    required init?(coder: NSCoder) {
        fatalError("init(coder:) has not been implemented")
    }

    private func configureAppareance(with title: String) {
        backgroundColor = .black
        setTitle(title, for: .normal)
    }
}
We are creating a button that is to be used in a view code context only, and we can set the background color and the title.
Now replace the code in your ViewController.swift file with the code below:
class ViewController: UIViewController {
let counterButton = CustomButton(title:"Button1")
let closureButton = CustomButton(title:"Button2")
var counterButtonAction: ((inout Int) -> ())?
var closureButtonAction: () -> (String)
private(set) var buttonPressCount = 0
init(button2Action: @escaping () -> (String) = {""}) {
self.closureButtonAction = button2Action
super.init(nibName: nil, bundle: nil)
}
required init?(coder: NSCoder) {
fatalError("init(coder:) has not been implemented")
}
override func viewDidLoad() {
super.viewDidLoad()
view.backgroundColor = .white
configureView()
}
private func configureView() {
[counterButton, closureButton].forEach {
view.addSubview($0)
}
NSLayoutConstraint.activate([
counterButton.centerXAnchor.constraint(equalTo: view.centerXAnchor),
counterButton.centerYAnchor.constraint(equalTo: view.centerYAnchor)
])
NSLayoutConstraint.activate([
closureButton.centerXAnchor.constraint(equalTo: view.centerXAnchor),
closureButton.topAnchor.constraint(equalTo: counterButton.bottomAnchor, constant: 10)
])
counterButton.addTarget(self, action: #selector(button1Tap), for: .touchUpInside)
closureButton.addTarget(self, action: #selector(button2Tap), for: .touchUpInside)
counterButtonAction = { count in
count += 1
print(count)
}
}
@objc
internal func button1Tap() {
counterButtonAction?(&buttonPressCount)
}
@objc
internal func button2Tap() {
print(closureButtonAction())
}
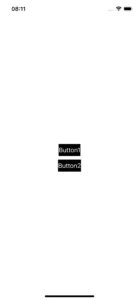
}Now you can run the app and we can start writing unit tests for UIButton. You should see the image below:
Unit Testing
In your test file let’s write our first test. As we comment before, first we want to test the button configuration. This configuration is split in two: the view alone and how it is used in the UIViewController.
After that, we will test the behavior of the button, for example what should happen when I tap the button?
Unit Testing the Button Configuration
Let’s write our first test, and this is for the view alone:
func testCustomButton_configuration() {
    let button = CustomButton(title: "Mike")

    XCTAssertEqual(button.backgroundColor, UIColor.black)
    XCTAssertFalse(button.translatesAutoresizingMaskIntoConstraints)
    XCTAssertEqual(button.titleLabel?.text, "Mike")
}
We are pretty sure that if anything changes, we have a failing unit test to alert us.
Let’s begin with the integration between UIViewController and custom UIButton. Our ViewController has two custom buttons, so we want to assure this behavior.
Let’s test that:
func testButton_viewDidload_haveTwoCustomButtonsInSubviews() {
    let buttonViewList = createButtonViews()

    XCTAssertEqual(buttonViewList.count, 2)
    XCTAssertEqual(buttonViewList[0].titleLabel?.text!, "Button1")
    XCTAssertEqual(buttonViewList[1].titleLabel?.text!, "Button2")
}
We need to create the createButtonViews function that is a helper function and it’s defined here:
private func createButtonViews() -> [UIButton] {
    let sut = ViewController()

    var viewList = [CustomButton]()

    sut.view.subviews.forEach { view in
        if let view = view as? CustomButton {
            viewList.append(view)
        }
    }

    return viewList
}
Now we are asserting that the ViewController has two custom buttons. But this has a little problem, our tests are kinda fragile. If someday the view controller changes the order of adding the subviews, our tests will break. In our tests, we don’t want to rely on that order, if you want it’s also ok to keep it that way but we will improve this by doing a sort on the buttons so the tests don’t rely on the ViewController addSubviews order.
Change the helper function above to:
private func createButtonViews() -> [UIButton] {
    let sut = ViewController()

    var viewList = [CustomButton]()

    sut.view.subviews.forEach { view in
        if let view = view as? CustomButton {
            viewList.append(view)
        }
    }

    return viewList.sorted { button1, button2 in

        guard let text1 = button1.titleLabel?.text else {
            return true
        }

        guard let text2 = button2.titleLabel?.text else {
            return false
        }

        return text1 < text2
    }
}
You can notice that we didn’t need to call anything to load the view, but why?
The response is in the view property of the UIViewController it says:
If you access this property when its value is nil, the view controller automatically calls the loadView() method and returns the resulting view.
This way when we try to access: sut.view.subviews in the helper function we are silently starting all the ViewController view lifecycle. Cool, isn’t it?
Testing Behavior with Unit Tests for UIButton
Let’s test the behavior part. Our view controller has two buttons, the counterButton and a closureButton. And they are both examples of things that can happen on a standard iOS screen.
Some buttons change the properties of the screen, in our case the counterButton but you could think that could be a dark mode button or a “change layout” button.
Likewise, other types of buttons trigger actions to objects that are outside the `UIViewController` scope in our case is represented by the closureButton. That is why we have those two buttons.
To test the counterButton behavior you can do something like this:
func testCounterButton_whenTapped_incrementCount() {
    let sut = ViewController()
    sut.loadViewIfNeeded()

    XCTAssertEqual(sut.buttonPressCount, 0)

    sut.counterButton.sendActions(for: .touchUpInside)

    XCTAssertEqual(sut.buttonPressCount, 1)

    sut.counterButton.sendActions(for: .touchUpInside)

    XCTAssertEqual(sut.buttonPressCount, 2)
}
The main takeaway from here is the sendActions(for:) function. Every time you want to test a button behavior you can use this function to trigger its action. On our screen, it just changes a counter but you can assert any internal modification that your button could do.
In addition, another thing to notice is the appearance of the sut.loadViewIfNeeded() function. This is important to load the view and add all the elements to the ViewController’s view stack. If you comment on that line your tests will fail.
To test the closureButton we should inject our closure to the ViewController so we can assert that later, let’s see:
func testClosureButton_whenTapped_callInjectedClosure() {
    var button2Pressed = false

    let sut = ViewController() {
        button2Pressed = true
        return "Ana"
    }

    sut.loadViewIfNeeded()

    XCTAssertFalse(button2Pressed)

    sut.closureButton.sendActions(for: .touchUpInside)

    XCTAssertTrue(button2Pressed)
}
As you can see, we created a spy inside the closure and we can assert that after we send the action to press the button. This closure technique could be used with any kind of dependency injection you are using, you would just need to change the closure to the conforming type you are injecting.
And we are done!
Summary – Unit Tests for UIButton
Today we studied how to unit test a UIButton, we explored two dimensions of that testing that is the configuration and the behavior of it in the UIViewController, this way you can fastly assure that all your configuration is correctly set up and your behavior does exactly what supposed to do. The full project can be found in [this GitHub repo.
That’s all my people, I hope you liked reading this article as much as I enjoyed writing it. If you want to support this blog you can Buy Me a Coffee or leave a comment saying hello. You can also sponsor posts and I’m open to freelance writing! You can reach me on LinkedIn or Twitter and send me an e-mail through the contact page.
Thanks for reading and… That’s all folks.
Credits:


