
Hallo dammes en heren, Leo hier. The topic today is about Home Screen quick actions.
They are a really good experience created by Apple from iOS 13 and above where you can have access to whatever feature that the app provides from your Home Screen.
Imagine that you have an e-commerce app and you can give access to the shopping cart directly from the Home Screen of the app (not using widgets, of course). Or imagine you have a weather app and you want the user to open the app already on the rain radar. There is an infinite number of possibilities!
There are two ways to set up this in your app and we will explore both here.
Painting of The Day
The painting is an 1862 piece called Path Towards a House in the Countryside by Jean-Baptiste-Camille Corot. A pivotal figure in landscape painting, Jean-Baptiste Camille Corot was an influential and prolific artist, producing over 3,000 works during his lifetime, and inspiring countless numbers of forgeries and copies.
He focused on two types of landscapes, historical landscapes, containing ancient and mythological creatures, and realistic landscapes, mostly of Northern Europe, with faithful renditions of flora and fauna, often mixing the two genres together.
I chose this painting because it shows a path in the woods. This remember me that the quick actions menu is another path to your app’s features.
The Problem – Home Screen Quick Actions
You want to add a Home Screen Quick Action to your app.
For those who aren’t familiar with the term and the feature. When you do a long press in any app on the Home Screen, some options will appear. The good thing is that you can add more action to it as a shortcut to features in your apps.
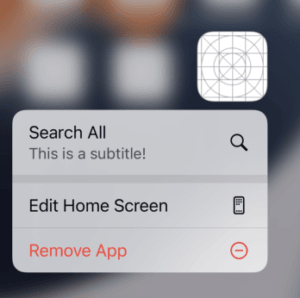
The Home Screen Quick Action looks like the image below:

Let’s start coding.
Two types of Quick Actions
Apple provides you with two types of home menu quick actions. One is called Static Quick Actions and the other Dynamic Quick Actions.
The static quick actions as the name suggest can’t change within the installation. That means that all actions you set up this way will be the same until your next app install. This is useful when you already know what features you want to provide from the home quick actions menu.
The other type is Dynamic Quick Actions. These actions you can change in runtime, for example: imagine that you have a weather app and the user can have favorite cities, you can show the favorites cities in the quick actions menu. This means that even if the user removes all cities or adds a lot of cities iOS will take care to show those favorites in the quick actions menu.
Making a Static Quick Action
Create a new Xcode iOS project anywhere on Mac.
Now go to the Info.plist file and we will add some data to it.
<key>UIApplicationShortcutItems</key>
<array>
    <dict>
        <key>UIApplicationShortcutItemType</key>
        <string>SearchAll</string>
        <key>UIApplicationShortcutItemIconType</key>
        <string>UIApplicationShortcutIconTypeSearch</string>
        <key>UIApplicationShortcutItemTitle</key>
        <string>Search All</string>
        <key>UIApplicationShortcutItemSubtitle</key>
        <string>This is a subtitle!</string>
    </dict>
</array>
Now you can already build and run your app and do a long press on the Home Screen, and you can already see the new option in the menu:
But if you tap it, nothing happens. Now we need to wire up everything in the code to intercept this call.
You have two types of callback to quick action. One is when the app is completely closed (not loaded / in the background), and the other is when the app is in the background.
When the app is completely closed we can intercept safe the quick action in the `SceneDelegate` to use when the app will become active:
var savedShortCutItem: UIApplicationShortcutItem?

func scene(_ scene: UIScene, willConnectTo session: UISceneSession, options connectionOptions: UIScene.ConnectionOptions) {
    guard let _ = (scene as? UIWindowScene) else { return }

    if let shortcutItem = connectionOptions.shortcutItem { // get the shortCutItem here
        savedShortCutItem = shortcutItem
    }
}

// Verify when user is opening your app with the home menu quick Action
func sceneDidBecomeActive(_ scene: UIScene) {
    if savedShortCutItem != nil {
        _ = handleShortCutItem(shortcutItem: savedShortCutItem)
    }
}
When the app is loaded/background you should add this function to the SceneDelegate to be able to intercept the shortcut Item:
func windowScene(_ windowScene: UIWindowScene,
                 performActionFor shortcutItem: UIApplicationShortcutItem,
                 completionHandler: @escaping (Bool) -> Void) {
    print(shortcutItem)
}
To test add this function to your SceneDelegate:
func showAlert(message: String) {
    let alertController = UIAlertController(title: "Quick Action", message: message, preferredStyle: .alert)
    alertController.addAction(UIAlertAction(title: "Close", style: .default, handler: nil))
    window?.rootViewController?.present(alertController, animated: true, completion: nil)
}
And show alerts in both situations, when you have and don’t have your app loaded:
func sceneDidBecomeActive(_ scene: UIScene) {
if let savedShortCutItem = savedShortCutItem {
showAlert(message: "\(savedShortCutItem.description) + from start")
}
}
func windowScene(_ windowScene: UIWindowScene,
performActionFor shortcutItem: UIApplicationShortcutItem,
completionHandler: @escaping (Bool) -> Void) {
showAlert(message: "\(shortcutItem.description) + from background")
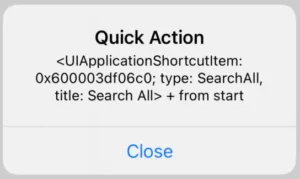
}Build and run, put the app in the background and tap the quick action menu in the app:
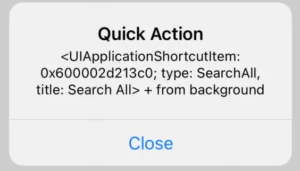
Now close the app. Tap the quick action menu in the app again, and you should see:
Dynamic Quick Actions menu
As above stated when using the dynamic quick actions menu, you should set programmatically all of them. In this matter, you can set them anywhere in the app.
However, the Apple documentation recommends you set the quick actions on the sceneWillResignActive(_:) function of the scene delegate. The argument is that a background state is a good time to refresh the quick menu action because is the last action the system does before returning to the Home Screen.
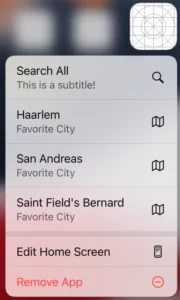
Let’s imagine that you have a bunch of favorite cities. And you want to dynamically show them in the quick action menu. Let’s create those in SceneDelegate:
var favoriteCities = ["Haarlem","San Andreas", "Saint Field's Bernard"]

func sceneWillResignActive(_ scene: UIScene) {
    let application = UIApplication.shared
    application.shortcutItems = favoriteCities.map { city -> UIApplicationShortcutItem in
        return UIApplicationShortcutItem(type: city,
                                         localizedTitle: city,
                                         localizedSubtitle: "Favorite City",
                                         icon: UIApplicationShortcutIcon(systemImageName: "map"),
                                         userInfo: ["CityIdentifier": city as NSSecureCoding])
    }
}
If was a production app, you should get this from a service or storage within your app. This is just a simplification.
Some remarkable things about creating shortcut Items:
- You can have a localized Title and Subtitle.
- You can retrieve the userInfo using:
shortcutItem.userInfo?["CityIdentifier"] as? String - You have two ways to set the icon, SF Symbol or template image.
And when using the quick actions menu, you can see your favorites cities:
Choosing the Icon in the Menu
You can set quick action icons with UIApplicationShortcutIcon class and they can be done in two different ways: SF Symbol or with a template image from this enum.
With a template image name enum:
UIApplicationShortcutIcon(type: .favorite)
With an SF Symbol name:
UIApplicationShortcutIcon(systemImageName: "star.fill")
Keep in mind that you have to check the SF Symbol version compatibility with the App minimum target.
Scene Delegate Full code
Below is the complete scene delegate code. Remember that you still need to do the Info.plist to work with static quick actions menu items.
import UIKit

class SceneDelegate: UIResponder, UIWindowSceneDelegate {

    var window: UIWindow?
    var savedShortCutItem: UIApplicationShortcutItem?
    var favoriteCities = ["Haarlem","San Andreas", "Saint Field's Bernard"]

    func scene(_ scene: UIScene, willConnectTo session: UISceneSession, options connectionOptions: UIScene.ConnectionOptions) {
        guard let _ = (scene as? UIWindowScene) else { return }

        if let shortcutItem = connectionOptions.shortcutItem {
            savedShortCutItem = shortcutItem
        }
    }

    func sceneDidDisconnect(_ scene: UIScene) {
    }

    func sceneDidBecomeActive(_ scene: UIScene) {
        if let savedShortCutItem = savedShortCutItem {
            showAlert(message: "\(savedShortCutItem.description) + from start")
        }
    }

    func windowScene(_ windowScene: UIWindowScene,
                     performActionFor shortcutItem: UIApplicationShortcutItem,
                     completionHandler: @escaping (Bool) -> Void) {
        showAlert(message: "\(shortcutItem.description) + from background \(shortcutItem.userInfo?["CityIdentifier"] as? String)")
    }

    func sceneWillResignActive(_ scene: UIScene) {
        let application = UIApplication.shared
        application.shortcutItems = favoriteCities.map { city -> UIApplicationShortcutItem in
            return UIApplicationShortcutItem(type: city,
                                             localizedTitle: city,
                                             localizedSubtitle: "Favorite City",
                                             icon: UIApplicationShortcutIcon(systemImageName: "map"),
                                             userInfo: ["CityIdentifier": city as NSSecureCoding])
        }
    }

    func sceneWillEnterForeground(_ scene: UIScene) {
    }

    func sceneDidEnterBackground(_ scene: UIScene) {
    }

    func showAlert(message: String) {
        let alertController = UIAlertController(title: "Quick Action", message: message, preferredStyle: .alert)
        alertController.addAction(UIAlertAction(title: "Close", style: .default, handler: nil))
        window?.rootViewController?.present(alertController, animated: true, completion: nil)
    }
}
And that’s the end!
Summary – Home Screen Quick Actions
Today we study how you can add quick menu actions to your apps. We learn there are two ways to show them and why to use each one. This feature is important because it gives multiple ways for your users to navigate through your apps and increases the usability of your apps.
That’s all my people, I hope you liked reading this article as much as I enjoyed writing it. If you want to support this blog you can Buy Me a Coffee or leave a comment saying hello. You can also sponsor posts and I’m open to freelance writing! You can reach me on LinkedIn or Twitter and send me an e-mail through the contact page.
Thanks for reading and… That’s all folks.
Credits:


