Hallo broeders en zusters, Leo hier. The topic today is how to use your camera to Scan Texts, QR Codes, and Barcodes in Swift and iOS.
It was never so easy to accomplish those tasks. Really. In a few lines of code, you can create a structure that reads QR Codes and texts. And that comes with a lot of new capabilities. We are talking about the new DataScannerViewController and we will make an example of how to use it to make a live camera math solver.
The curious and impressive part of this article is that we will make the app recognize text with the camera and we can solve that in less than 100 lines of code. It is living in a world where we can do a lot in programming with so few lines of code.
Keep in mind that everything in this post is just for iOS 16+ using Xcode 14+ and an iPhone or iPad that are released after 2018 because you will need the neural engine chip.
No more talking because we have a lot to do today.
Let’s code! But first…
Painting of The Day
Today’s painting is called Sailors a 1922 painting by Norman Rockwell. Norman Perceval Rockwell was a 20th-century American author, painter, and illustrator. His work is loved by Americans for its reflection of American culture, making him one of the most famous artists in the USA.
He also loved to travel, and from the 1920s -1930s he went five times to Europe, then to South America and Africa. Influenced by European art, he experimented with contemporary styles, but the director of the Post urged him to keep to his manner. In 1930, Rockwell then went to California, where he became friends with Walt Disney.
I chose this painting because the boy is using his Vision to Scan things that are far away. Got it?
The Problem – Scan Texts, QR Codes, and Barcodes
You need to scan text or QR code with your app to solve a math problem
Before starting studying the new scanner object for iOS, at the end of this article we will have a live camera math solver like the gif below:
Background Story On Scanning Objects with Vision and AV Foundation
Before diving into the new iOS 16 view controller let’s see how you could scan texts and QR codes in past. Back in the day, we were supposed to handle more things manually or connect more frameworks manually. You were obligated to directly use AVFoundation to capture video and or handle it yourself or later pass it into another framework like Vision to handle the image processing.
Check here two main ways to achieve that feature.
- Use pure
AVFoundationto capture images and parse yourself.
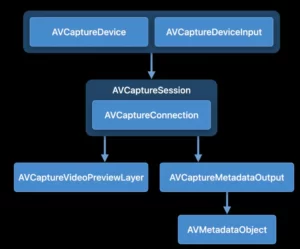
- Or you could plug the AVFoundation
AVCaptureVideoDataOutputinto the Vision framework usingCMSampleBufferRefand them using aVNImageRequestHandlerto getVNBarCodeObservationorVNRecognizedTextObservation.
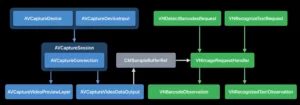
Either way, you would end up with a lot of objects that you have to manage yourself to achieve your live camera parsing feature.
The New DataScannerViewController joins the battle
Nowadays we have a new object that unifies the last solution into just one UIViewController. This is the brand new DataScannerViewController and you can use it right now if your deployment target is iOS 16 or above.
When you use it you get for free a lot of features that in the past you should implement by yourself. For example, out of the box you have a live camera preview, user guidance with labels for better image quality, and item highlighting, and user’s can tap to focus and pinch to zoom.
Users can also capture photos from the live preview if the developer implements the right function.
For us developers, the new object has a lot of handy functions too. You can delimit a region of interest within the camera view so the Vision framework will not search for the whole extension of the camera view for texts or QR Codes. You can also add an overlay View to your camera so you can guide users where they should point the camera.
As you can see is a lot of good feature with a single UIViewController. And today we will create a Live Camera Math Solver with just one UIViewController.
Code example – Live Camera Math Solver
You will need Xcode 14 or above version to make this tutorial on camera scan texts and QR codes. That said start a new project and use storyboards. This post will be very simple so you can easily reproduce this guide in your home. We just need three steps to implement our example.
- We need the user’s permission to use the camera.
- We will create a MathObject to parse the input.
- Instantiate, start and present the
DataScannerViewControllerfrom yourUIViewController.
Also, our project will have some limitations as the text scanner also have. I couldn’t make it work with the division operand for example, so I don’t know if this is the most suitable solution for parsing math problems with a camera in iOS. Take it as just an example of the use of the new scan text API, not a recommendation of how to parse mathematical operations with the camera.
That said, let’s start with the first part.
User permission to use the device camera
In your project go to the Info tab, like the image below:
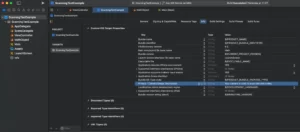
And as you can check the image above you will need to add the key “Privacy – Camera Usage Description” with a value that in my project is “Your camera is used to scan text and codes.”
This way the first time user opens the app it will be prompted with this:
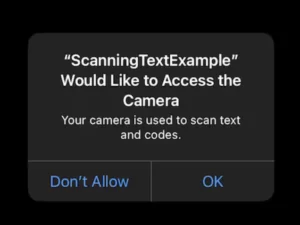
The permission part is done, let’s start the fun part, coding.
Creating the MathObject
Create a new file called MathObject.swift and copy/paste the code below:
struct MathObject {
    private let firstInput: Int
    private let secondInput: Int
    private let operand: Operand

    var result: Int {
        switch operand {
        case .addition:
            return firstInput + secondInput
        case .subtraction:
            return firstInput - secondInput
        case .multiplication:
            return firstInput * secondInput
        case .division:
            return firstInput / secondInput
        }
    }

    init?(inputData: String) {
        let splitted = inputData.filter { !$0.isWhitespace }.map { String($0) }
        guard splitted.count == 3,
              let firstInput = Int(splitted[0]),
              let secondInput = Int(splitted[2]),
              let operand = Operand(rawValue: splitted[1]) else
        { return nil }

        self.firstInput = firstInput
        self.secondInput = secondInput
        self.operand = operand
    }

    private enum Operand: String {
        case addition = "+"
        case subtraction = "-"
        case multiplication = "*"
        case division = "÷"
    }
}
Our MathObject will only work with the most basic operations with two operands and one operator. For example: 2+2, 5-2, 7*3, etc. Before any criticism about this object, I know that ideally, we should separate logic from data types but this is just a quick example.
This object will get the string from the camera and try to parse it into a mathematical operation. If it succeeds we can use the result property to get the result of the operation.
Now let’s get to the most exciting and important part, the DataScannerViewController in the ViewController.
Deep into DataScannerViewController
We will discuss extensively the ViewController, but first copy and paste it:
import UIKit
import VisionKit

final class ViewController: UIViewController {

    private let dataScannerViewController = DataScannerViewController(recognizedDataTypes: [.text()],
                                                                      qualityLevel: .fast,
                                                                      recognizesMultipleItems: false,
                                                                      isHighFrameRateTrackingEnabled: true,
                                                                      isPinchToZoomEnabled: true,
                                                                      isGuidanceEnabled: true,
                                                                      isHighlightingEnabled: true) // Mark 1

    private var isScannerAvailable: Bool { DataScannerViewController.isSupported && DataScannerViewController.isAvailable } // Mark 2

    override func viewDidLoad() {
        super.viewDidLoad()
        dataScannerViewController.delegate = self // Mark 5

        if isScannerAvailable { // Mark 2
            present(dataScannerViewController, animated: true) // Mark 4
            try? dataScannerViewController.startScanning() // Mark 4
        }
    }
}

extension ViewController: DataScannerViewControllerDelegate { // Mark 5
    func dataScanner(_ dataScanner: DataScannerViewController, didAdd addedItems: [RecognizedItem], allItems: [RecognizedItem]) { // Mark 5
        for item in addedItems {
            switch item {
            case .text(let text):
                print("Text Observation - \(text.observation)")
                print("Text transcript - \(text.transcript)")
                process(data: text.transcript)
            case .barcode:
                break
            @unknown default:
                print("Should not happen")
            }
        }
    }

    private func process(data: String) { // Mark 6
        guard let mathObject = MathObject(inputData: data) else {
            print("Could not parse into MathObject")
            return
        }

        dismiss(animated: true)

        let alertViewController = UIAlertController(title: "Math Solver", message: "The result of your calculus is: \(mathObject.result)", preferredStyle: .alert)
        alertViewController.addAction(UIAlertAction(title: "Holy Swift!", style: .cancel))
        present(alertViewController, animated: true)
    }
}
Let’s start with the ScannerViewController parameters and why they are so useful for scan texts, QR codes, and barcodes.
The Data ScannerViewController Parameters
First, let’s discuss our new shiny DataScannerViewController in Mark 1.
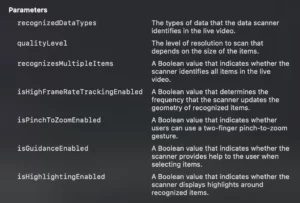
Interestingly, every parameter is a great feature of this new object, for example, we can set it to recognize multiple items that are not our case.
You can set if pinch to zoom will be enabled or not. Set if highlighting of the scanned object will be available that is very useful if you are not using overlays.
But what I think that shines is the recognizedDataTypes parameter here. It accepts DataScannerViewController.RecognizedDataType that has two static functions: text and barcode.
In the text type you can set languages and content type as the example below:

This way you can set your content type for very specific use cases. For example: imagine that you have a flight tracker app and you want to provide a way for your users just scan the flight number and all info appears on the screen to them, that would be cool, right?
And the barcode as you can imagine, you can set a lot of barcode types to be parsed, check the image below:

This is very handy for developers who want to scan items in stores or just want to implement a QR code scanner quickly.
Explaining The Scanner
Mark 2 shows how to check if the scanner is available to be used. This is a safeguard for any situation where you have multiple iOS targets and you don’t want to enable anything related to the scanner for users with iOS versions below 16.
private var isScannerAvailable: Bool { DataScannerViewController.isSupported && DataScannerViewController.isAvailable } // Mark 2Them on Mark 4 we are presenting the camera in a modal and starting it. Ideally, you should catch errors here also.
present(dataScannerViewController, animated: true) // Mark 4
try? dataScannerViewController.startScanning() // Mark 4
Mark5 is where we get the results of the scanner. It begins with setting the delegate object that in this case will be our ViewController. Then we are extending our ViewController to conform to the DataScannerViewControllerDelegate and implementing the func dataScanner(_ dataScanner: DataScannerViewController, didAdd addedItems: [RecognizedItem], allItems: [RecognizedItem]).
Then finally we are processing every entry in our scanner with the process function that we simply try to make a MathObject and if it succeeds we dismiss the scanner and show a popup with the result.
Now build and run, and write down on a piece of paper a simple math operation like 2+2 and you can solve it with your brand new scanner:
Nice, right?
Handling scanner unavailable errors
If you want to catch the errors that can occur if the scanner became unavailable when you are using the camera, put this code in your delegate extension:
func dataScanner(_ dataScanner: DataScannerViewController, becameUnavailableWithError error: DataScannerViewController.ScanningUnavailable) {
    // handle here the sudden camera scanner unavailability. Ex: camera permission revoked.
    print("The scanner became unavailable. Sorry.")
}
And that’s it for today!
Summary – Scan Texts, QR Codes, and Barcodes in Swift
I don’t know you, but I found it amazing that we can do with less than 100 lines of code an app that can parse the camera input into texts and then parse a mathematical operation. This is such a powerful tool and I’m excited to see the new generation of developers using this to make the world better.
If you want to check the full project, remember is less than 100 lines maybe is just easier to copy and paste the code in this article, you can check in my Github repo.
That’s all my people, today we finished the Architecture and iOS Tooling article closing the series about the beginning of iOS development. I hope you liked reading this article as much as I enjoyed writing it. If you want to support this blog you can Buy Me a Coffee or leave a comment saying hello. You can also sponsor posts and I’m open to freelance writing! You can reach me on LinkedIn or Twitter and send me an e-mail through the contact page.
Thanks for reading and… That’s all folks.
Credits:


