
Hallo flessen en potten, Leo hier. Today we will explore a very powerful structure to make your life easier, the SwiftUI ForEach.
It is a common place for all iOS developers. We create an abstraction and want to show a list or table of that abstraction. For example, when you create a list of users, or a list of recipes, each one of the items is an individual entity but in the UI part, they share the same structure. It is good that the SwiftUI team thought about that for us.
Whenever you want to show, a list of items, or a repetition of a view pattern you can use the ForEach structure to help you. We will learn today what is that structure when you can use it, and how versatile it can be.
We have some spicy today with nontrivial data to show in the ForEach. We will also learn how to use ForEach with nontraditional structures like enumerations, dictionaries, Enums, etc.
This is part of my series of basic SwiftUI knowledge, you can also find how to create animated launch screens where you will learn an example of a launch screen in SwiftUI. And how to create an accordion UI style in SwiftUI where we explore how to use DisclosureGroups to make your app more appealing to the user.
Let’s start! But first…
Painting of The Day
Today I chose an 1881 painting called Scotland Forever by Elizabeth Thompson. Elizabeth Southerden Thompson, also known as Lady Butler because she married Lieutenant General Sir William Butler, becoming Lady Butler.
Lived from November 1846 to October 1933. She was a British painter, one of the very few female painters to achieve fame for historical paintings, predominantly military battle scenes, at the end of that habit. Some of her most famous military backgrounds come from the Napoleonic Wars, but she surrounded most major 19th-century wars and painted several pieces depicting the First World War.
The painting portrays the start of the charge of the Royal Scots Greys, a British cavalry unit that charged alongside the British cavalry at the Battle of Waterloo in 1815. In fact, it seems that Scots Greys never started the charge at a gallop, due to the broken ground, and instead advanced at a quick walk.
I chose this picture because the various elements, the horsemen, are really similar to each other, and look like a pattern that repeats. The same occurs when you use ForEach with your views.
The Problem – A guide for SwiftUI ForEach
You want to repeat a pattern of views in your code, for example, a list of views.
We will start this article by answering the first thing you need to know, and the exact definition that structures ForEach in SwiftUI. Then we will provide examples of how and when you can use it to improve your code.
ForEach in SwiftUI is one of the most basic structures out there and it is really important to have a good grasp of it.
What is ForEach in SwiftUI?
First things first. To my surprise, ForEach is a struct and it is defined like this:
struct ForEach<Data, ID, Content> where Data : RandomAccessCollection, ID : Hashable {}
I was surprised because whenever I read that in code, I don’t know why, but my mind just changed it to some special keyword, like for. But ForEach it is just a plain old struct.
It has some initializers where you can:
Creating a collection from an Int range. For example using: init(Range<Int>, content: (Int) -> Content)
Creating a collection from data if data is Identifiable or binding type. For example using: init(Data, content: (Data.Element) -> Content), init<C>(Binding<C>, content: (Binding<C.Element>) -> Content), etc.
- Creating Editable Content. Using: init<C, R>(Binding<C>, edit
Actions: Edit Actions<C>, content: (Binding<C.Element>) -> R)
I’m sure that one of the above initializers can help you in your daily SwiftUI development. They are quite powerful, lest check all of them, but first when to use each one.
Also as this is just ONE struct, you can break the limit of the VStack of only 10 members, adding more than 10 views to your screen with it. If you ever wondered why it is just 10, is because the result builder struct called ViewBuilder only accepts a maximum of 10 generic arguments in its functions. And that is the backbone of all HStack, ZStack, and VStack views.
When to use ForEach in SwiftUI
You had a meeting with the design team and you decided that you need to repeat some view pattern in the UI, it can be a list or a scroll view. Then you can use ForEach to solve your problem. But now you have another problem, for ForEach to work you need to have some pre-conditions.
You go back to your codebase and check if you have it. Now you must check if you have models that support the use of ForEach structure, and that means that they should be a Random
How to use ForEach in SwiftUI – Code Examples
First, let’s check the most common case for ForEach in SwiftUI. First, let’s set up some code, create a new SwiftUI project, and add a new file called GuestManager.swift and copy/paste this code to it:
import Foundation

struct Guest: Identifiable, Hashable {
    var id: String { name }

    let name: String
    let isVip: Bool
}

final class GuestManager: ObservableObject {

    var timer: Timer?

    @Published var guests = [Guest(name: "Ninha", isVip: true),
                     Guest(name: "Mike", isVip: false),
                     Guest(name: "Pepijn", isVip: true),
                     Guest(name: "Alan", isVip: true)]

    func createRandomGuests() {
        Timer.scheduledTimer(withTimeInterval: 1, repeats: true) {[weak self] _ in
            self?.guests.append(Guest(name: UUID().uuidString.prefix(7).description, isVip: Bool.random()))
        }
    }
}
Observe that we are declaring the Guest as Identifiable. And the ID will be its name. This is just an example, in the real world you should use something unique as your IDs.
Then in the App add the GuestManager as an environmentObject to the ContentView.swift:
import SwiftUI

@main
struct ForEachUltimateExampleApp: App {

    let guestManager = GuestManager()

    var body: some Scene {
        WindowGroup {
            ContentView()
                .environmentObject(guestManager)
        }
    }
}
In ContentView.swif get the guestManager:
import SwiftUI

struct ContentView: View {

    @EnvironmentObject var guestManager: GuestManager

    var body: some View {
        VStack {
            Text("Hallo")
        }
    }
}

struct ContentView_Previews: PreviewProvider {
    static var previews: some View {
        ContentView()
            .environmentObject(GuestManager())
    }
}
Let’s start using our ForEach.
How to use ForEach with List and ScrollView in SwiftUI
Now in the ContentView create these two variables:
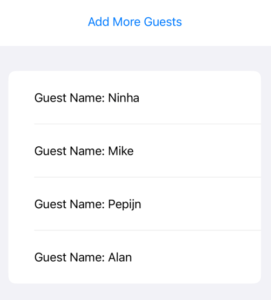
var guestList: some View {
List {
ForEach(guestManager.guests) { guest in
Text("Guest Name: \(guest.name)")
.padding()
}
}
}
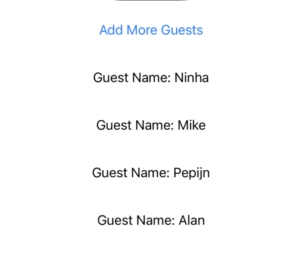
var guestScroll: some View {
ScrollView {
ForEach(guestManager.guests) { guest in
Text("Guest Name: \(guest.name)")
.padding()
}
}
}Observe that we can use directly the guests variable inside the guestManager in our forEach because it satisfies the Identifiable requirement and is an array that is also a randomAccessCollection type.
And change the body variable of ContentView.swift to be like this:
 var body: some View {
        VStack {
            Button("Add More Guests") {
                guestManager.createRandomGuests()
            }.padding()

            guestList
        }
}
The result is this:
If instead of a List you embed your ForEach in a ScrollView, you will have a different screen design:
 var body: some View {
        VStack {
            Button("Add More Guests") {
                guestManager.createRandomGuests()
            }.padding()

            guestScroll
        }
}
Check below:
Now let’s check the next initializer.
How to use SwiftUI ForEach index with Ranges
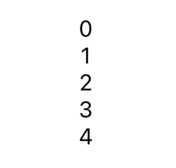
To use the ForEach structure with ranges you just need to pass a range to the ForEach initializer:
ForEach(0..<5) { value in
    Text("\(value)")
}
The result is:
How to use SwiftUI ForEach with explicit Id Parameter
So it comes out that you actually need to inform SwiftUI Foreach id. You probably are trying to use ForEach with some object that is not identifiable, so you have to provide a way for Swift to identify your views.
Check the problem below and the solution after:
let items = ["leo","ninha","peps"]
ForEach(items) { a in
    Text("\(a)")
}
This gives you an error:
Referencing initializer ‘init(_:content:)’ on ‘ForEach’ requires that ‘String’ conform to ‘Identifiable’
What if we could say to the ForEach what Id we want to use? For example, you could use the hash value as a keypath for your ForEach id:
let items = ["leo","ninha","peps", "a", "a", "a"]
ForEach(items, id: \.hashValue) { item in
    Text("\(item)")
}
The most used way is just to use the self, like the example below:
let items = ["leo","ninha","alan"]
ForEach(items, id: \.self) { a in
    Text("\(a)")
}
Why \.self works? Well, if will need to be familiar with identity keypaths. In short terms this keypath means “the whole structure” and what SwiftUI does is compute its hash value of it to uniquely identify that view, and of course this only works if the items are also Hashable.
And that’s how you can deal with things that don’t conform to identifiable. For everything else, you can just pass the array/binding to the ForEach and it will work like a charm.
Creating Updatable ForEach Content
ForEach is very versatile, you can use it also to change the position of items and/or remove items from your data source. So if you ever wondered how many lines of code you need to do that in SwiftUI, you will discover now that is less than 10.
You will need to create a @State variable, and add some more code.
Check the example below:
import SwiftUI

struct ContentView: View {

    @EnvironmentObject var guestManager: GuestManager

    @State var guests = [Guest(name: "Ninha", isVip: true),
                         Guest(name: "Mike", isVip: false),
                         Guest(name: "Pepijn", isVip: true),
                         Guest(name: "Alan", isVip: true)]

    var body: some View {
        VStack {
            Button("Add More Guests") {
                guestManager.createRandomGuests()
            }.padding()

            List { // how to re-arrange and enable delete items
                ForEach($guests, editActions: [.move, .delete]) { guest in
                    Text("Guest Name: \(guest.wrappedValue.name)")
                        .padding()
                }.onMove(perform: { indexSet, index in
                    print("index moved \(indexSet.first) to \(index) index")
                })
                .onDelete { index in
                    print("\(index.first)")
                }

            }
        }
    }
}
Now you can move and delete rows:
Check that now we can pass editActions, and we are enabling reordering with the “.move” and also content deletion with the var “.delete” in the array of EditActions. To capture those actions you need to use onMove and onDelete functions respectively, this way you can call any other side effect of that removal in your code.
You can also conditionally disable the removing and moving rows with the code below:
List {
    ForEach($guests, editActions: [.move, .delete]) { guest in
        Text("Guest Name: \(guest.wrappedValue.name)")
            .padding()
            .moveDisabled(!guest.wrappedValue.isVip) // conditionally disable moving rows
            .deleteDisabled(guest.wrappedValue.isVip) // conditionally disable deleting rows
    }
}
Really straightforward, right?
Using SwiftUI ForEach With Enumerated – Code Example
Now, imagine that you don’t have those alternatives above, and you need to use ForEach with something that doesn’t have either a safe ID to use or a Random
For example:
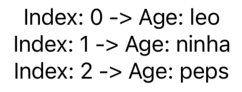
let items = ["leo","ninha","peps"]
ForEach(Array(zip(items.indices, items)), id: \.0) { index, item in
    Text("Index: \(index) -> Age: \(item)")
}
Resulting in:
Using ForEach With Dictionaries – Code Example
Another interesting use case is when you have a dictionary and you want to transform it into views. First, we need to make it conform to Random
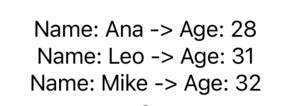
let nameAgeDict = ["Leo":31, "Ana":28, "Mike":32]
ForEach(nameAgeDict.sorted(by: <), id:\.key) { (key, value) in
    Text("Name: \(key) -> Age: \(value)")

}
Generating this:
Using ForEach With Enum – Code Example
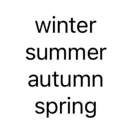
I think at this point you already know what we are going to do. Create an enum called Season, that conforms to CaseIterable and has String as RawValue:
enum Season: String, CaseIterable {
    case winter,summer, autumn, spring
}
Now you can use what you learned today to make it work with your ForEach:
ForEach(Season.allCases, id:\.self) { season in
    Text("\(season.rawValue)")
}
Resulting in:
Another alternative with enums would be creating a static var that has all the cases, or only the cases that you want, and make it return an Array of that.
And that’s it for today!
Summary – ForEach SwiftUI Guided Tour
We are coming to the end of one more basic SwiftUI article. I’m loving discovering all the handy stuff that this UI API has, it is not easy because the way of thinking in it is really different than UIKit but I can say it is fun. And no UI framework will be perfect, we will always have our preferences and that doesn’t stop me to learn new points of view this way increasing my technology toolbox.
Today we checked a lot of stuff. We learned what is ForEach structure, some of their initializer, and when you can use it to leverage your code. We checked a lot of examples using the ForEach structure going through ranges, pure bindings, only arrays, enums, enumerations, and even dictionaries! Today was a real playground exploring a lot of ForEach capabilities, and also with editable content that you can move and remove from places.
Fellow developers, that’s all. I hope you liked reading this article as much as I enjoyed writing it. If you want to support this blog you can Buy Me a Coffee or just say hello on Twitter. You can reach me on LinkedIn, or send me an e-mail through the contact page.
You can also sponsor this blog so I can get my blog free of random advertisers.
Thanks for the reading and… That’s all folks.
Image Credit: Wikiart


