Hallo vrienden en vijanden, Leo hier. Today we will talk about PreferenceKeys in SwiftUI and how to use it to get how much of a percentage of a view is showing on the screen.
If you are here just for SwiftUI content, you can skip the introduction. If you want the gossip, just continue reading.
It’s been a long time since my last article, almost 3 months ago. This is the longest time that I spent without writing to you guys, and I’m sorry. This whole I was thinking about writing stuff but life happens. I had a wonderful three months lately, a lot of big things happened, and let’s share a little bit of them.
In the meantime, I’ve moved to a new house and there was a hell of things to do. I got a leakage, which is also taking my free time to fix. Other things like assembling a lot of furniture (which end up causing a lot of pain in my weak forearms), and painting :

On the other hand, the literal moving process was a breeze because we hired a company to do that for us, if you can pay for the service, I strongly recommend you to do so.
After my move, WWDC happened and brought a lot of news. I won’t cover them today because I don’t want to install Apple beta software, the not-beta software is already too unstable for me. Later this year we can talk about the good and the bad of the new Xcode.
Continuing the “Leo will not blog for a while” combo, my lovely family came to visit me and that was another 3 weeks without touching blogging stuff. We went to Belgium and I saw for the first time the Atomium and was amazing, looks like an alien spaceship that landed on our planet. A must-see in Europe. I also got sick on the Belgian trip with a really bad cold, got a fever, and coughed a lot. Yay, fun times. All in all, was a nice experience with family that came just to visit us.
And the finisher move of that “not blogging” combo, I had a HUGE water leakage in my house and it’s been almost 6 months for my insurance to fix it, and other house renovations are going on here. So it has been a lot lately.
I think that was all the news in my life. I can’t even believe that my last article about how to create a settings screen in SwiftUI was released on May 8.
No more talking, let’s code! But first…
Painting Of the Day
The “Nozze di Cana” (“The Wedding at Cana”) is a monumental painting by the Italian Renaissance artist Paolo Veronese, completed in 1563. This masterpiece is one of the largest canvases of the 16th century, measuring approximately 6.77 meters by 9.94 meters (22 feet by 32.6 feet). Originally commissioned for the refectory of the Benedictine monastery of San Giorgio Maggiore in Venice, the painting now resides in the Louvre Museum in Paris.
The artwork depicts the biblical scene of the Marriage at Cana, where Jesus performs his first miracle by turning water into wine during a wedding feast. Veronese masterfully blends the sacred with the secular, portraying over 130 figures in a lavish Venetian banquet setting. The composition is rich with intricate details, vibrant colors, and opulent attire, reflecting the grandeur of Venetian society at the time.
I shared this painting because it’s how I feel about my life lately, a lot happening at the same time.
The Problem – Check How Much a View is Visible in SwiftUI
You need to know how much of a view is visible in SwiftUI. For example, you want to know if a View is not visible, and when it’s visible how much it is visible in percentage. And you want to know when its completely visible on the screen.
This looks like a hard challenge to take and don’t take me wrong, is not easy either. We will need to understand a lot of small concepts but don’t worry we will present every little step one at a time.
Small disclaimer: I know that Apple launched a new API to do exactly what this article proposes, however, I believe that not everyone can use iOS 18 as a minimum target.
First of all, you need to be familiar with Preference Keys in SwiftUI.
Preference keys in SwiftUI are a mechanism for passing data UP the view hierarchy, allowing parent views to read values set by their child views. This is particularly useful for scenarios where a parent view needs to respond to changes or provide layout information based on its children. By defining a custom preference key, developers can aggregate values from multiple child views and apply those values in the parent view’s context.
If the definition is still too cloudy for you let me explain simply. Preference Key is a way to pass data from child views to parent views, that’s it.
Looking at this definition this API is perfect for what we want to achieve, we can send the relative position of a child view to the parent view, and the parent view can calculate the child view position based on that data.
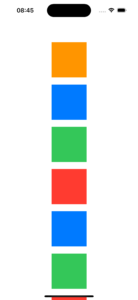
Today we will build a simple VStack of different color squares, that will be embedded in a ScrollView. As the user scrolls we can capture how much of the one single black box inside the scroll is shown.
Check the image below of the today’s project:

Open your mind and prepare your fingers because now it’s time for the project! ( I miss blogging so much )
Steps To Build Your Custom Preference Key
Ok, so do you want to add send information to parent views from child views?
The steps are simple:
- Create a Struct that extends
PreferenceKeyprotocol and will store the values received from child views. Since several views can use the same preference key, you the SwiftUI engineers thought that a great way to aggregate all the values would be with a reduce function, which you also have to implement. - Add a view modifier to the child view specifying what values you want to propagate upwards. Which can be
.preference()or.anchorPreference()modifiers. The preference is more generic and the anchorPreference function is more focused on the position of the view, and that is the one we will use today. - Capture changes of the Preference in the parent view using
.onPreferenceChange()view modifier and make the changes that you need to do.
Straightforward right? Let’s implement that.
Code Example – Using SwiftUI PreferenceKey to Read the View Showing Percentage On The Screen
First, create your SwiftUI project, and then let’s start the first step that I mentioned above. Copy and paste the following struct to your project:
struct BottomPreferenceKey: PreferenceKey {
    typealias Value = Anchor<CGRect>?
    static var defaultValue: Value = nil


    static func reduce(value: inout Value, nextValue: () -> Value) {
        value = nextValue()
    }
}
But what that means? Here is the most straightforward implementation of a PreferenceKey that you can have. We are not doing any manipulations over the elements that the reduce function receives, we are just storing the most recent one. But what will that function receive? It will always receive a value that you set on the typealias.
The first step is complete, you already have the reduce function and a place to store the values that the child views want to propagate to the parent views.
For the second step, we need to add the right modifier to the view that we want to observe. Let’s create some views, copy paste the code below:
struct ContentView: View {
    var body: some View {
            GeometryReader(content: { geometry in
                ScrollView {
                    ColorBoxList()
                }
                .frame(maxWidth: .infinity, alignment: .center)
            })
        .ignoresSafeArea()
    }
}

struct ColorBox: View {
    let color: Color

    var body: some View {
        Rectangle()
            .frame(width: 100, height: 100)
            .foregroundColor(color)
    }
}

struct ColorBoxList: View {
    var body: some View {
        VStack(spacing: 20) {
            ColorBox(color: .white)
            ColorBox(color: .orange)
            ColorBox(color: .blue)
            ColorBox(color: .green)
            ColorBox(color: .red)
            ColorBox(color: .blue)
            ColorBox(color: .green)
            ColorBox(color: .red)
            ColorBox(color: .blue)
            ColorBox(color: .green)
            ColorBox(color: .black)
                .anchorPreference(key: BottomPreferenceKey.self,
                                  value: .bounds) { $0 } // STEP TWO HERE!!!!
            ColorBox(color: .blue)
        }
    }
}
The code above is just creating two custom views, one is the ColorBox which is just a rectangle that receives a color in the initializer, and the second one is the ColorBoxList which is a list that we set several ColorBox views but one we want to observe change.
The part that you need to pay attention to here is the black ColorBox inside the ColorBoxList, we are using the viewModifier called anchorPreference. The anchor preference has two types of pre-defined values, the Anchor<CGPoint> used for top, bottom, trailing etc; and the Anchor<CGRect> which is used for the bounds view bounds.
Since in this project, we want to know how much percentage of a view is showing, sending the bounds of a particular view up in the hierarchy sounds like the best option. And with that, we finished the second step.
The final step now is to implement the logic of checking how much of the view is actually showing on the screen.
The steps are:
- Add the onPreferenceChange modifier to the ColorBoxList view. That modifier will receive all the changes of the bounds (position) of the view that we want to observe.
- Inside the onPreferenceChange we will use the GeometryProxy object to read the bounds of the children object and find a point in the current ScrollView coordinate space.
- With that specific point in hands we can calculate how much it is appearing on the screen. We will use a simple ratio formula which is: the max Y point in coordinate space minus the max Y from the global frame divided by the height of the view and the result multiplied by 100 and then minus 100.
- Then we can manipulate that percentage value with our view/business logic.
Let’s implement that in the code.
Copy and paste the code below in the ColorBoxList:
struct ContentView: View {
    var body: some View {
        GeometryReader { geometry in
            ScrollView {
                ColorBoxList()
                .onPreferenceChange(BottomPreferenceKey.self, perform: { value in // STEP 1
                    if let value {
                        let pointInCoordinateSpace = geometry[value] // STEP 2
                        let viewHeight = pointInCoordinateSpace.height
                        let globalY = geometry.frame(in: .global).maxY

                        let viewPercentage = 100 - ( ( pointInCoordinateSpace.maxY - globalY ) / viewHeight ) * 100 // STEP 3

                        if viewPercentage < 0 { // STEP 4
                            print("view not showing")
                        } else if viewPercentage > 100 {
                            print("view Show completely")
                        } else {
                            print("percentage showing \(viewPercentage)%")
                        }
                    }
                })
            }
            .frame(maxWidth: .infinity, alignment: .center)
        }
        .ignoresSafeArea()
    }
}
In your production code probably you would have a view model getting the percentage and sending whatever events you need to send and responding to the percentage of the SwiftUI view showing.
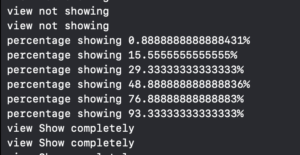
With the code above our little project is complete! You can now run in your Canvas or Simulator and you will have a console log that looks like the below:

Full Code Example – Showing A SwiftUI View Screen Visibility Percentage
Below is the full code example for the ones who just want the code working without explanations:
import SwiftUI

struct ContentView: View {
    var body: some View {
        GeometryReader { geometry in
            ScrollView {
                ColorBoxList()
                .onPreferenceChange(BottomPreferenceKey.self, perform: { value in
                    if let value {
                        let pointInCoordinateSpace = geometry[value]
                        let viewHeight = pointInCoordinateSpace.height
                        let globalY = geometry.frame(in: .global).maxY

                        let viewPercentage = 100 - ( ( pointInCoordinateSpace.maxY - globalY ) / viewHeight ) * 100

                        if viewPercentage < 0 {
                            print("view not showing")
                        } else if viewPercentage > 100 {
                            print("view Show completely")
                        } else {
                            print("percentage showing \(viewPercentage)%")
                        }
                    }
                })
            }
            .frame(maxWidth: .infinity, alignment: .center)
        }
        .ignoresSafeArea()
    }
}

struct ColorBox: View {
    let color: Color
    var body: some View {
        Rectangle() .frame(width: 100, height: 75)
            .foregroundColor(color)
    }
}

struct ColorBoxList: View {
    var body: some View {
        VStack(spacing: 20) {
            ColorBox(color: .white)
            ColorBox(color: .orange)
            ColorBox(color: .blue)
            ColorBox(color: .green)
            ColorBox(color: .red)
            ColorBox(color: .blue)
            ColorBox(color: .green)
            ColorBox(color: .red)
            ColorBox(color: .blue)
            ColorBox(color: .green)
            ColorBox(color: .black)
                .anchorPreference(key: BottomPreferenceKey.self, value: .bounds) { $0 } // STEP TWO HERE!!!!
            ColorBox(color: .blue) }
    }
}

struct BottomPreferenceKey: PreferenceKey {
    typealias Value = Anchor<CGRect>?
    static var defaultValue: Value = nil

    static func reduce(value: inout Value, nextValue: () -> Value) {
        value = nextValue()
    }
}

#Preview(body: {
    ContentView()
})
And we are done!
How to Track View Visibility Percentage in SwiftUI
By using the power of PreferenceKeys in SwiftUI, we’ve successfully created a way to monitor how much of a view is visible on the screen.
This technique is invaluable for building dynamic interfaces that respond to user interactions, such as triggering animations when a view becomes fully visible or loading additional content as the user scrolls. I hope this walkthrough has demystified PreferenceKeys for you and sparked ideas for your projects.
Fellow iOS Developers, that’s all. I hope you liked reading this article as much as I enjoyed writing it.
If you want to support this blog you can Buy Me a Coffee or say hello on Twitter. I’m available on LinkedIn or send me an e-mail through the contact page.
You can likewise sponsor this blog and help our community to grow.
Thanks for the reading and…
That’s all folks.


